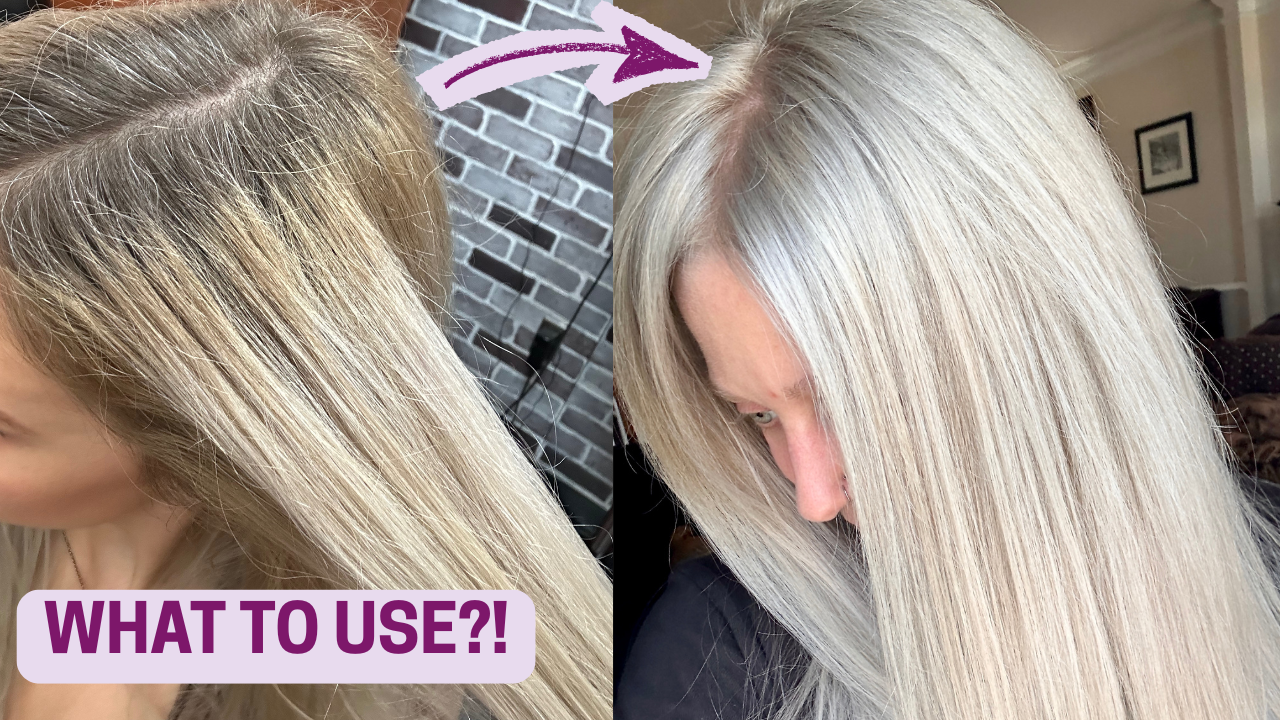
Hair color is not one-size-fits-all. You can apply the same tube of dye to two different heads of hair and have each one come out wildly different. That’s why learning how to choose what hair dye to use when going lighter is actually about much more than picking a shade that looks good on the box. Your starting hair, previous history, texture, and goal all play a role in determining the right formula.
In this guide, I’ll show you how to choose the right hair dye when going lighter by teaching you the same formulation process I use behind the chair. You’ll learn how to determine whether you need bleach, high lift color, or permanent hair dye, how to select the right developer volume, and how to account for unwanted warmth so you can create a formula that’s made for your hair and your goal.
Hair dye formulation is one of the most complex parts of cosmetology, so my goal is to break that complexity down into a simple, step-by-step process that’s easier to understand and apply.
DISCLAIMER: This guide is intended for educational and informational purposes only. Hair color is a complex chemical process, and results can vary significantly depending on your hair’s history, porosity, condition, previous color, and the products used. While I’ve simplified the process to make it easier to understand, no formula can guarantee the same results on every head of hair.
I always recommend seeing a licensed professional for the safest and most predictable outcome, especially for major color changes or corrective work. If you choose to color your hair yourself, you do so at your own risk. Always perform a strand test before applying color to your entire head.
When dyeing hair, it’s very rare that I use only one tube of color from scalp to ends. The majority of the time, I’m mixing a few colors together, as well as using a different formula for the roots versus the mids and ends.
There are also many different formulas that you can mix together to get very similar results, so don’t get too hung up on the specifics here. The most important aspect is distinguishing between warm, cool, and neutral colors. If you can determine this correctly, you’ll be on the right track. Everything else (beige, pearl, mahogany, etc) is just refining details.
I have an extremely helpful blog post that you may want to refer to for a deeper dive on specific aspects of the formulation process, where you can learn the levels of hair, understand the tone, and learn how to correct underlying pigment. I will briefly explain these aspects here, but I suggest keeping that post open and referring to it as needed.
And to make this process easier to understand, I’ll use my own hair as an example throughout each step that you can follow along with.
**Note that this post is not about technique, but formulation for what hair dye to choose when going lighter. I have tons of tutorials on my blog and YouTube channel, where you can find many different application techniques.
Products I Personally Recommend
I strongly recommend sticking with one color line from start to finish rather than mixing brands. Every manufacturer has its own shade system, but the formulation process you’ll learn in this guide stays the same! I prefer Wella, but you can use any line you want.
***Since I’m sharing the products that I love to use with you, this page includes affiliate links to these products. If you take action and purchase a product through clicking one of my links, I’ll make some commission money from it at no extra cost to you. This enables me to be able to continue giving you awesome hair tips, so thanks! ***
Before crafting a hair dye formula, you first need to understand your starting canvas. The same hair color formula can produce completely different results depending on what your current hair looks like.
Even or uneven canvas: You’ll generally need a separate formula for each different starting color. So write down if you have multiple colors to begin with.
Virgin or previously dyed: Previously dyed hair reacts differently to permanent dye than virgin hair does.
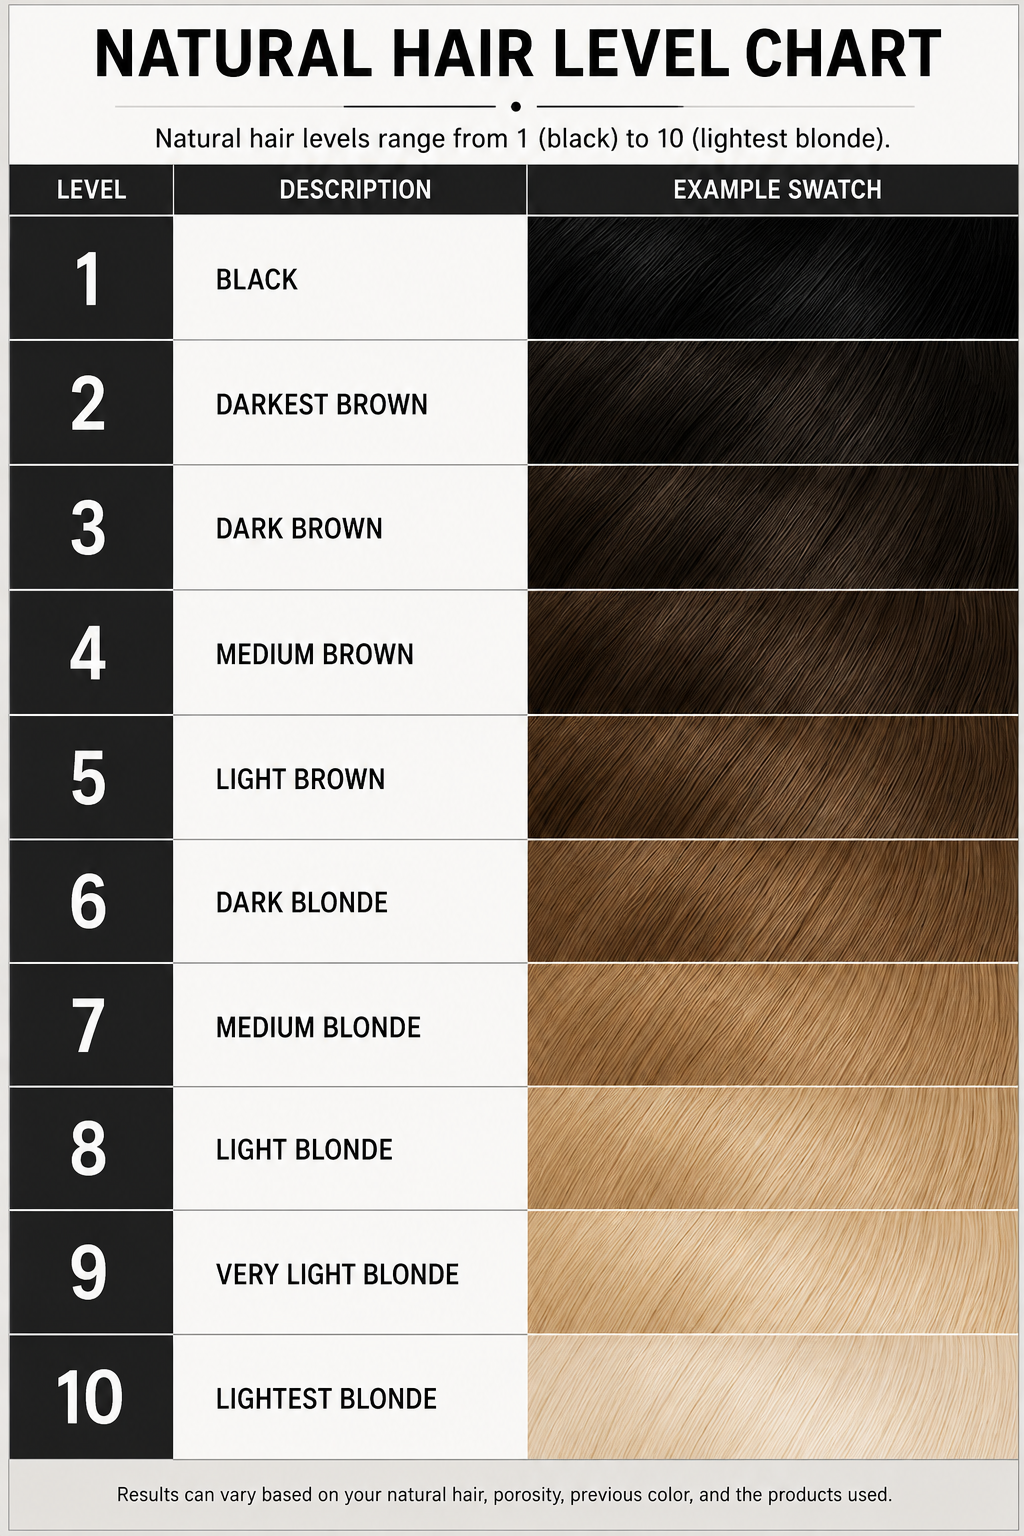
Starting level: The level is how light or dark your hair is on a scale from 1 being the darkest, to 10 being the lightest.
Starting tone if previously dyed: The tone refers to the shade of the hair. You’ll first determine if it’s warm, neutral, or cool. Then, if you can, narrow it down to the closest shade (yellow/gold, mahogany, etc). You don’t need to note the tone of virgin hair since we will be lightening it and exposing the underlying (warm) pigment anyway.
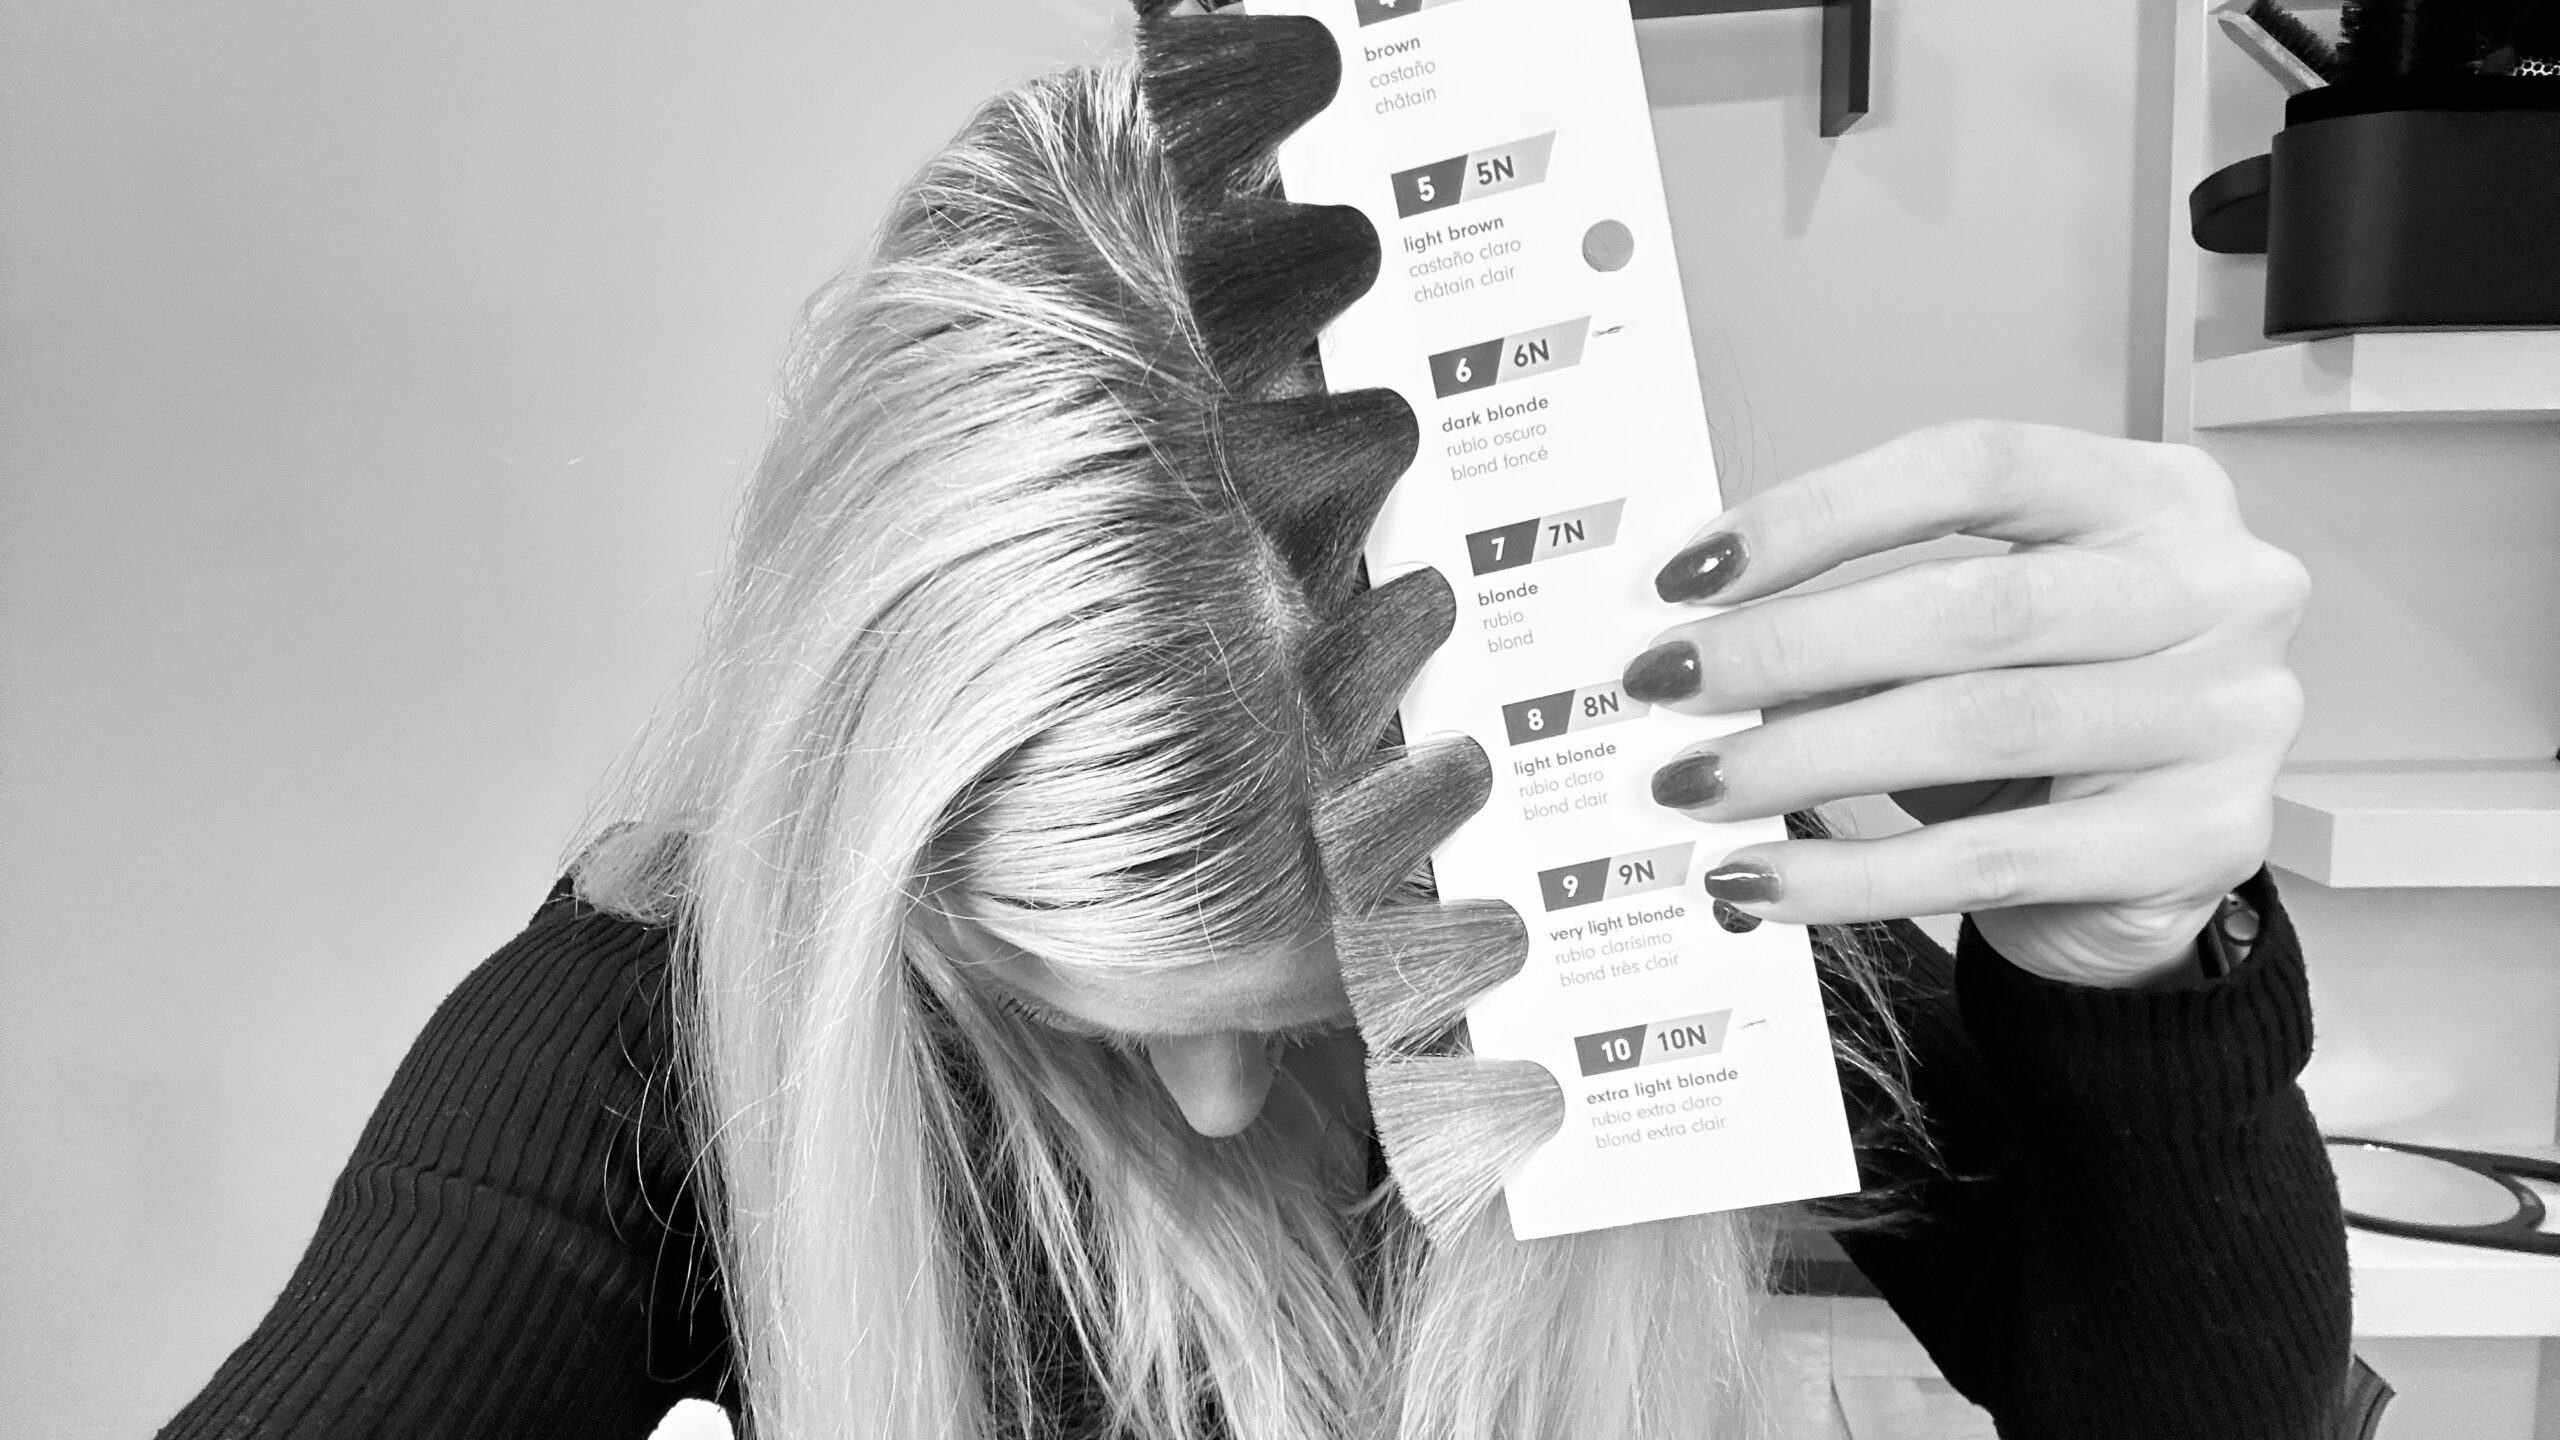
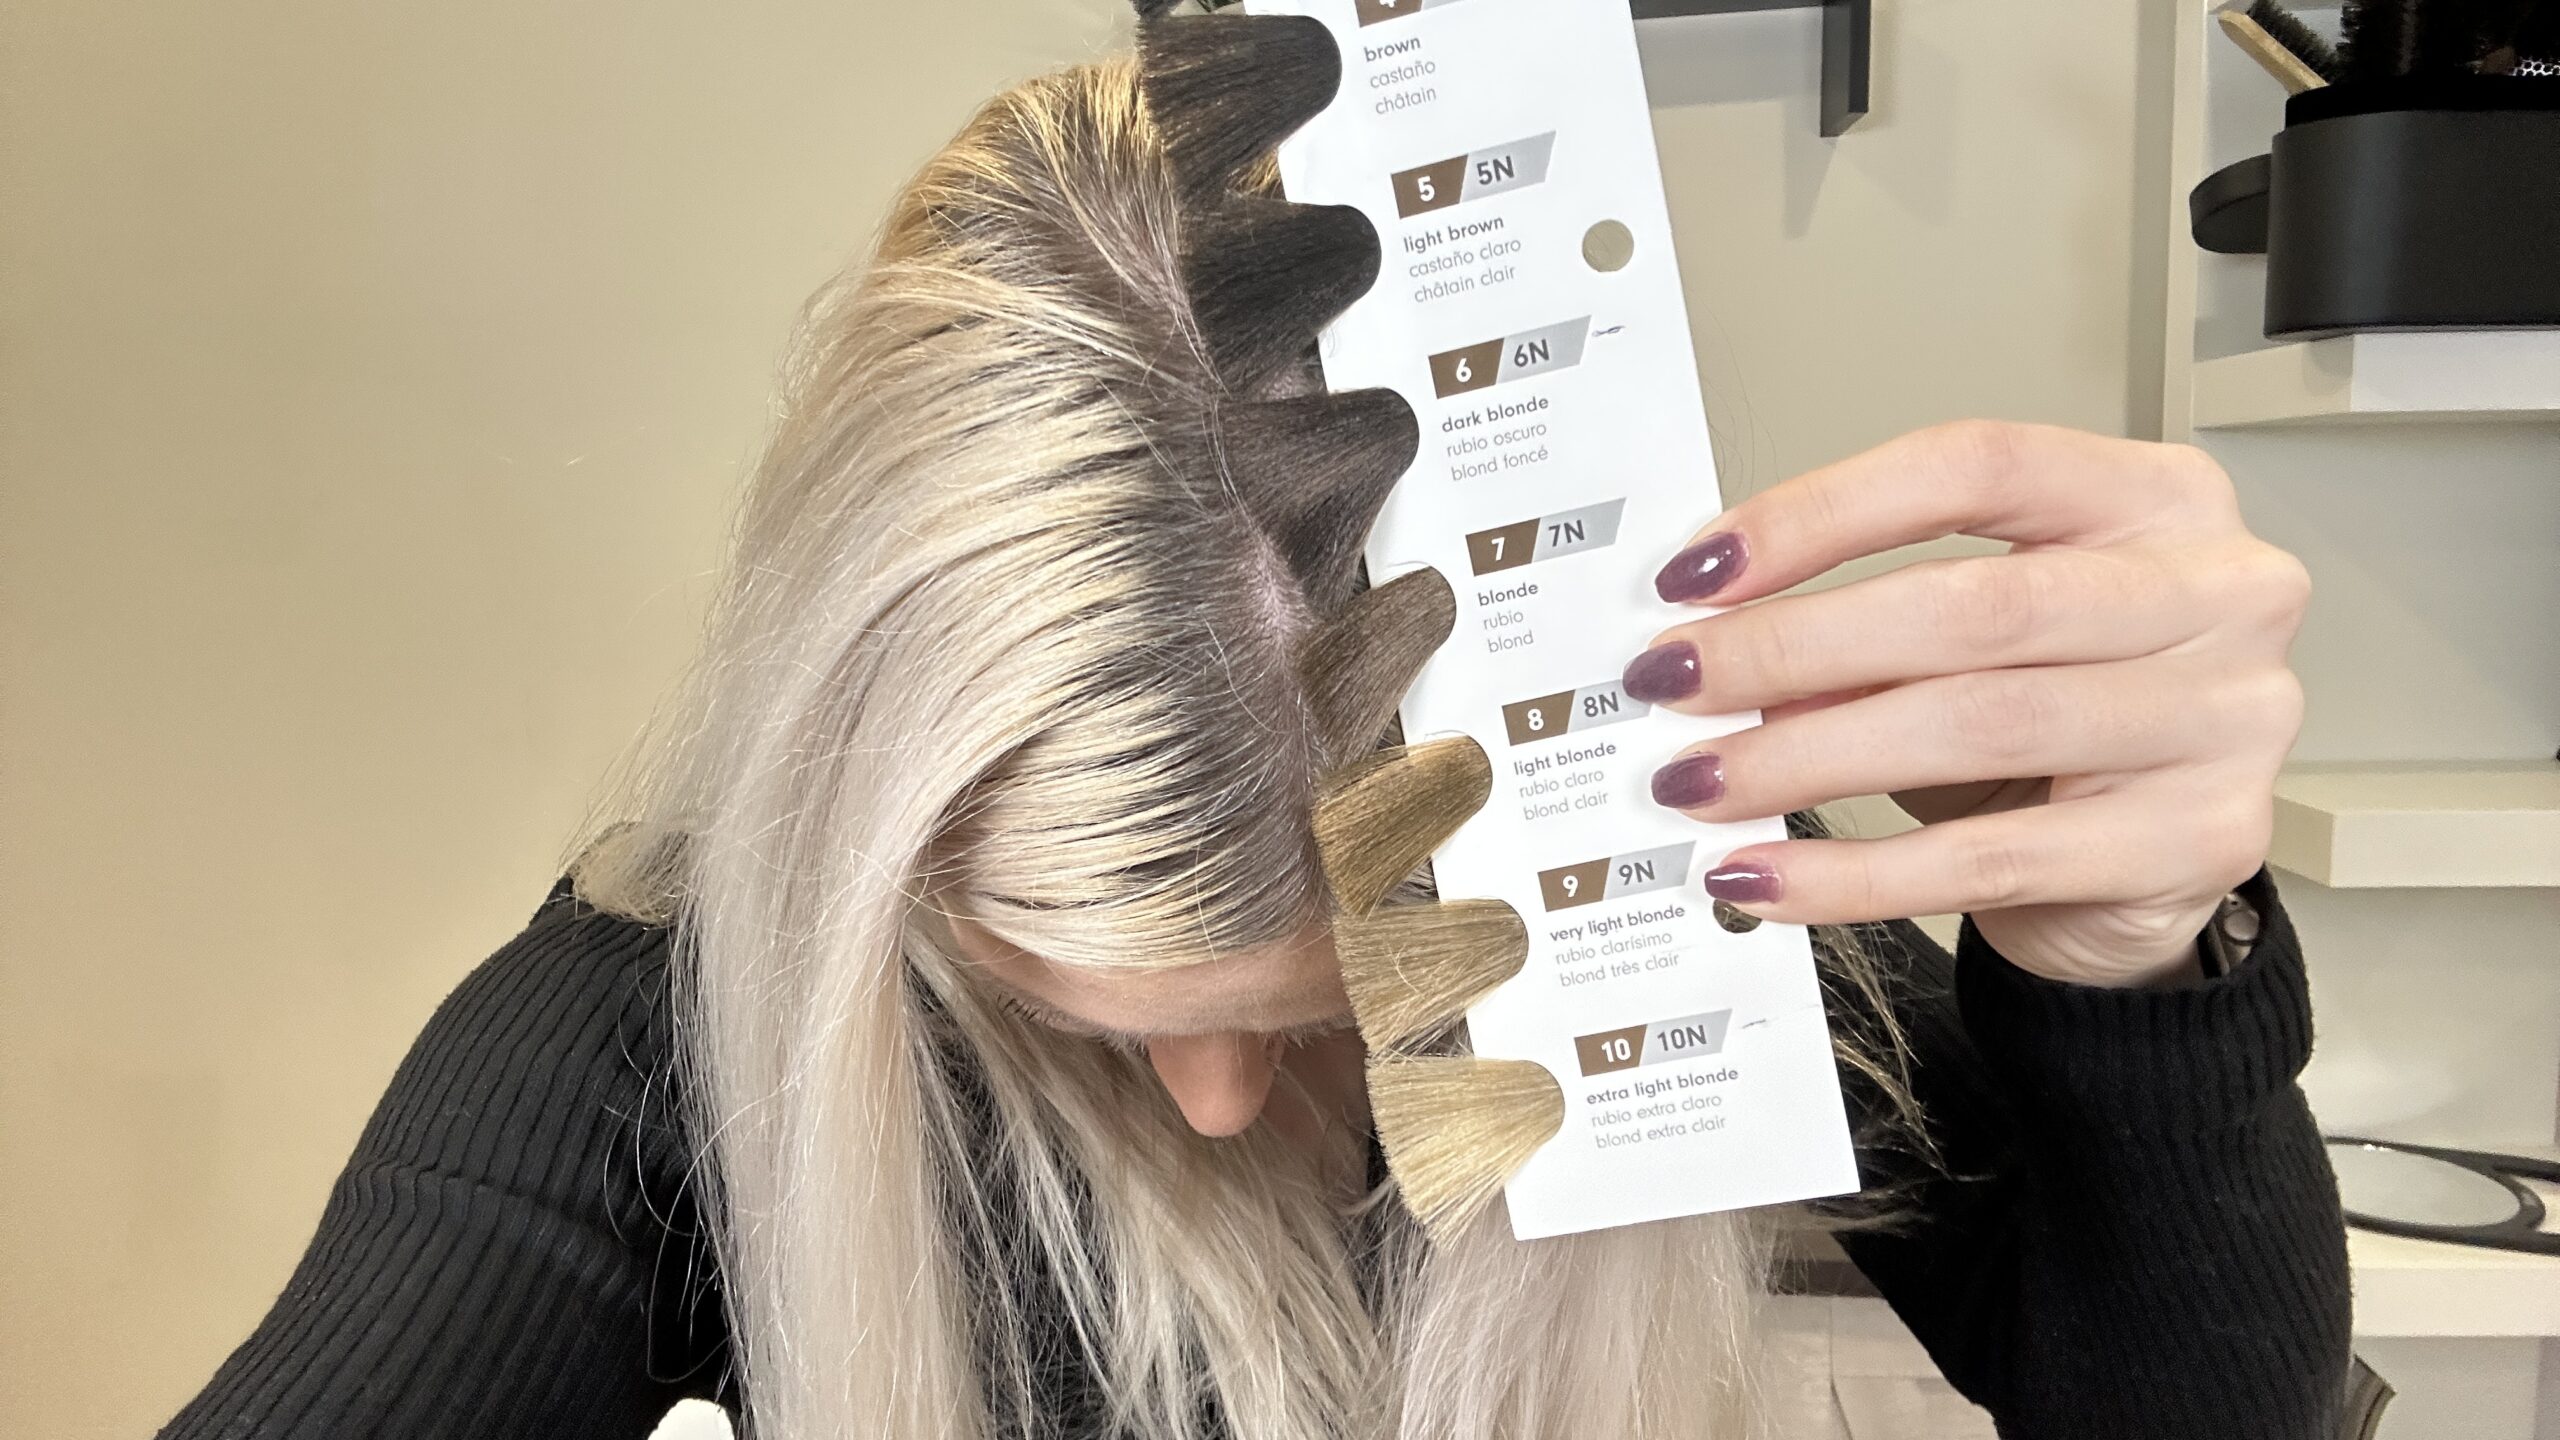
Use this chart to determine your level. Don’t pay attention to the shade, just the lightness and darkness
Example:
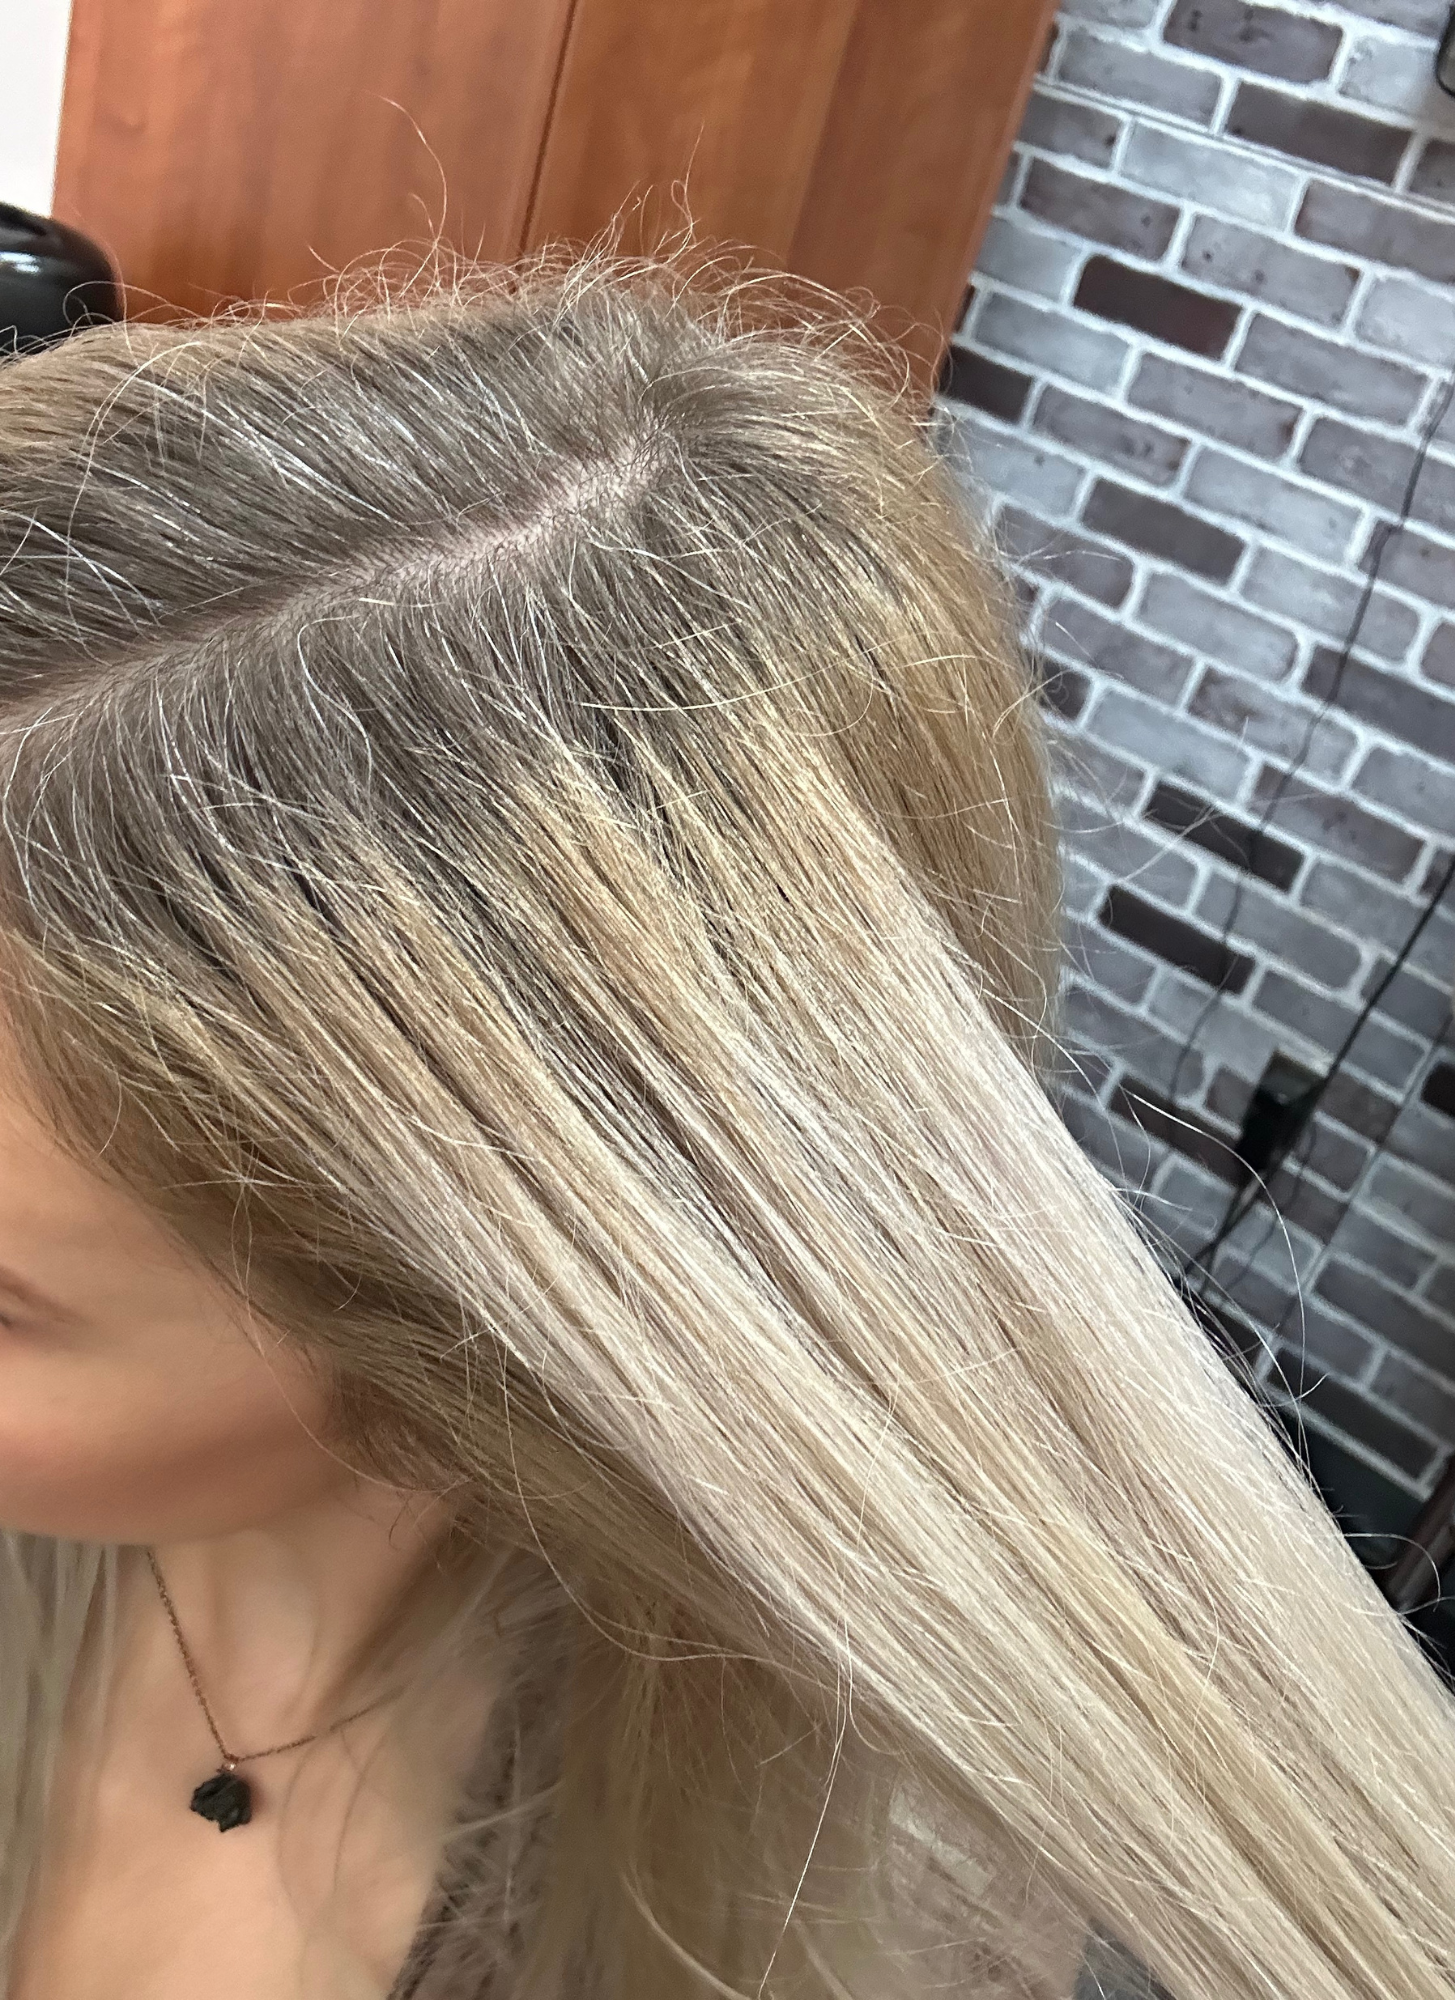
My starting hair
Uneven canvas: 3 colors, solid/not highlighted.
Roots: Virgin level 7
Mids: Previously dyed level 9 band, with underlying warmth (yellow)
Ends: Previously dyed level 10 neutral
PRO TIP: Taking a photo holding a swatch chart up to your hair and viewing it in black and white is a great way to determine your level without the shade deceiving the eye. Warmer colors often look lighter than they are, while cooler colors often look darker.
Step 2: Choose Your Desired Hair Color Goal
Once you’ve identified your starting canvas, the next step is disecting your goal. Narrow it down to a few pictures that you’re shooting for. If you have some flexibility in the outcome, this may make the process a little easier for you. For example, if you’re okay with a few levels darker and/or warmer, you may be able to use high lift color instead of bleach.
Solid color or dimensional: If the goal color is dimensional or gradient, you’ll write down each different color.
Goal level: The lightness or darkness of each color (levels 1-10).
Goal tone: The shade of each color, first warm/neutral/cool, then try to narrow it down, like copper/beige/ash.
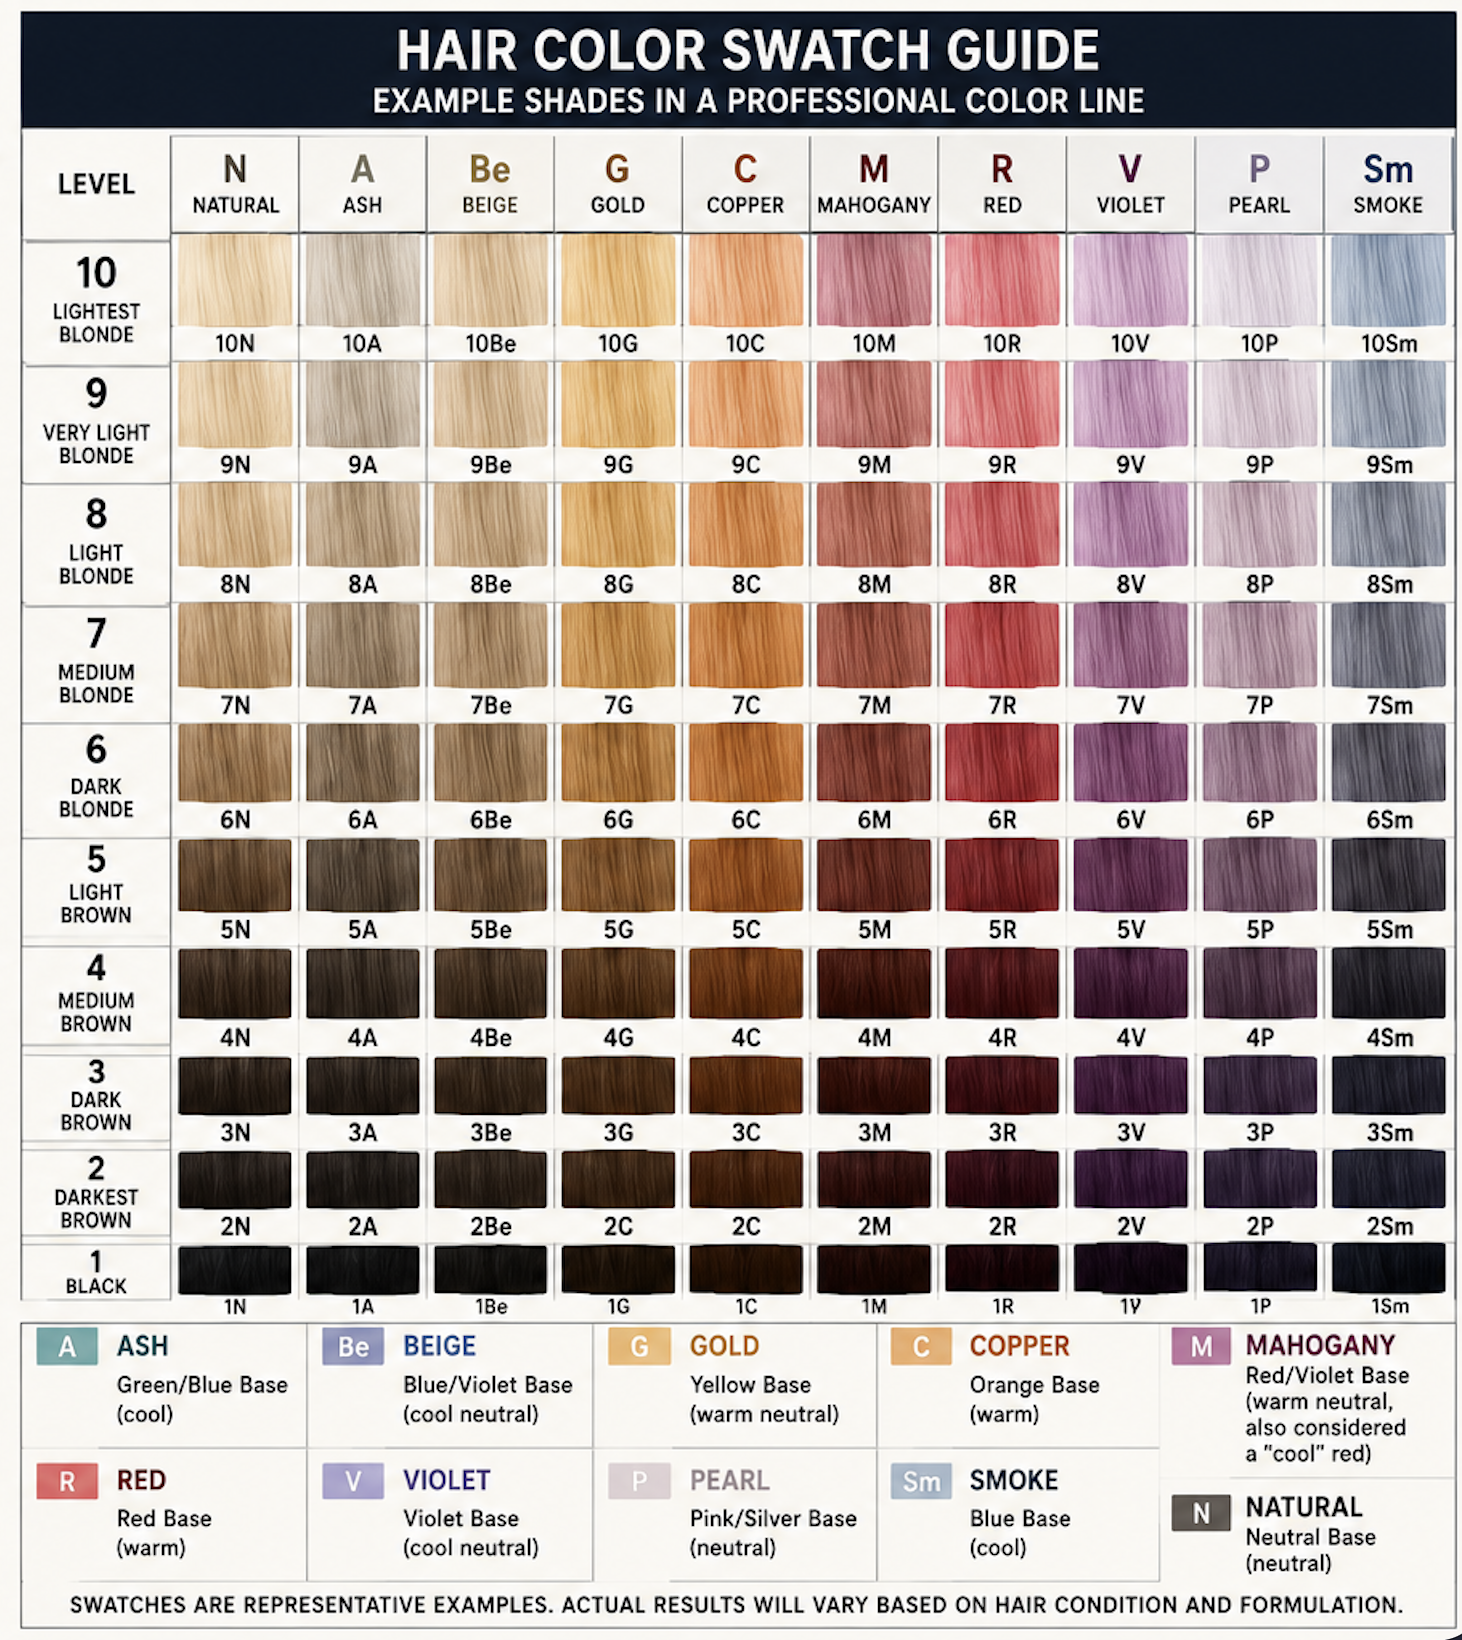
Common hair color shades and their bases (may vary slightly with different lines):
Ash = Green/Blue Base (cool)
Beige = Blue/Violet Base (cool neutral)
Gold = Yellow Base (warm neutral)
Copper = Orange Base (warm)
Mahogany = Red/Violet Base (warm neutral, also considered a “cool” red)
Red = Red Base (warm)
Violet = Violet Base (cool neutral)
Pearl = Pink/Silver Base (neutral)
Smoke = Blue Base (cool)
Natural = Neutral Base (neutral)
This is just a generic chart. If you know what color line you want to use, look at their color chart online for a better selection.
Example:
My goal
Solid color from roots to ends
Level 10
Cool, Ash tone
Now that you know your starting hair color and your goal hair color, you have everything you need to begin building your hair dye formula.
Step 3: Choose Your Lightening Product Type
In this step, we’ll determine if you can use permanent hair dye, high lift hair dye, or if bleach is necessary. In most cases, previously colored hair requires bleach for predictable lifting. While there are some exceptions that I’ve tested in other posts, bleach is still the standard recommendation when significant lightening is needed.
If permanent or high lift dye can be used, you’ll be able to lighten and tone in the same process.
Bleach will only lighten the hair and expose the underlying pigment; it won’t add any tone. So if bleach is needed, you may need to tone the hair afterwards with a demi-permanent dye to get more specific to your desired goal shade.
How many levels lighter?: If your starting level is a 7, and you want to be a 10, you’ll need to lighten 3 levels.
If going 1-2 levels lighter on virginhair, use permanent hair dye.
If going 1 level lighter on previously dyed hair, high lift hair dye can bump it up slightly.
If going 3-4 levels lighter on virgin hair, use high lift hair dye.
If going 2+ levels lighter on previously dyed hair, use bleach.
If going 5+ levels lighter, use bleach.
PRO TIPS:
It is much better to lighten a level past your goal and tone down than it is to not get it light enough. (If your goal is a 7, lighten to an 8, then tone down to a 7).
Consider the texture of your hair. Fine hair may be able to get away with a weaker product (permanent dye or high lift), and coarse hair may require bleach, even with only a few levels of lift desired.
Example:
My starting hair
My goal
Virgin Roots: Need to lighten 3 levels, can use high lift hair dye
Previously Dyed Mids: Need to lighten 1 level, can pull high lift down
Previously Dyed Ends: Leave out to avoid over-processing
Step 4: How To Choose What Shade To Use When Going Lighter
In this step, we’ll decide what shades to use. You’ll determine the underlying pigment that will be exposed when lightening that you may need to correct. However, if your goal shade is warm, you do not need to cancel out the warmth.
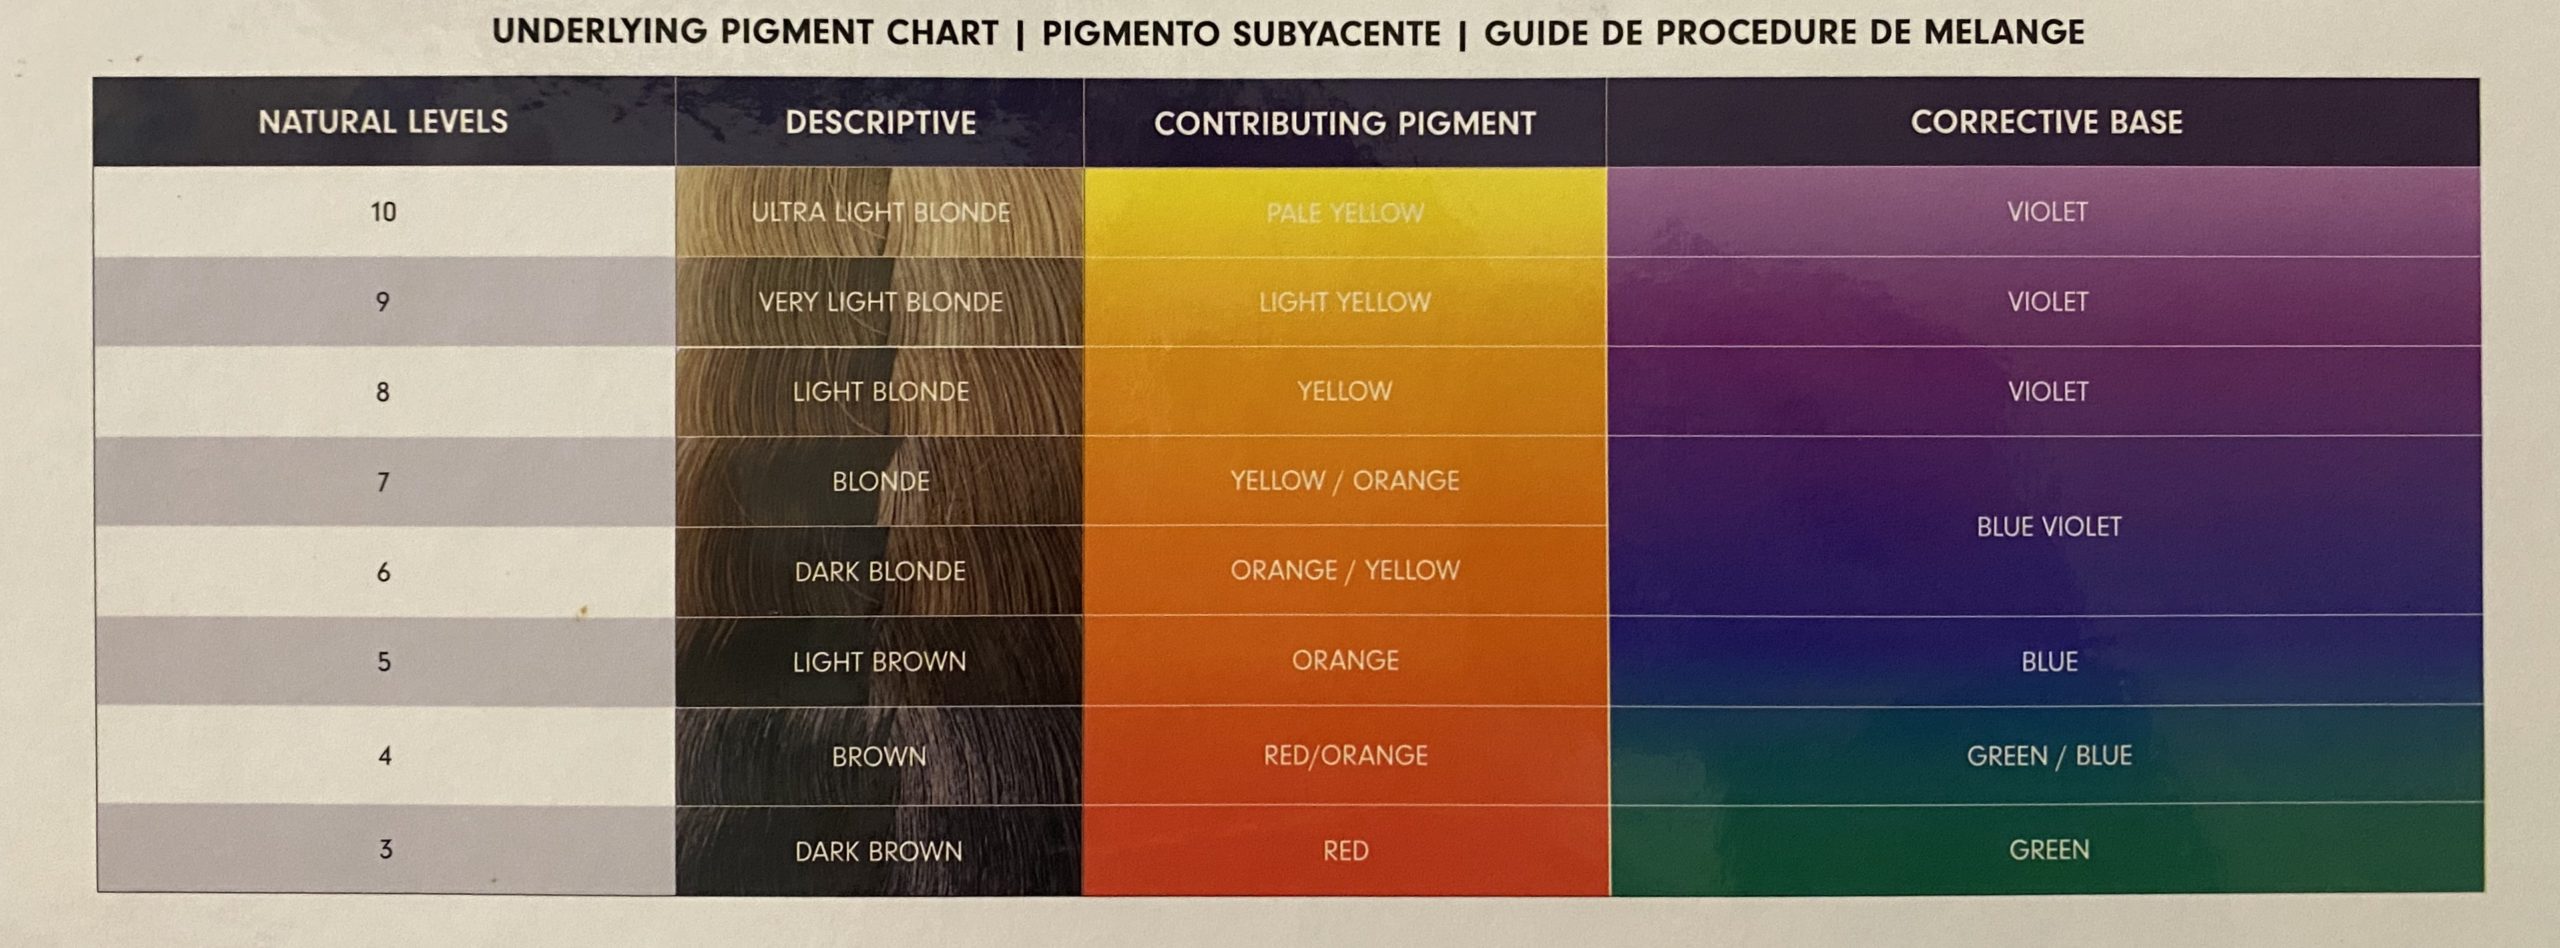
This chart below shows the underlying warm pigment that lives under each hair color level, as well as what tone you need to use to correct it. So if your goal is to lighten the hair to a level 7 with a neutral or cool shade, you’ll need to use a color that has a blue/violet base (beige) to neutralize (cancel out) the warmth.
Determine the underlying pigment in the goal level + correcting base: If your goal is not warm, you’ll need to neutralize the underlying pigment that is present in the goal level with the correcting base in the chart above.
Choose your shade: Once you know what your corrective base is, you’ll want to choose shades that neutralize unwanted warmth while still creating your desired final tone. You can either mix your desired tone with the corrective tone, or color lines have options with them already mixed together: NA = Natural + Ash.
This is a basic shade chart, but I suggest following the chart of the line you’re using for this step so you can see what mixtures they offer.
When toning in a second process (usually after bleaching), tone down 1 level. So if you lightened to a level 7 with bleach, you should tone down to a level 6 to ensure coverage.
If you still have warmth or are unhappy with the tone after using your permanent or high lift dye, you can still apply a demi-permanent toner over it using the charts/system above for your formulation. As with toning after bleaching, you will tone down 1 level to ensure coverage.
**If you only take away one thing from this step: identify the underlying pigment and choose a shade that accounts for it.
Example:
My goal
End goal is level 10
The underlying pigment is pale yellow
The neutralizing pigment is violet (violet alone would make the tone neutral)
End goal is a cool, ash tone
Using an ash tone (often /1) would not only neutralize the pale yellow, but would make the tone cooler than using violet alone.
However, using a double ash (often /11) could make the underlying yellow take on a green hue (because yellow and blue/green = green), especially if the yellow is strong like in a level 8 or 9.
High LiftColor options I’d consider: (I prefer Wella)
Step 5: How To Choose the Right Developer When Going Lighter
Developer affects how much lift and deposit your hair color formula can achieve. Choosing the correct volume will help you get predictable results while minimizing unnecessary damage.
Permanent Dye:
1 level 20 volume developer
2 levels 30 volume developer
2 levels with coarse hair 40 volume developer
3 levels with fine hair 40 volume developer
High Lift Dye:
3-4 levels fine hair 30 Volume developer
3-4 levels medium to coarse hair 40 Volume Developer
Bleach: With bleach, the developer volume is correlated to the speed at which it processes. Eventually, 10 volume will catch up to 40 volume; it just takes longer to get there. Additionally, with a lower volume and bleach, you may need to reapply the bleach and let the color process for longer. Whereas a higher volume will get to the goal faster.
Fine hair: 10 Volume Developer
Medium hair: 20 Volume Developer
Coarse hair: 30 Volume Developer
(40 Volume developer is not recommended with bleach)
Toner(for after bleaching): 5 or 6 volume developer with demi-permanent hair dye only.
PRO TIPS:
Virgin roots process faster than mids and ends because the heat from your scalp speeds up processing. To help prevent “hot roots” (roots lighter than the rest), I typically use a lower-volume developer at the roots than I do through the mids and ends when lightening the hair.
Follow the hair dye to developer ratio recommended by the brand you’re using (it will say on the box). Additionally, you should follow the process time recommended by the brand as well.
Example:
My starting hair
My goal
Medium Hair Texture
High Lift Dye (need 3 levels of lift)
Will use 40 volume developer
Common Issues & Special Cases When Lightening Hair
Some cool shades require extra lifting. For example, deep smoke or icy tones require very little underlying warmth. If your hair still contains significant orange or red pigment, choosing a smoke shade won’t create a true smoky result. In many cases, the hair must first be lifted lighter to remove the warmth before it can be toned back down to the desired cool shade.
Porous hair grabs cool tones more easily. Highly porous or damaged hair may absorb ash or violet tones more strongly than expected, so strand testing is especially important if your hair is damaged.
If you have highlights or previously lightened hair, be careful not to overlap your color onto those pieces. Hair that has already been lightened is more fragile. When possible, isolate those sections and formulate only for the darker hair that still needs to be lightened.
Always Do a Strand Test Before Dyeing Your Hair Lighter
Even a perfectly formulated color can produce unexpected results depending on your hair’s individual history and the brand used. A strand test is the only guaranteed way to confirm your formula before applying it to your entire head.
To perform a strand test, mix your formula exactly as you plan to use it and apply it to a small, hidden section of hair in the back. Process it for the full time, then rinse, dry, and evaluate the result.
Pay attention to more than just the final color! Ask yourself:
Did the hair lift to the level you expected?
Is there unwanted warmth that needs additional correction?
Is the tone too cool, too warm, or just right?
Does the hair still feel healthy, or has it become over-processed?
Do you need to adjust your formula, processing time, or developer strength before coloring the rest of your hair?
Hair dye formulation is part science and part interpretation. A strand test allows you to fine-tune your formula based on how your hair responds, giving you the best chance of achieving predictable, even results.
Recap: How To Formulate Hair Dye To Go Lighter
Learning how to formulate hair dye when going lighter isn’t about memorizing one perfect hair color recipe. It’s about understanding the decisions that go into crafting a formula for your specific situation. By assessing your starting canvas, defining your goal, choosing the right lightening product, accounting for underlying warmth, and selecting the appropriate developer, you can build a hair dye formula that’s tailored to your specific situation.
There are often multiple hair color formulas that can achieve very similar results. Two professional colorists may approach the same transformation differently and still end up with beautiful hair. Focus on understanding the reasoning behind each step rather than trying to copy an exact formula.
Before applying your dye, always perform a strand test. It’s the best way to guarentee that your hair dye type, formula, and developer work for your specific hair and gives you the opportunity to make changes before committing to your entire head.
I hope this guide has helped you better understand how to choose hair dye when going lighter and given you the confidence to formulate with conviction instead of guessing. While I can’t cover every exact situation in this post, leave me any questions you may have on how to make a hair dye formula for going lighter. And be sure to subscribe if you want to make everyday a good hair day!
From hairstylist and studio salon owner of 10+ years to haircare content creator. My goal is to use all of my experience and knowledge from years behind the chair to help you make everyday a good hair day!