

The Best Way To Remove Direct Dye Without Bleach!
Looking for a way to fully remove direct dye from your hair? If so, you’ve come to the right place! In this post I’m going to cover what direct dye is as well as give you the best and safest way to remove it without using any bleach OR developer at all!
What is direct dye?
Before we dive in to how to remove it, let’s first talk about what direct dye is to begin with. Direct dye is essentially a stain for the hair. It is a semi-permanent hair color that does not contain any ammonia, nor does it need to be mixed with developer (hydrogen peroxide).
The hair does typically need to be pre-lightened before it is applied because these colors only deposit (go darker) and do not lighten the hair. So the canvas needs to be light enough in order for the direct dye pigment to show up.
Since these colors are semi-permanent, direct dye does not permanently alter the chemical composition of the hair. This means that the hair does not penetrate the cortex (middle layer) of the hair strand. The color molecules sit just inside of the cuticle and essentially coat the hair.
These colors will begin fading with every wash, and will gradually fade out completely over time. The length of time that these colors last is dependent on the porosity and condition of the hair, as well as the original color of the hair.
The way the hair is maintained also affects how long direct dye lasts. For example; frequent, hot, shampooing will fade the color rather quickly.
To learn more about the differences between semi, demi, and permanent hair color, see my post here.
How to remove semi-permanent hair color
When it’s time to remove your direct dye, make sure you fade the hair the best you can before starting this process. The more the direct dye has faded, the easier the process of removing it will go.
Below you can watch my Youtube video demonstrating the direct dye removal process on a freshly colored mannequin.
***Since I’m sharing the products that I love to use with you guys, this page includes affiliate links to these products. If you take action and purchase a product through clicking one of my links, I’ll make some commission money from it at no extra cost to you. This enables me to be able to continue giving you awesome hair tips, so thanks! ***
1. Hot water and Dawn dish soap
First, you’ll begin by shampooing the hair in extremely hot water with Dawn dish soap. You can use off brand dish soap as well, but I think that Dawn works the best. Dawn is safe to use on the hair, and it will fade your hair color drastically.
I also suggest using Dawn if your permanent hair color came out too dark. Although it won’t come out like the semi-permanent will, the Dawn will help to fade the color up a few levels.
Shampoo the hair in Dawn dish soap in as hot of water as you can stand until the suds are completely clear. In my demonstration video; since the hair was freshly colored, this took a total of 9 Dawn shampoos.
2. Shampoo, condition, moisture mask
After the suds are free from color, you need to remove all the Dawn and replenish any lost moisture. You’ll do this by using a moisturizing shampoo, conditioner, and moisture mask.
Be sure to let the moisture mask sit on the hair for a minimum of 10 minutes to be sure it has fully penetrated the cortex of the hair. This is how you’ll avoid your hair becoming too dried out from the Dawn.
I recommend using Pravana’s Intense Therapy line linked below.
3. Blow dry to reveal residual tone
Next, you’ll need to blow dry the hair to see the true residual tone now that the Dawn has removed most of the direct dye.
In some instances, the Dawn may have removed all of the color, but not always. If you are planning on using another direct dye on the hair, then this should be all you need to do.
Just be sure that you formulate to factor in any residual color that is left on the hair. Your formulation will be dependent on what color the hair is, as well as what color you are going for. See the next section for help formulating.
4. Formulate a corrective direct dye
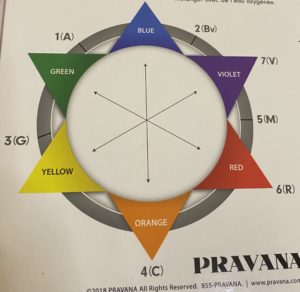
Now, the residual tone that is left in the hair will determine what corrective tone you’ll need to apply to completely neutralize the remaining direct dye. The corrective tone is always the color opposite on the color wheel (pictured above).
In my video example, green is the tone that we need to correct. This means that we need to use a color with a red base to it to counter the green in the hair.
It’s important to notice the level, or lightness and darkness of the color. In my example, my mannequin was a light green. Since the color is light, we don’t want to put straight up red on the hair or else it would overpower the color and turn the mannequin red.
So instead, we will use pink. Which is essentially light red.
It is best to use another direct dye so that you are not permanently altering the hair color in this step. For ease of use, I suggest using a color toning conditioner linked below.
5. Assess while applying
The above step should completely neutralize the remaining pigment left in the hair, as it did in my video example. But the trick is getting the correct amounts of pigment.
Unfortunately direct dye isn’t usually measured by the level system, and I typically just use my eye to match the correct amount of pigment needed to counter the residual color. The nice thing with direct dye is that you can see while you’re applying the color if the amount is correct.
If after a few minutes the color hasn’t neutralized, then you can add a little deeper of a pigment (in my case I would gradually add drops of red into the pink to deepen the color). It’s best to start off on the lighter side and add more pigment, rather than using too much red to start with.
Direct dye removal conclusion
Direct dye is semi-permanent and ammonia free hair color. It is essentially a stain that will gradually fade completely out of the hair, leaving the chemical composition of the hair unaltered.
The safest way to remove direct dye is to follow the below steps:
- Shampoo in hot water with Dawn dish soap until the suds are clear
- Shampoo, condition, and use a moisture mask to replenish lost moisture from the Dawn
- Blow dry the hair to see the residual color that needs corrected
- Formulate your correcting direct dye formula using the color wheel
- Adjust as needed before rinsing
If you have any further questions for me regarding direct dye removal, leave them for me in the comments. And make sure you subscribe to make everyday a good hair day!
share item
