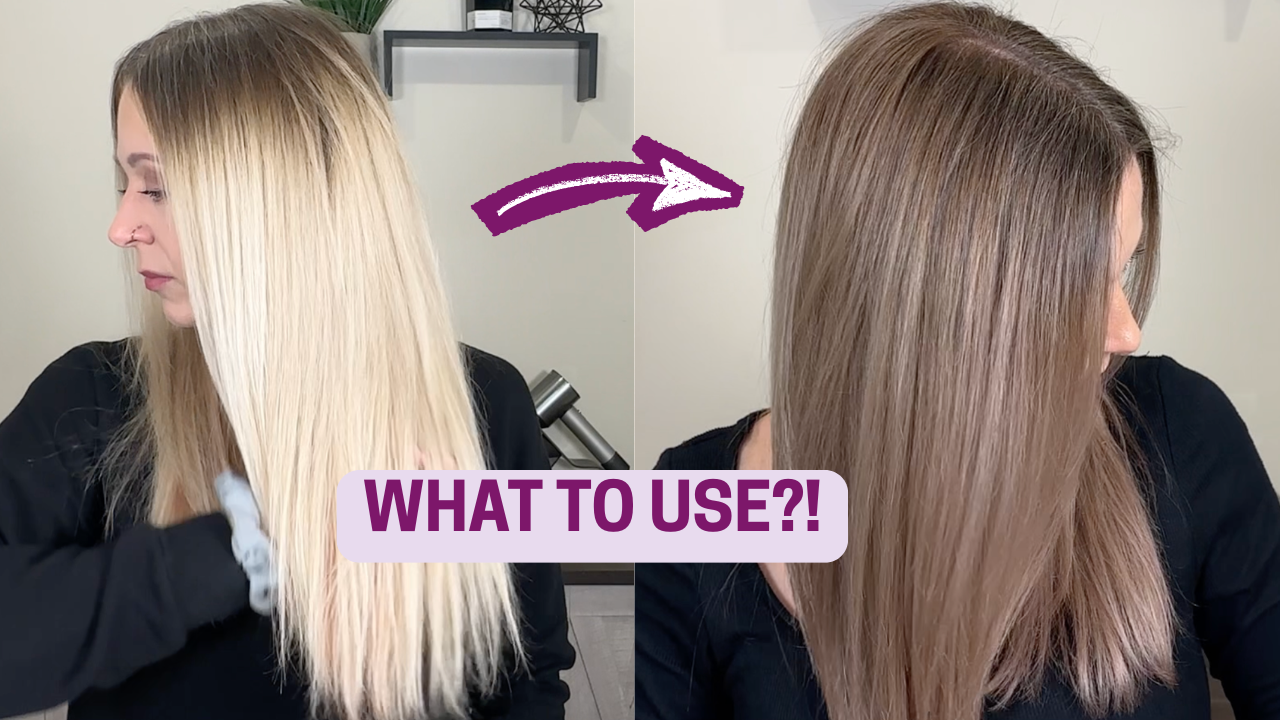
Going darker with your hair seems much easier than going lighter, and it’s certainly not as damaging. But the truth is, the wrong hair dye formula can cause your results to wind up muddy, hollow, or be extremely difficult to remove. Your starting hair, history, gray percentage, and even your future plans for your hair all play a role in determining the right formula for your goal.
So in this guide, I’ll show you how to choose the right hair dye when going darker by teaching you the same formulation process I use behind the chair. You’ll learn how to determine whether you should use permanent, demi-permanent, or semi-permanent dye, how to select the right developer volume, how to cover gray, and how to fill the hair so it doesn’t look too drab or muddy.
Hair dye formulation is one of the most complex parts of cosmetology, so my goal is to break that complexity down into a simple, step-by-step process that’s easier to understand and apply. This guide will help you create a formula that’s made for your hair and your goal.
DISCLAIMER: This guide is intended for educational and informational purposes only. Hair color is a complex chemical process, and results can vary significantly depending on your hair’s history, porosity, condition, previous color, and the products used. While I’ve simplified the process to make it easier to understand, no formula can guarantee the same results on every head of hair.
I always recommend seeing a licensed professional for the safest and most predictable outcome, especially for major color changes or corrective work. If you choose to color your hair yourself, you do so at your own risk. Always perform a strand test before applying color to your entire head.
How To Formulate Hair Color: Going Darker
When dyeing hair darker, it’s very rare that I use only one tube of color from scalp to ends. The majority of the time, I’m mixing a few colors together, as well as using a different formula for the roots versus the mids and ends. There are also many different formulas that you can mix together to get similar results, so don’t get too hung up on the specifics here.
I have an extremely helpful blog post that you may want to refer to for a deeper dive on specific aspects of the formulation process, where you can learn about the levels of hair, understand the tone, and how to correct underlying pigment. I will briefly explain these aspects here, but I suggest keeping that post open and referring to it as needed.
And to make this process easier to understand, I’ll use my own hair as an example throughout each step that you can follow along with.
**Note that this post is not about technique, but formulation for what hair dye to choose when darkening your hair. I have tons of tutorials on my blog and YouTube channel where you can find many different application techniques.
Products I Personally Recommend
I strongly recommend sticking with one color line from start to finish rather than mixing brands. Every manufacturer has its own shade system, and sometimes one brand’s level 6 is a little lighter or darker than another’s. But the formulation process you’ll learn in this guide stays the same.
I prefer Pravana for darkening because I trained with this line to become an educator, so I know the brand and their formulas really well. And Celeb Luxury is my go-to for semi-permanent coloring shampoo and conditioners. But you can use whatever brand you choose; the formulation process is still the same.
***Since I’m sharing the products that I love to use with you, this page includes affiliate links to these products. If you take action and purchase a product through clicking one of my links, I’ll make some commission money from it at no extra cost to you. This enables me to be able to continue giving you awesome hair tips, so thanks! ***
Before creating a darker hair dye formula, you first need to understand your starting canvas. The same color formula can produce completely different results depending on what your current hair looks like.
Even or uneven canvas: You’ll generally need a separate formula for each different starting color. So write down if you have multiple colors to begin with.
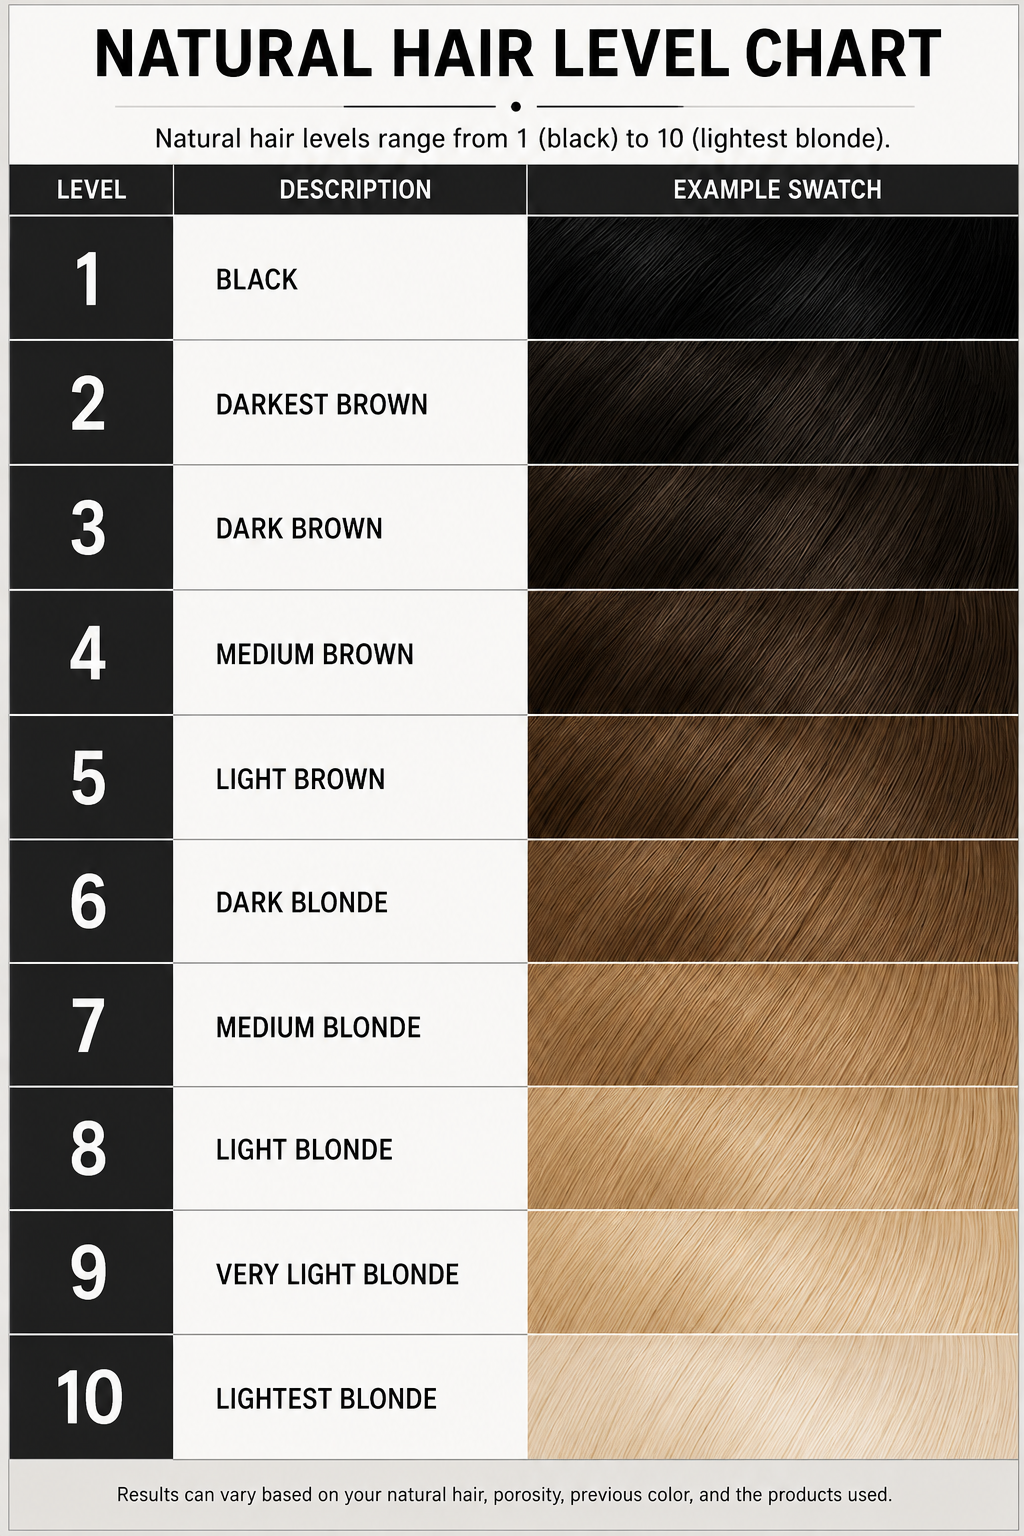
Starting level: The level is how light or dark your hair is on a scale from 1 being the darkest, to 10 being the lightest.
Starting tone: The tone refers to the shade of the current hair. Start with warm, neutral, or cool, then narrow it down if you can like copper/beige/ash.
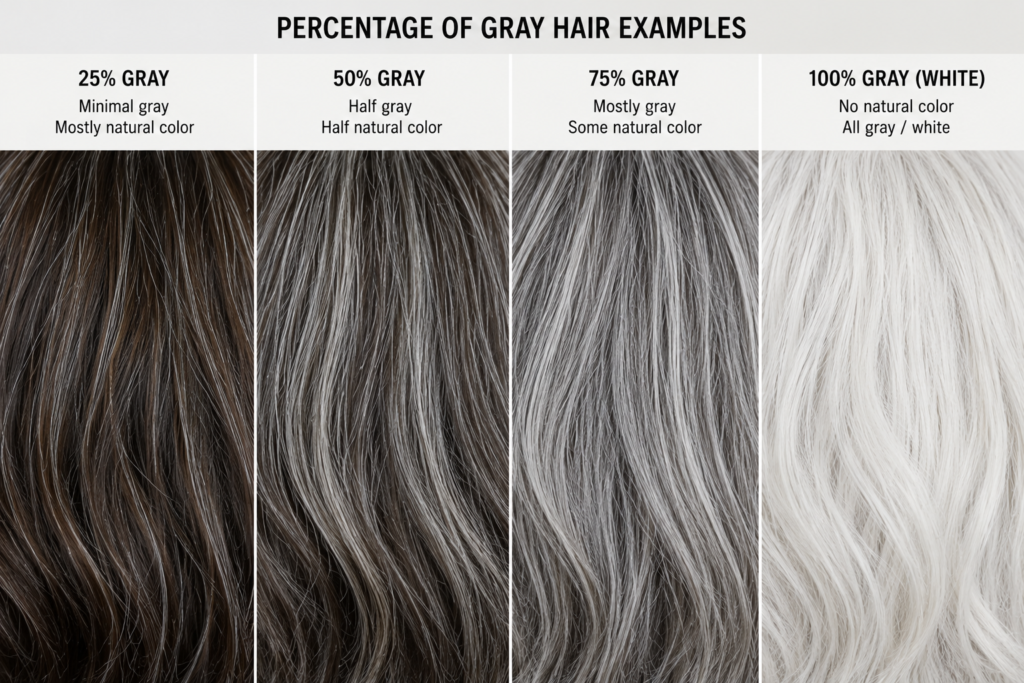
Gray hair: If gray hair is present, determine the percentage of gray. 100%, 75%, 50%, or 25%. If it’s less than 25%, you won’t be adjusting the formula for it. But if it is over 25%, we will need to adjust the formula to ensure it covers properly.
PRO TIPS:
Covering Highlights: Understand that when covering highlights, the highlights will take color differently than the darker hair. You may choose to create a “happy medium” formula (which is somewhere between what you’d formulate for each) and apply one color over all of the hair, or formulate separately for the lighter pieces, pick them out, and apply separately.
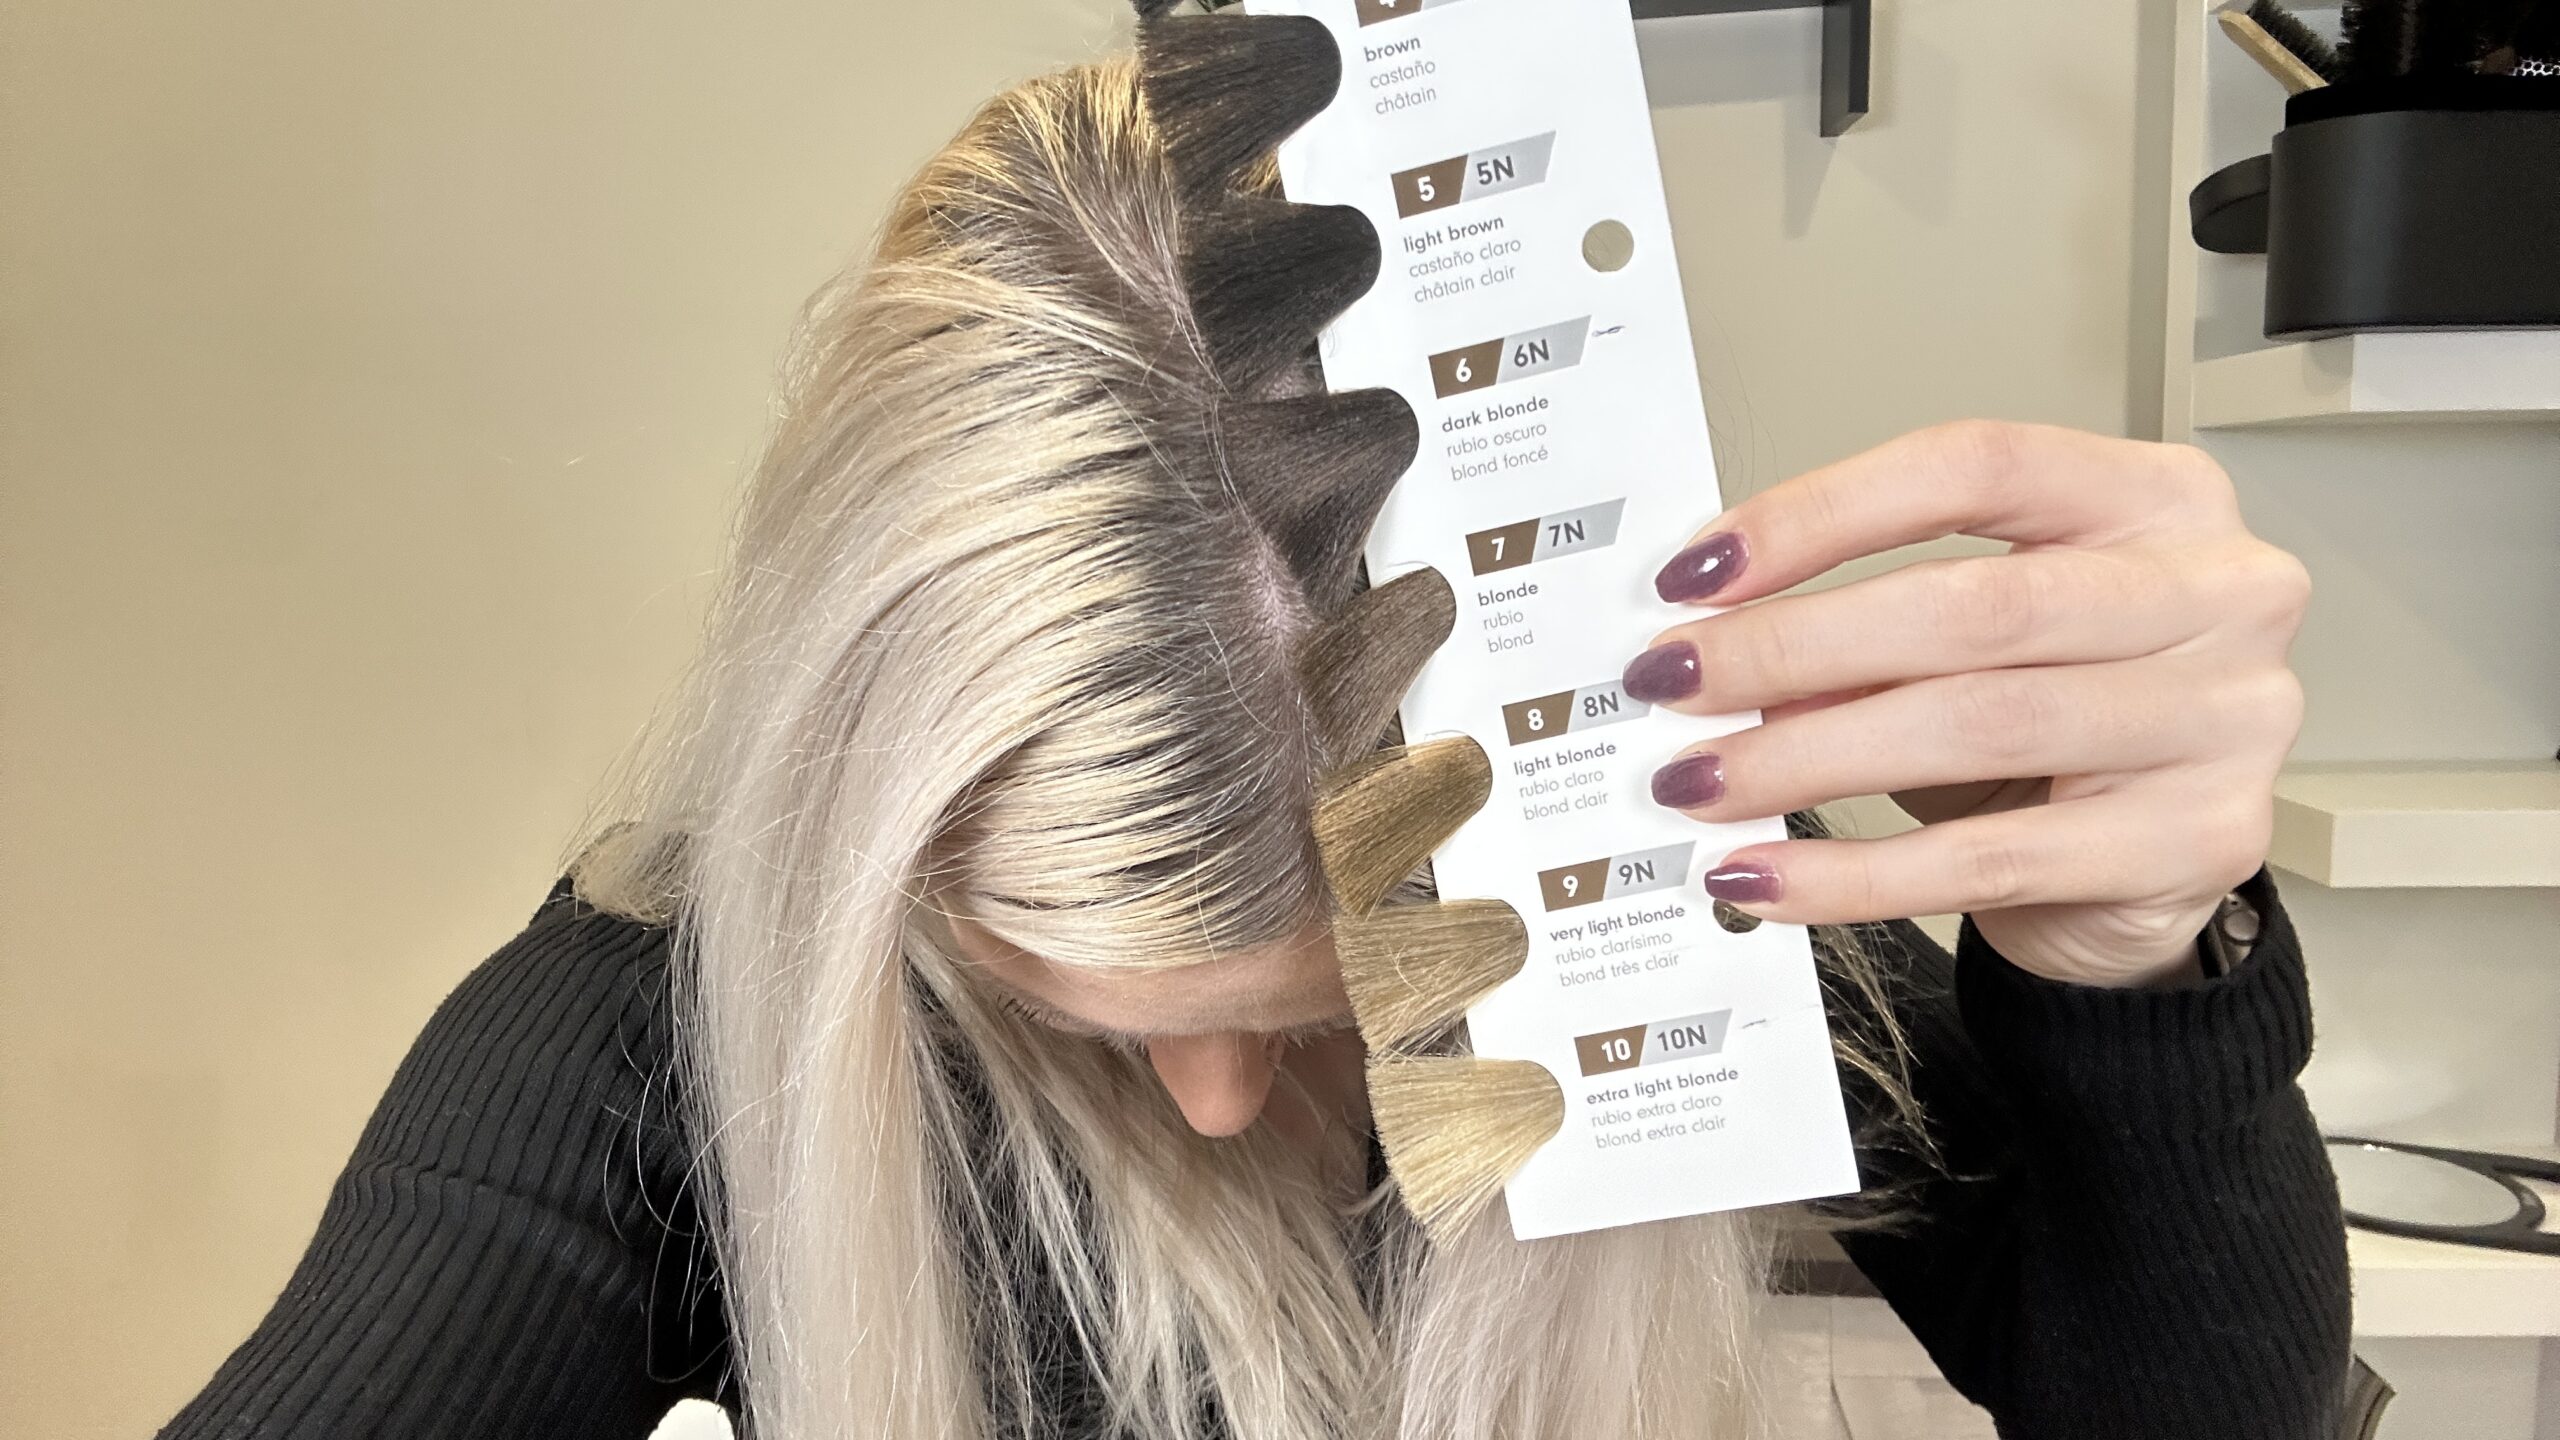
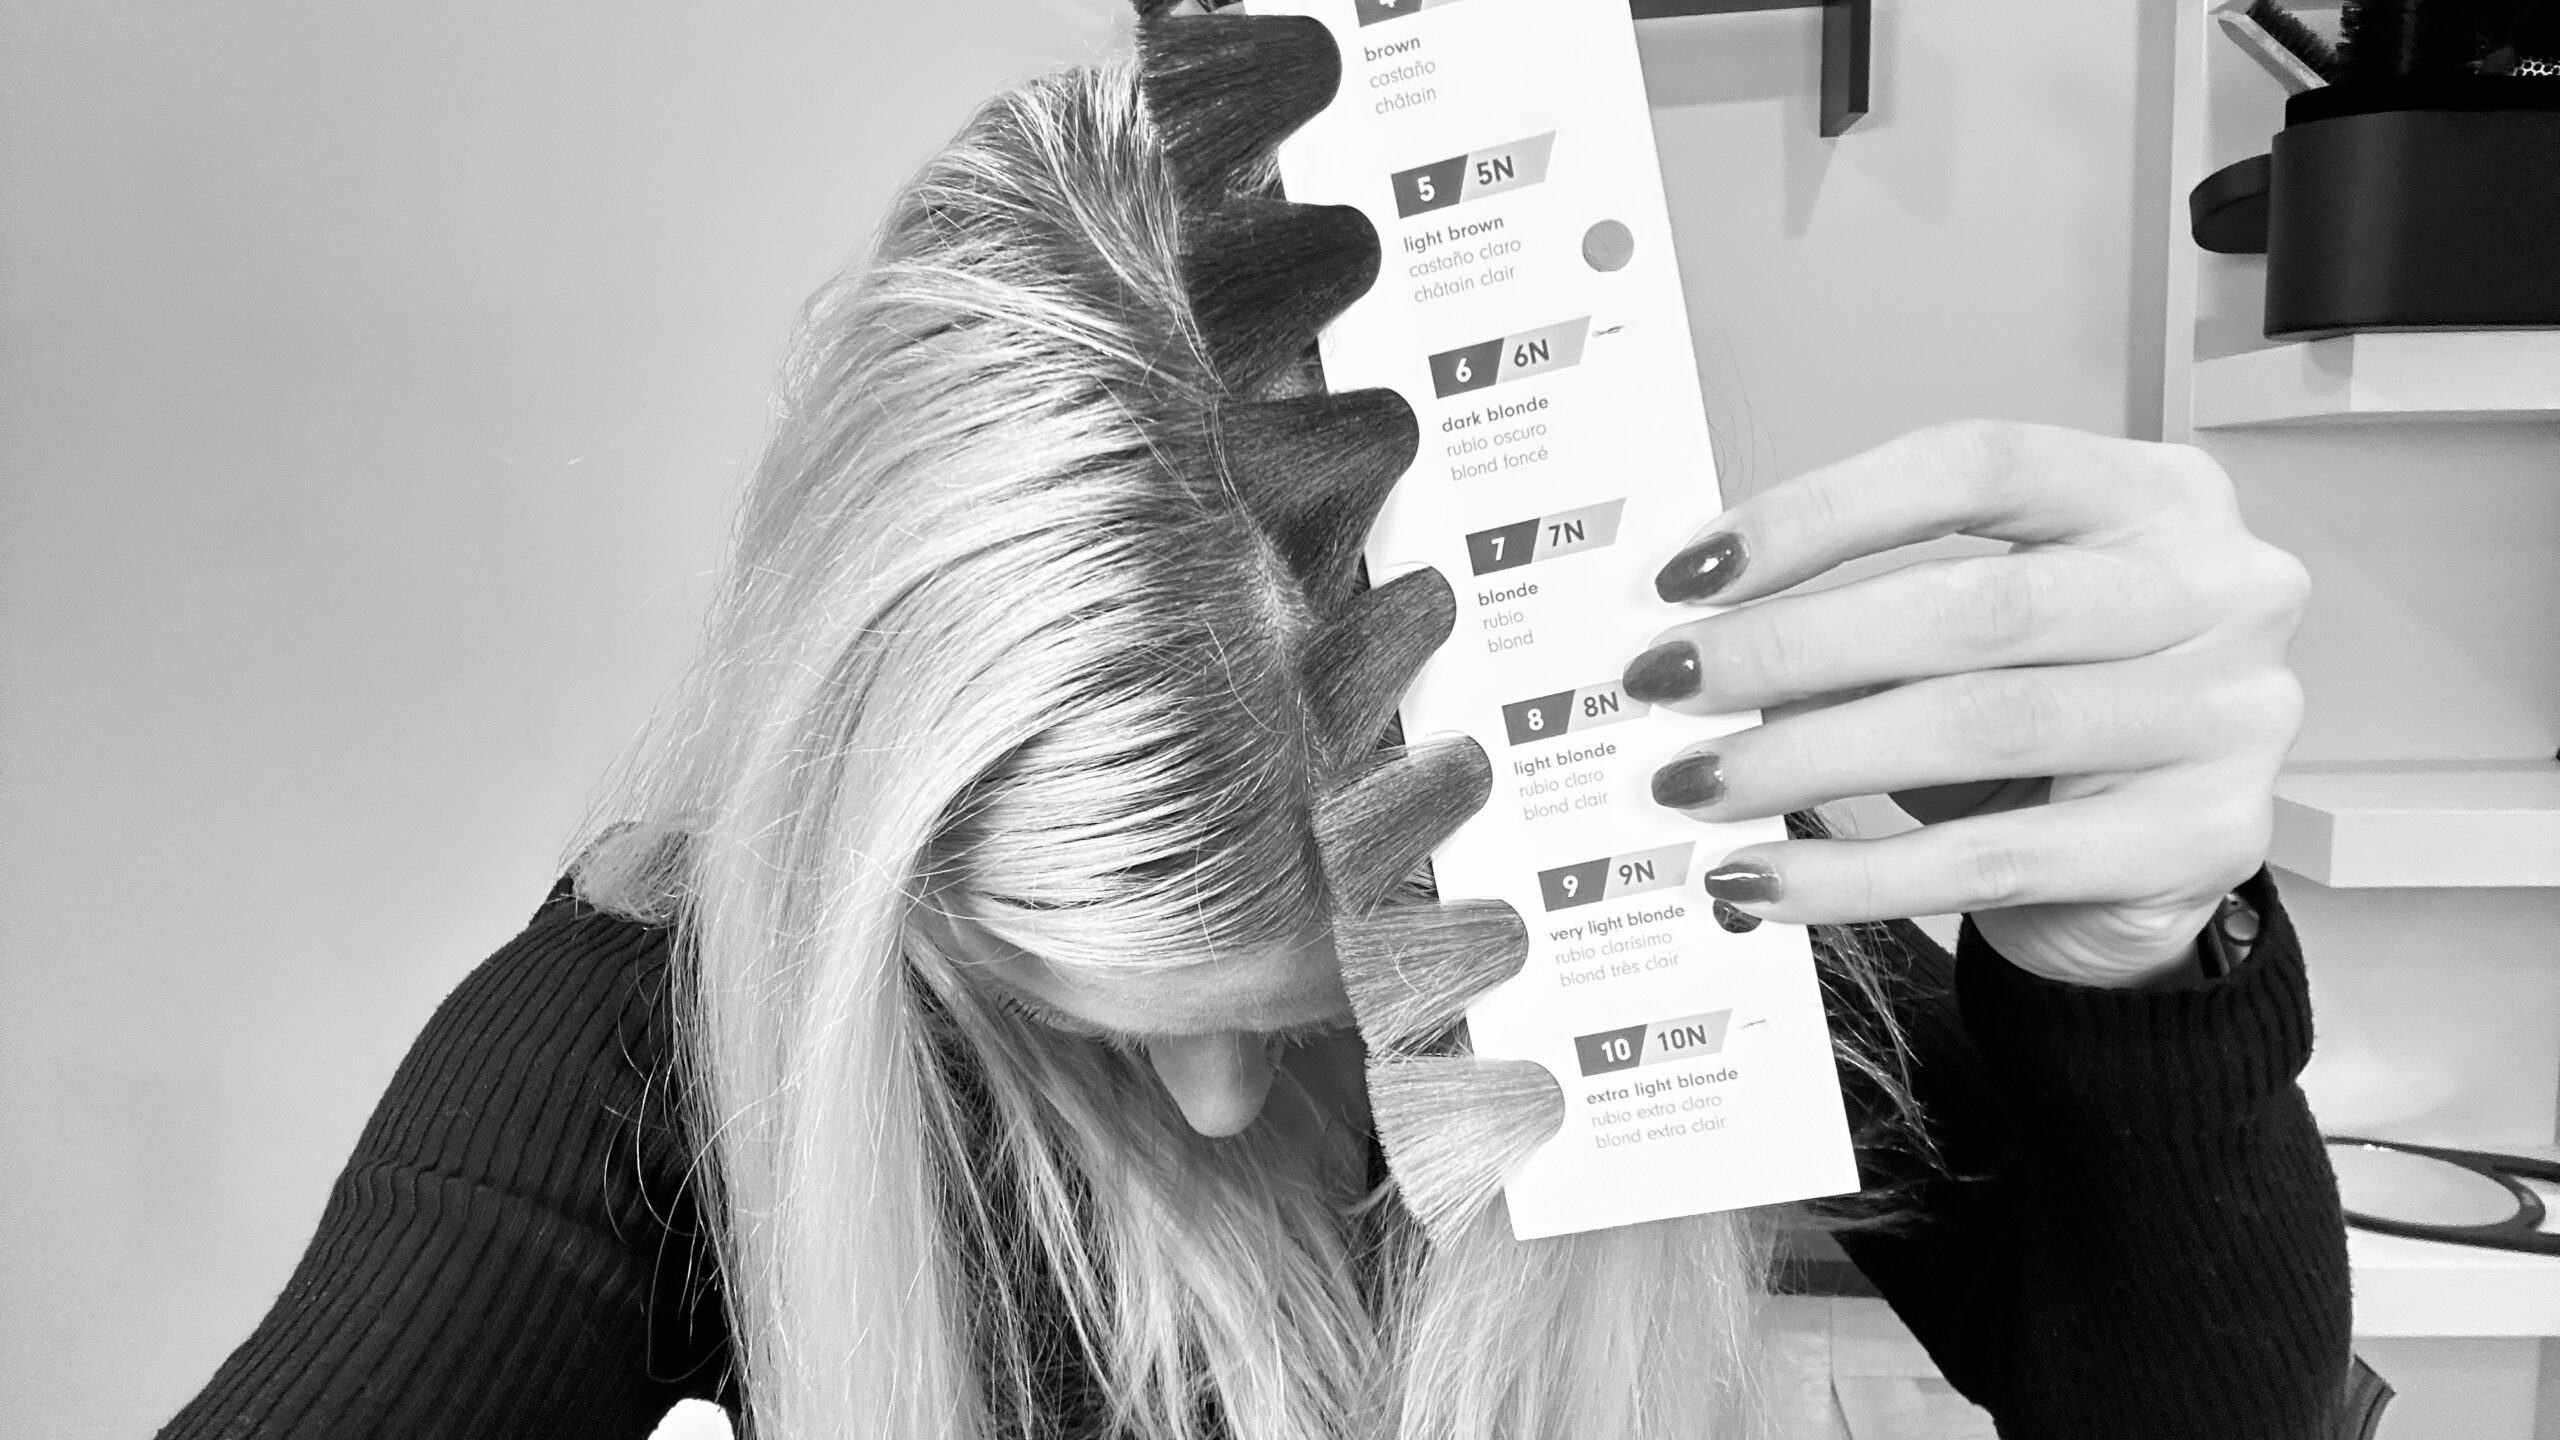
Taking a photo holding a swatch chart up to your hair and viewing it in black and white is a great way to determine your level without the shade deceiving the eye. Warmer colors often look lighter than they are, while cooler colors often look darker.
In black and white, we can see that I am no darker than a level 7
Example:
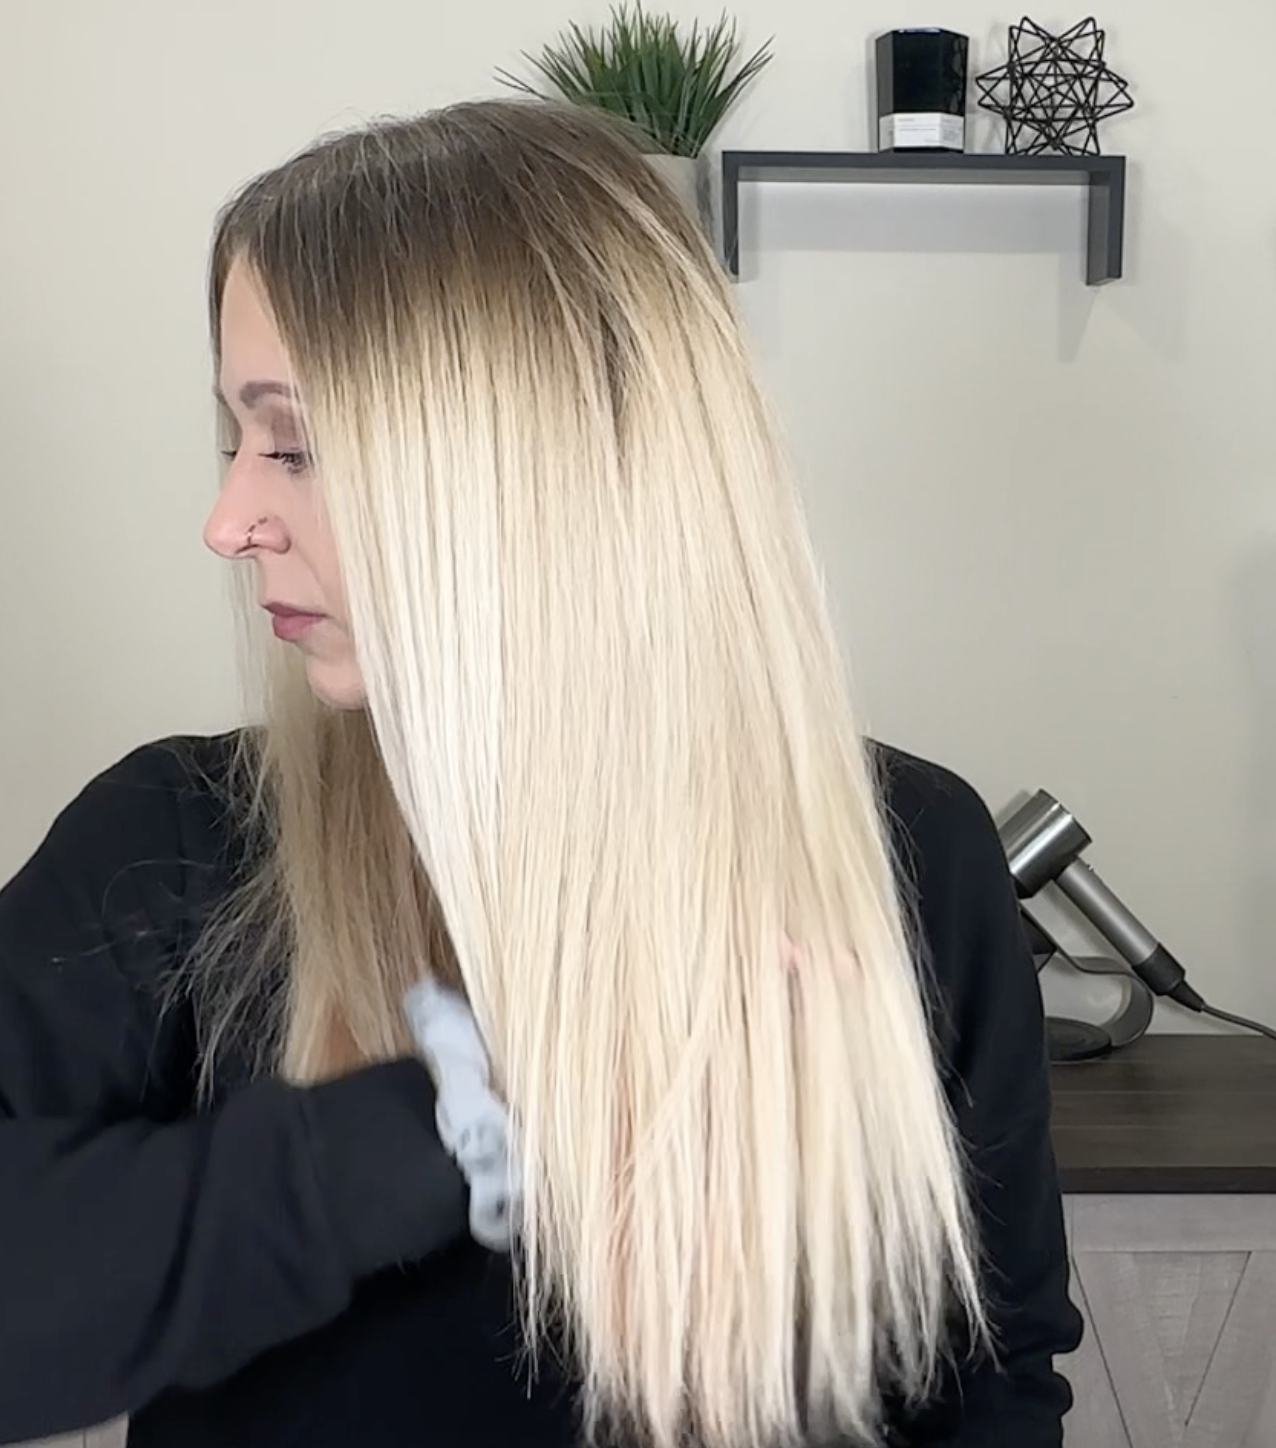
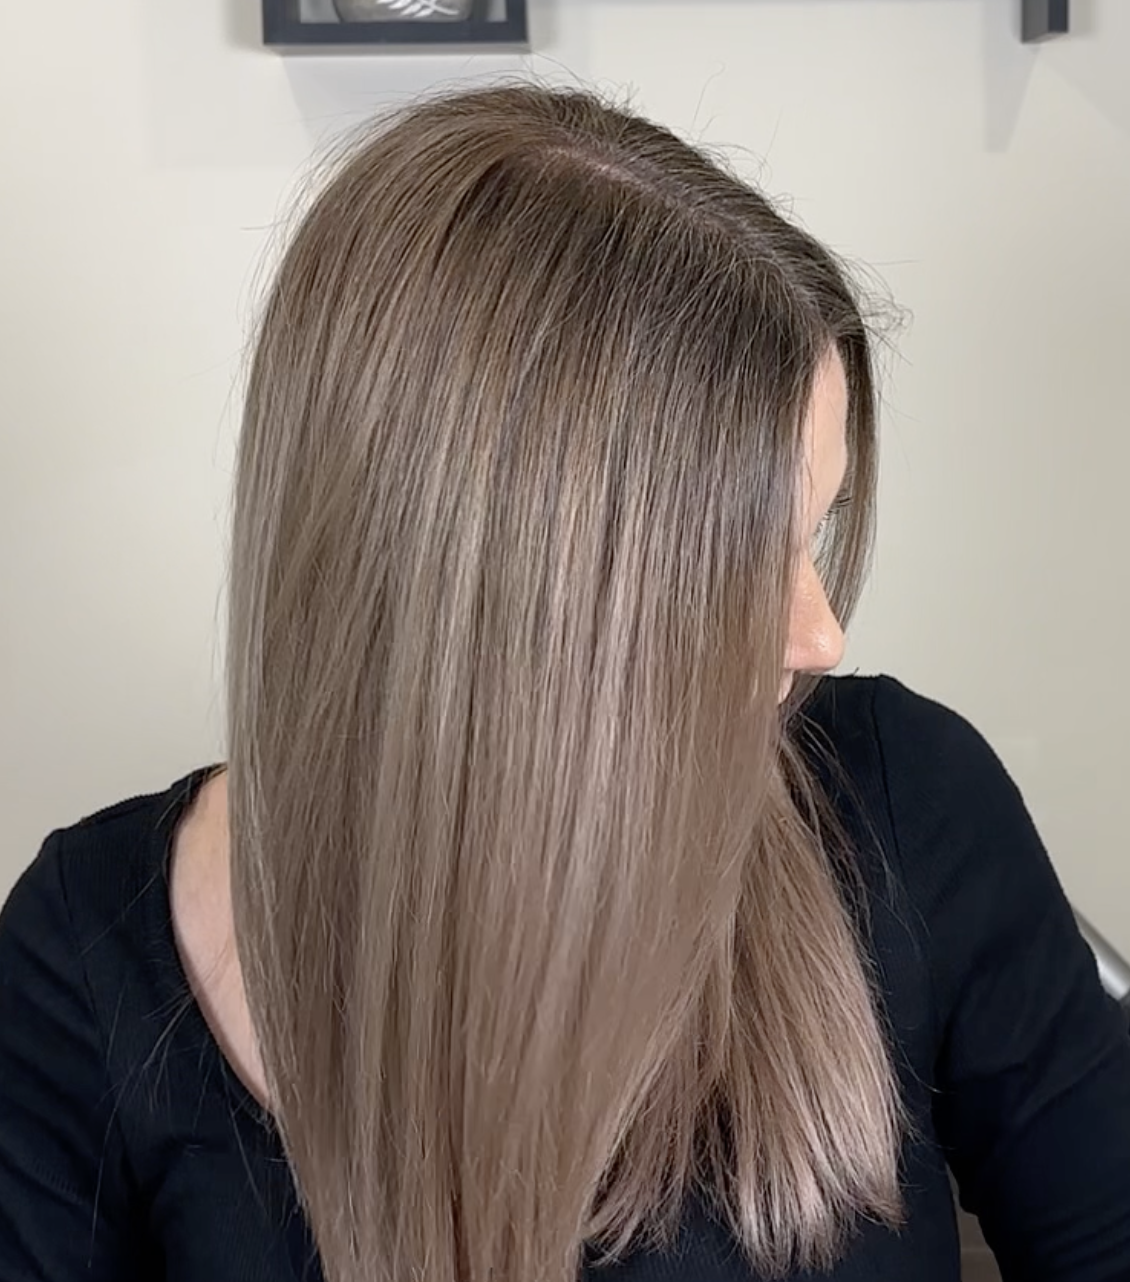
My Starting Hair (I know it looks darker than a level 7 in this picture, it’s just the lighting.
Uneven Canvas: Solid (not highlighted), 3 colors
Roots: Level 7, neutral/cool, with less than 25% gray
Mids: Level 8, neutral (root smudge between the two shades)
Ends: Level 10, neutral
Step 2: Choose Your Desired Hair Color Goal
Once you’ve identified your starting canvas, the next step is disecting your goal for going darker. Narrow it down to a few pictures that you’re shooting for, and decide how flexible you are with the final outcome.
It helps to have a general idea of what you’ll be doing to your hair in the future. If you plan on lightening it again in a few months, you’ll want to use a very different formula than someone who wants to maintain dark hair for a prolonged period of time.
Additionally, dark hair doesn’t always mean low maintenance. Sometimes coloring our hair darker is actually higher maintence, especially when covering grays.
Commitment level: You may want to lighten your hair again in a few months (recommened to go no more than 2 levels darker), or stay dark for a prolonged period of time.
Maintenance level: Do you want to move towards no color maintenance, low maintenance, or high maintenance?
Solid color or dimensional: If the color is dimensional or gradient, you’ll write down each different color’s level and tone.
Goal level: The lightness or darkness of each color (levels 1-10).
Goal tone: The shade of each different color. Start with warm, cool, or neutral, then narrow it down if you can to a more specific shade like mahogany, smokey, or beige.
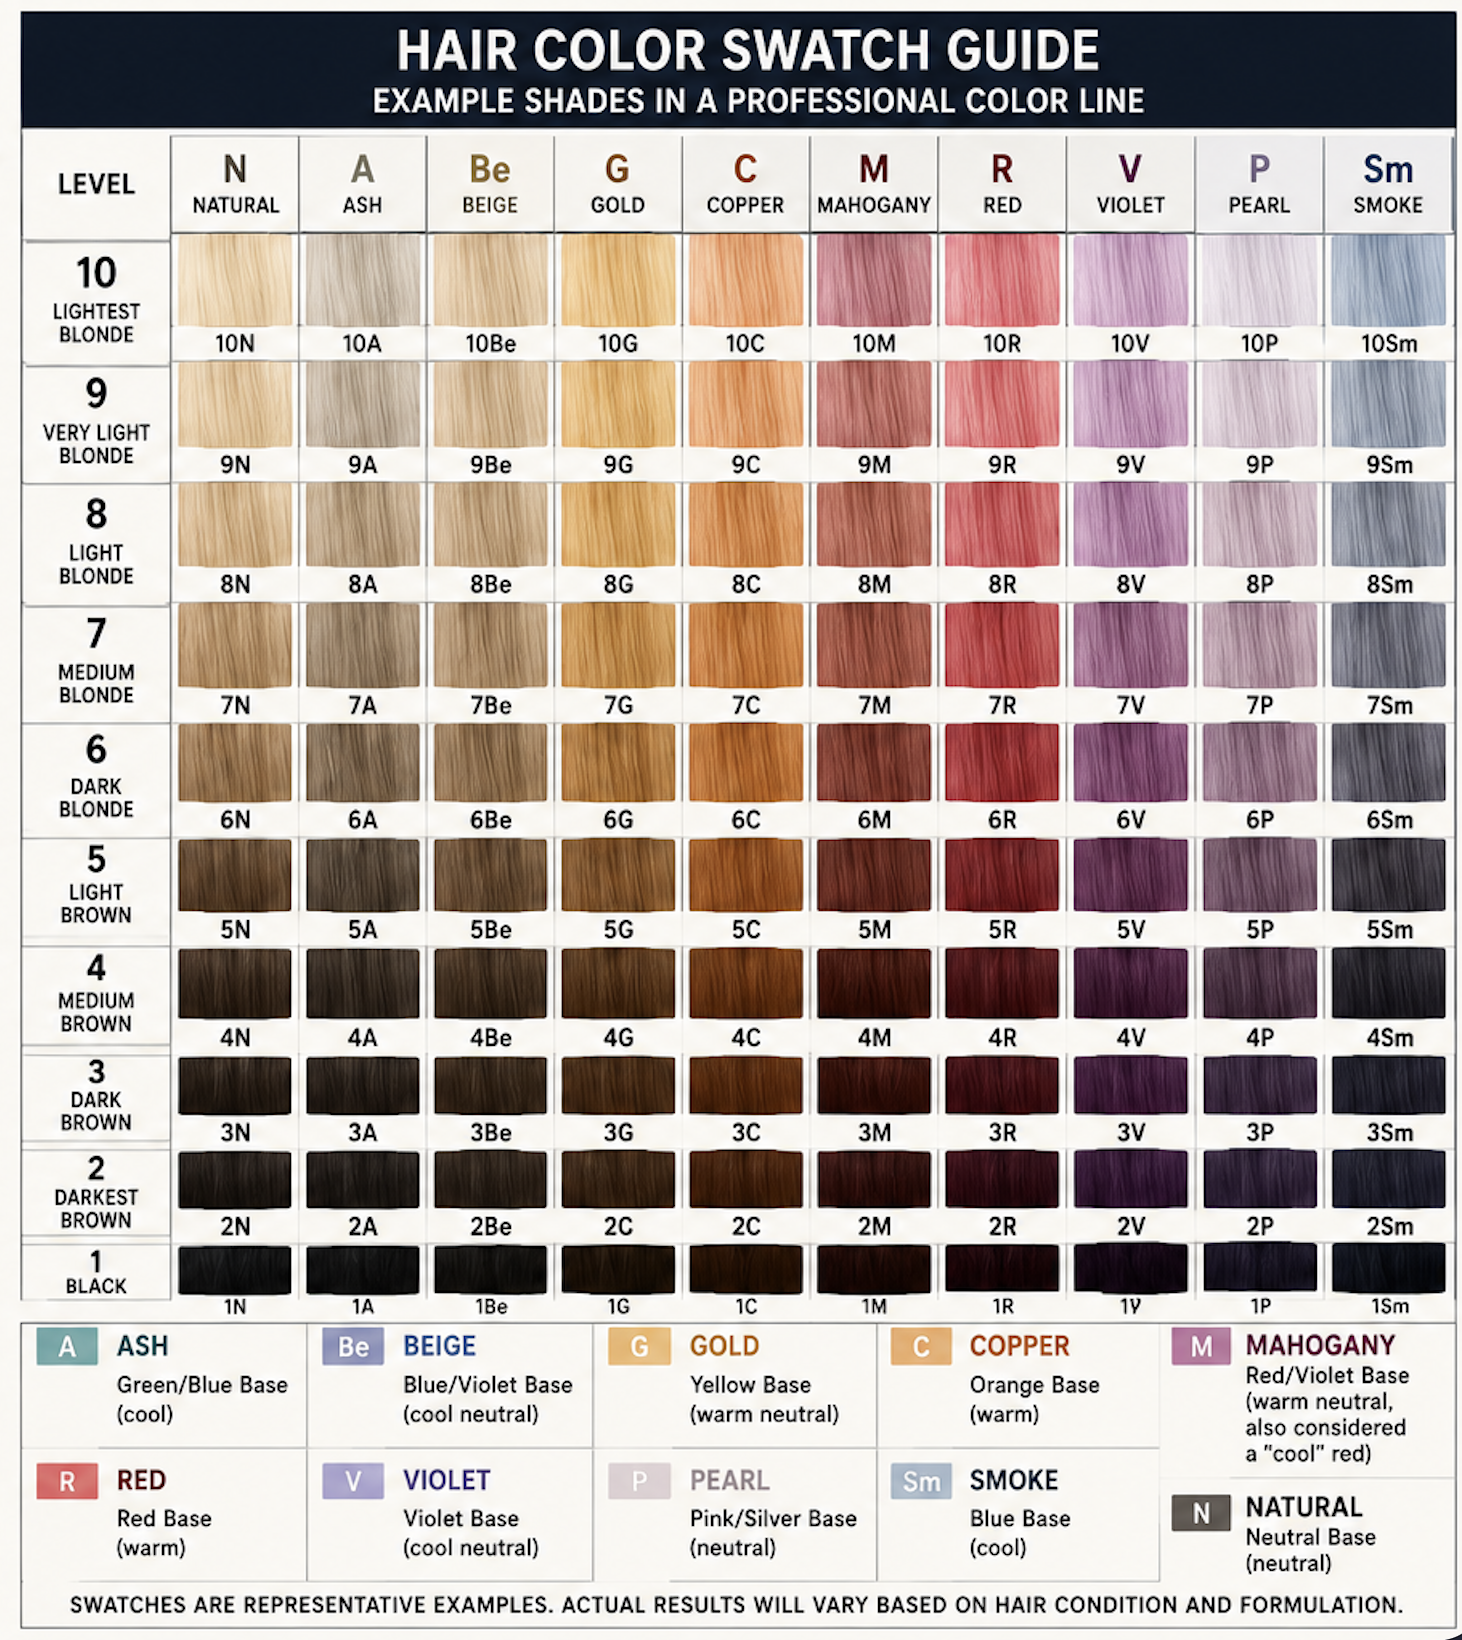
Common hair color shades and their bases (may vary slightly with different lines):
Ash = Green/Blue Base (cool)
Beige = Blue/Violet Base (cool neutral)
Gold = Yellow Base (warm neutral)
Copper = Orange Base (warm)
Mahogany = Red/Violet Base (warm neutral, also considered a “cool” red)
Red = Red Base (warm)
Violet = Violet Base (cool neutral)
Pearl = Pink/Silver Base (neutral)
Smoke = Blue Base (cool)
Natural = Neutral Base (neutral)
This is just a generic chart. If you know what color line you want to use, look at their chart online for a better selection.
Permanent doesn’t mean that the dye will last permanently without fading. It actually has the same dye molecules as demi-permanent dyes do. It sometimes has ammonia added and is used with higher developer volumes (10-40), so it shifts the natural pigment permanently. This exposes the underlying warmth, and the color will never be the same again until it grows out. Once it starts to fade, it usually fades warm.
Demi Permanent is similar to permament dye but is always used with 5 or 6 volume developer. Because of this, it darkens the hair only, and it does not expose the underlying warmth unless used with a higher volume of developer. When permanent dye is used with 5 or 6 volume developer, it acts as a demi, and this is what I often use as a stylist. It creates a softer root and fades more naturally than a permanent mixed with 10-40 volume developer.
Semi-Permanent (also known as direct dye) is merely a stain, and it has a completely different chemical composition than demi and permanent hair dye. It is NOT mixed with developer and it does not shift the color in the cortex layer of the hair. The hair does need to be light enough for the semi-permament dye to show, and for bright colors, the hair often needs to be pre-lightened.
Least commitment: Use semi-permament dye as it will usually wash out completely. (Some exception for very intense colors that may stain very light hair).
Maintianing color: To slow the fading process or reduce underlying warmth as your color fades, use semi-permanent color depositing shampoos or conditioners.
Going back to natural: if your end goal is to stop dying your hair, use demi-permament first for coverage, then semi-permanent ongoing after that for maintenance until it grows out. (I suggest using a coloring shampoo or conditioner.)
If your hair is pre-lightened (bleached): Use demi-permanent and/or semi-permanent. Since your hair is already prelightened, permanent would be unnecessary.
Gray blending: Use demi-permanent dye. This will soften the root line and make your growout much more blended.
Gray coverage: If you desire 100% gray coverage and don’t mind frequent touch-ups, use permament dye with 10 volume developer for fine hair, and 20 volume developer if the hair is coarse.
If you have coarse/resistant hair: Use permanent dye with 10 volume developer. Demi and 5 volume may not be strong enough to open your cuticle unless your hair is already pre lightened.
If you want a neutral or cool result: Use demi-permanent dye to avoid the color from fading warm.
If you want a warm result: If your hair is not pre-lightened and you want a warm result (red, copper), use permament dye to expose the underlying warmth in your hair which will act as a base for your warm end goal.
PRO TIPS:
Virgin roots process faster than mids and ends because the heat from your scalp speeds up processing. When using permament dye, to prevent “hot roots” (roots lighter than the rest), use a lower-volume developer at the roots than through the mids and ends.
Using a semi permanent over top of demi or permanent can help intensify the color and reduce fading. The semi permanent can be used in a shampoo/conditioner which is easy to apply in the shower to maintain color between dye sessions. This is commonly done for deep reds and violets or when wanting to stop any color from fading too quickly or warm.
For covering stubborn grays, you can “pre-soften” the gray by applying dye right out of the tube (not mixed with developer) onto the stubborn areas (usually part line and around face) before applying the color to the entire head.
Example:
Starting Hair
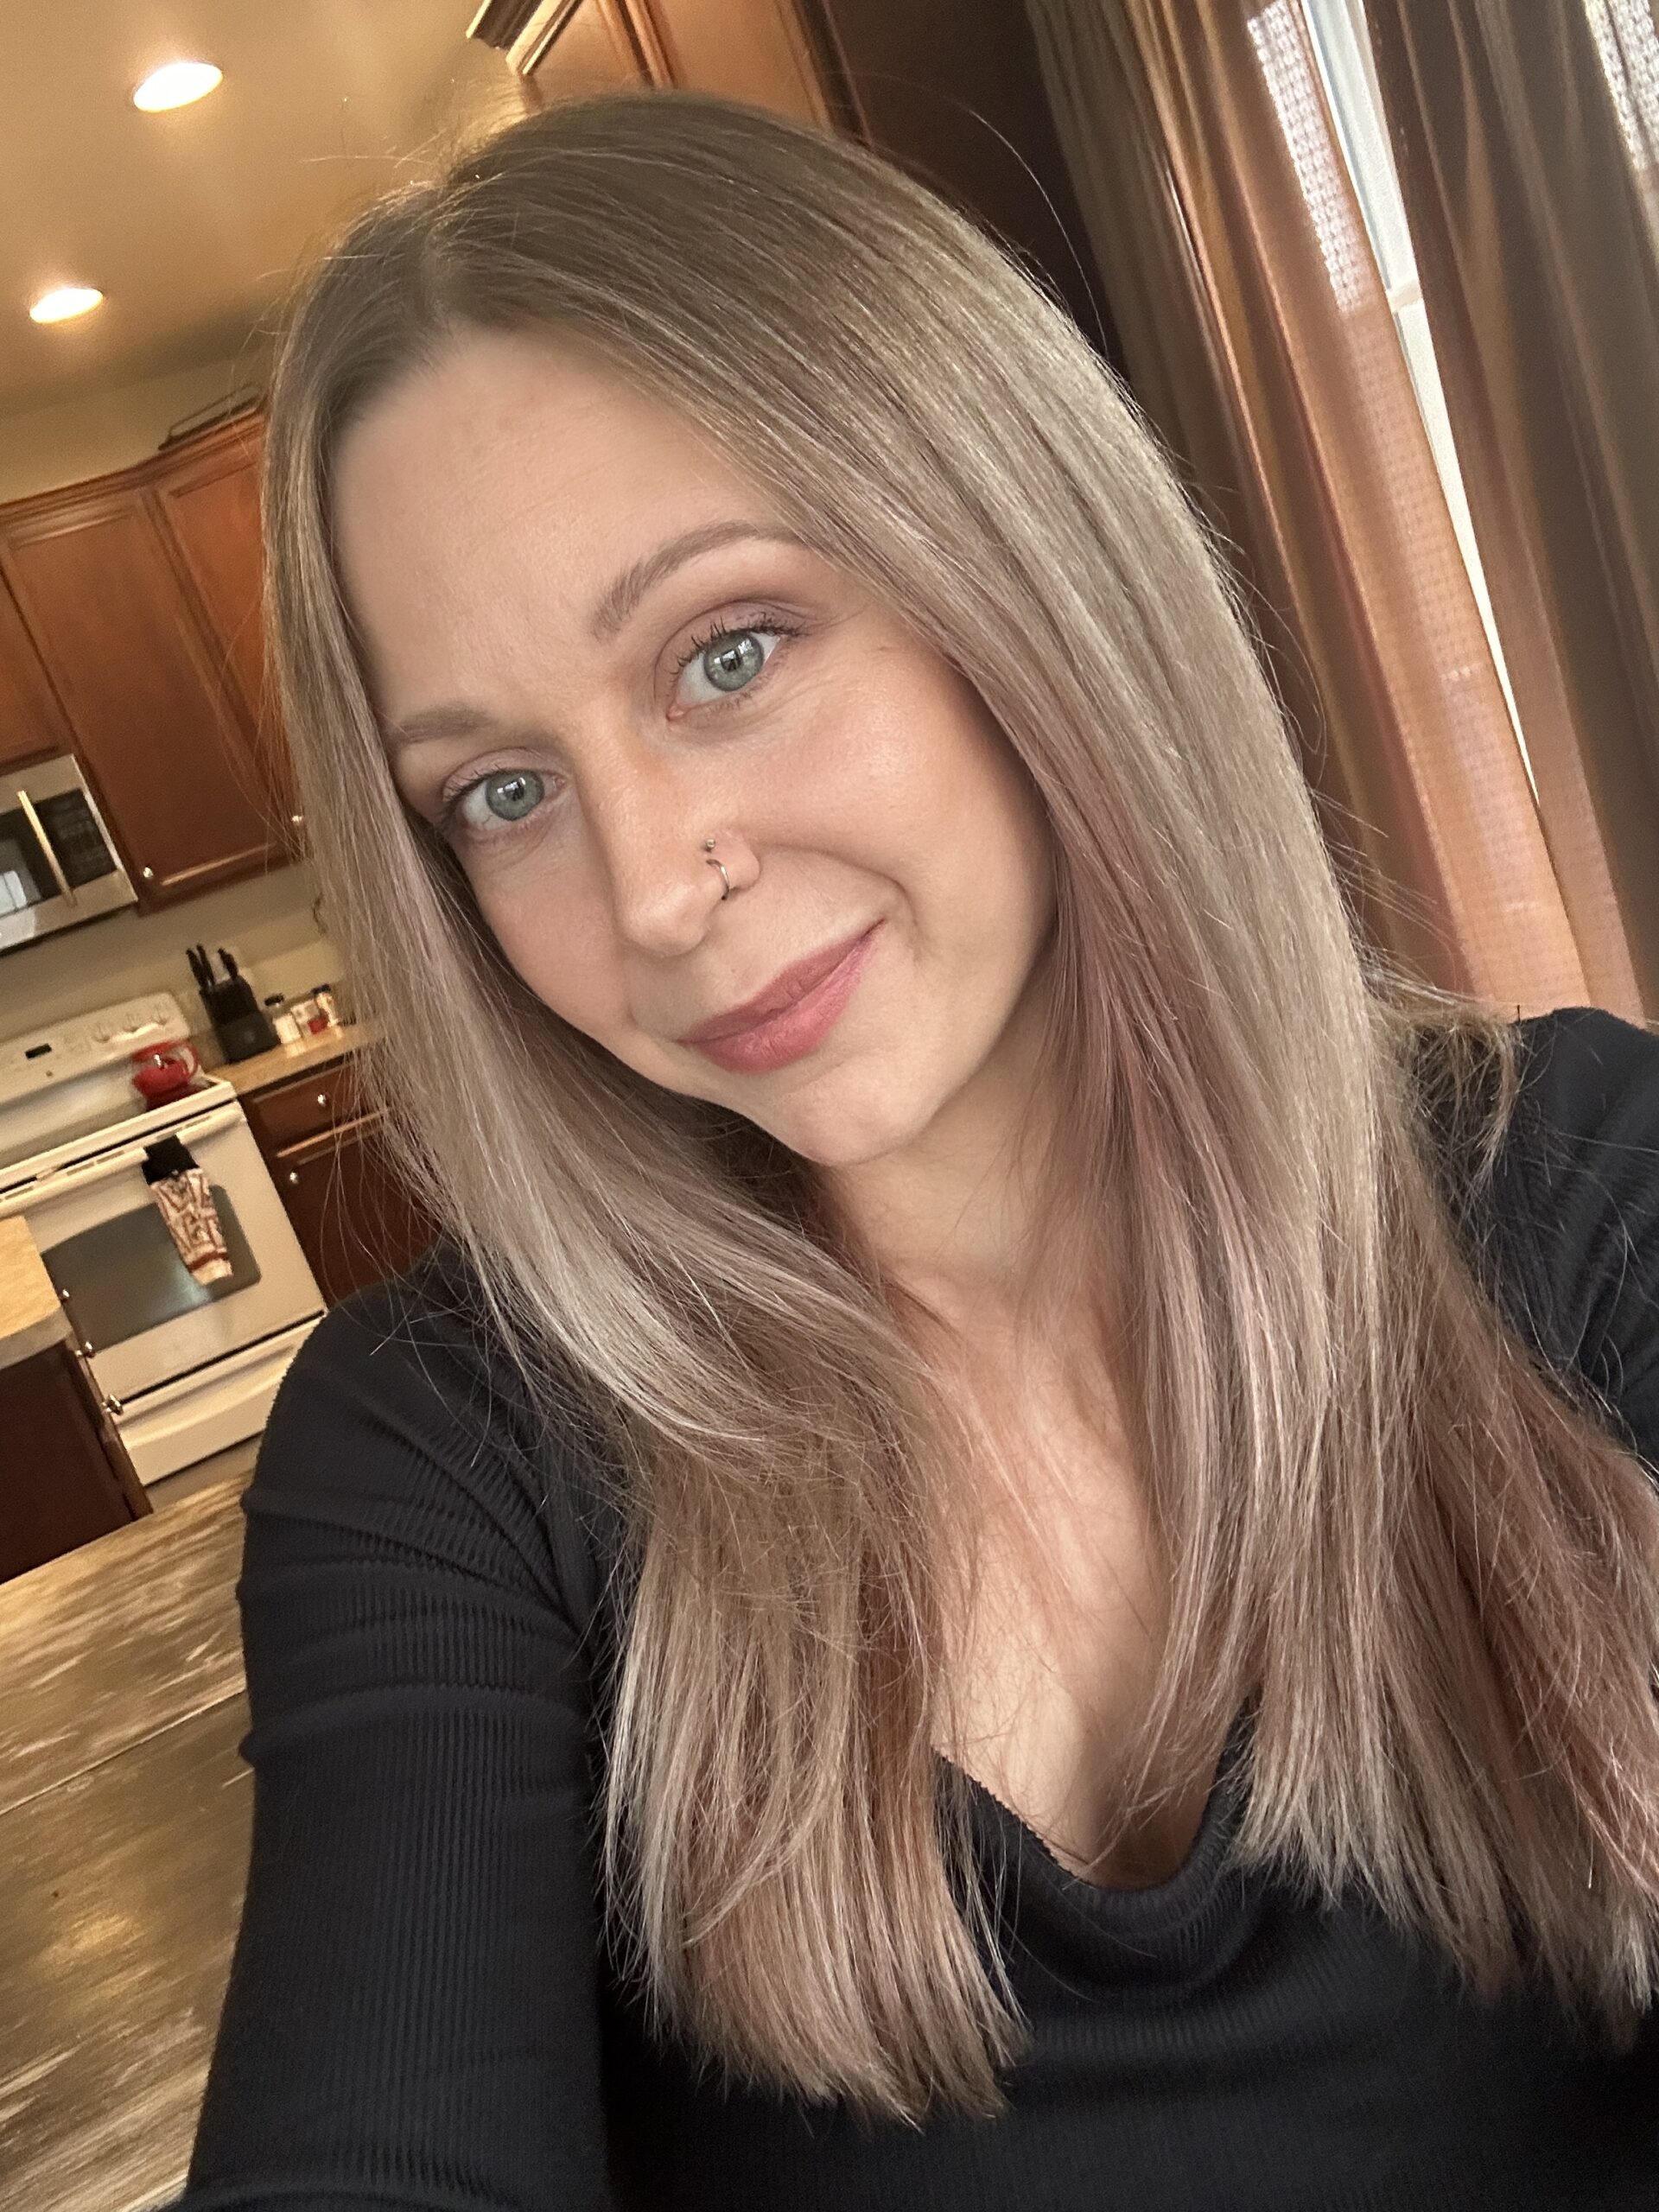
Goal Image #1
Goal Image #2 (same hair, different lighting)
Prelightened & Going back to natural: Will use Demi-Permanent with 5 volume developer. Permanent with 10 volume would shift my natural roots, creating a root line of demarcation and the color would fade warm and unnatural looking.
Step 4: How To Choose What Shade To Use When Going Darker
Now it’s time to determine what shade to use to get to your darker goal. You may need to correct an unwanted tone, formulate for gray coverage, or fill the hair.
If you’re darkening 3+ levels, you need to add a filler to the formula so that the hair doesn’t turn muddy or dull. This replenishes the warm underlying pigment back into the hair that was removed when the hair was lightened, so that the color maintains depth and richness.
For lower commitment: You may choose to only darken 2 levels instead of 3 to avoid having to fill the hair. This will make it easier to lighten in the future than if you went significantly darker.
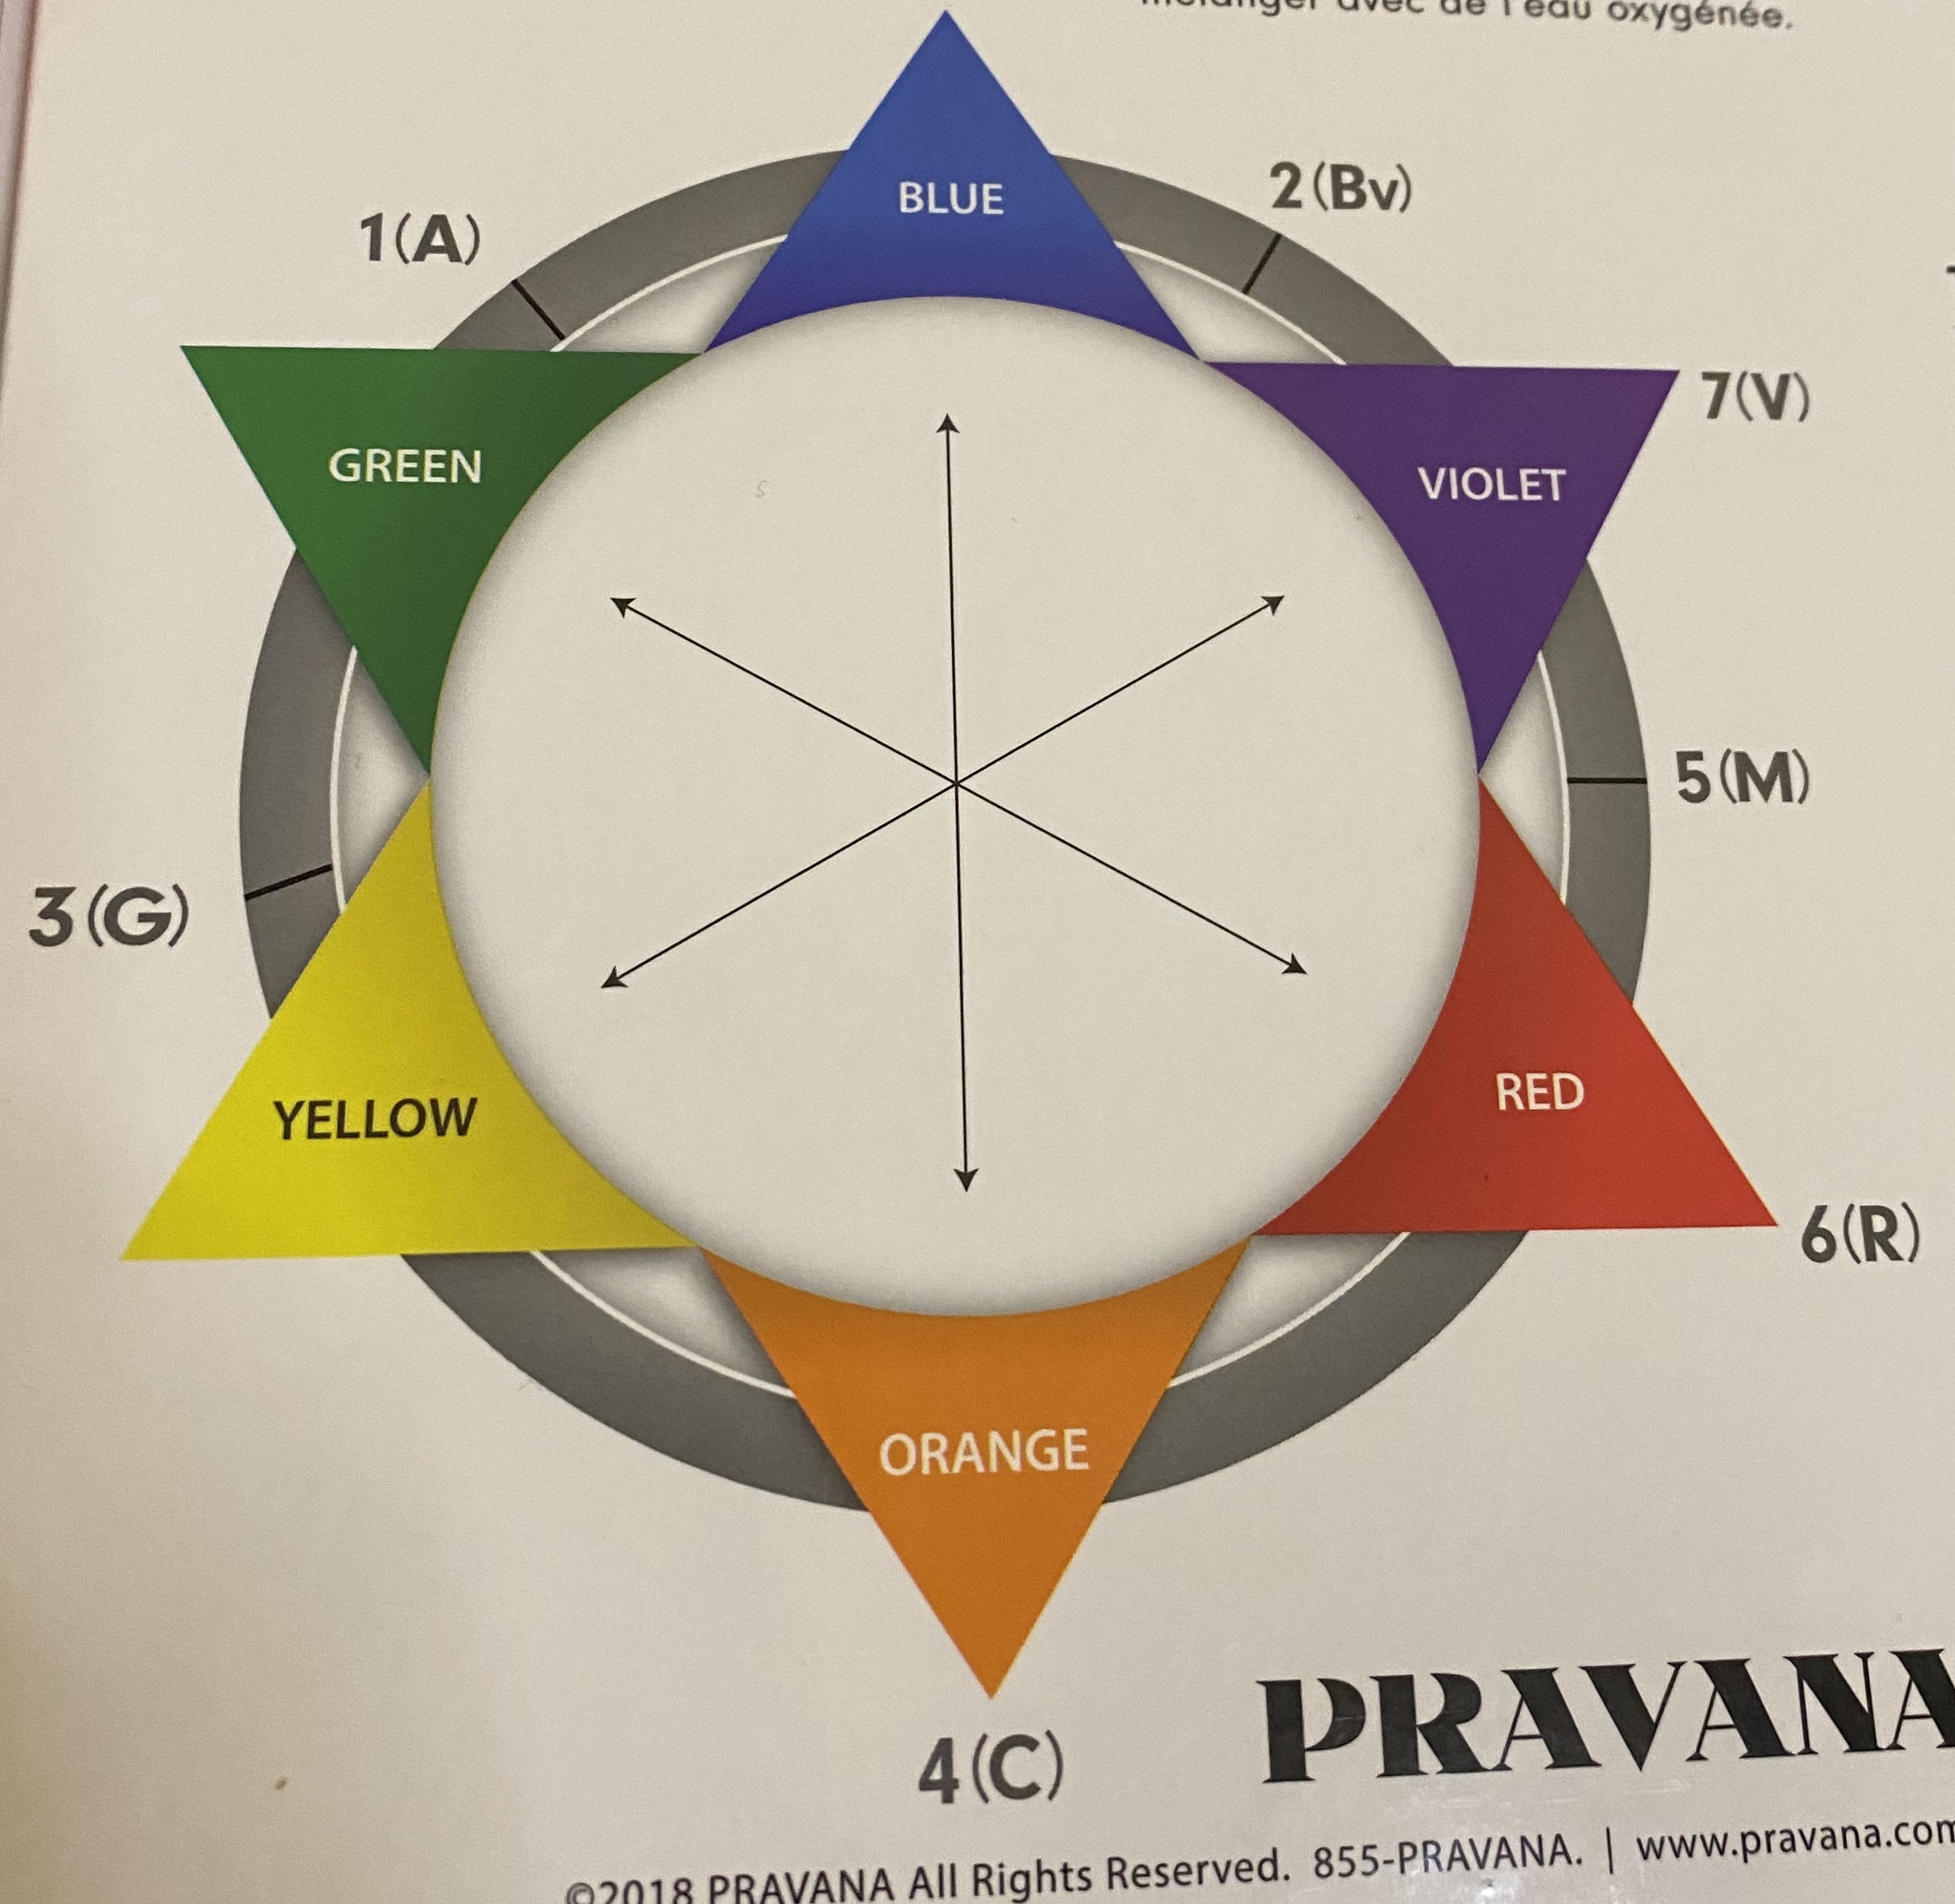
Is there a tone we need to correct?: If the hair is currently warm and you want it to be neutral or cool, mix a shade with the neutralizing base (green, blue, etc) with your desired shade. Use the color wheel below to determine what neutralizing base you need to use.
Add either a 1/4, 1/2, or 3/4 ratio to your desired shade, depending on how strong the unwanted tone is. Perform a test strand to test different ratios.
Example: 1/2 Ash + 1/2 Natural to cancel out unwanted red, but a natural shade is desired.
If going 3+ levels darker, determine fill shade: The fill shade get’s mixed into the goal shade in a 1/4 (fill shade) + 3/4 (desired shade) ratio.
If the goal is level 7: The filler shade should be level 8 with 70% gold and 30% copper (8GC).
If the hair is damaged or porous: The filler shade should be level 8 with 70% copper and 30% gold (8CG).
If the hair is level 6 or below: The filler shade should be level 6 with 70% gold and 30% copper (6GC).
Example: If you’re a level 10 going to a level 5, your formula will be 1/4 6GC + 3/4 level 5 of the desired tone.
Gray hair percentage for full coverage: If you have gray that needs to be covered, you’ll need to ensure you add a neutral or gold shade to your formula if the desired outcome is not already one of those tones. This ensures coverage and avoids the roots from taking flourescent.
If 25% gray: 1/4 of the formula should be neutral or gold.
If 50% gray: 1/2 of the formula should be neutral or gold.
If 75% or more gray: 3/4 of the formula should be neutral or gold.
Example: if you are 100% gray but want a red shade, your formula would be 1/4 Red + 3/4 Gold.
If none of the above: Select your desired level and shade from the swatch chart of the line you’re using.
The colors across from each other neutralize the other out.
This generic chart shows the base of each shade at the bottom. If you know what color line you want to use, look at their chart online for a better selection.
When darkening over level 10, healthy hair, the result will often appear sheer and cool. And while filling hair will help this, it’s not uncommon for the hair to still appear sheer and fade quickly for several dye sessions afterwards. Even if you don’t need to fill the hair, you may still want to add a little more warmth to the formula to avoid it looking dull. Understand that similarly to lightening the hair, it can take several sessions for darker color to hold well.
If the hair is porous or very damaged, it may suck up cool colors very dark initially (this can happen to the ends only if they are particularly damaged). In these cases you may need to use a lighter or warmer formula on extremely damaged hair so it doesn’t take super dark. Perform a test strand first to find out if this will happen to your hair if you have damage.
There are many formula options that will work. The beauty of hair color is that there are unlimited formulas to try. I often mix multiple different tones together to fine tune the color. I suggest performing test strands to determine what you like best.
Example:
Starting Hair
Goal Image #1
Goal Image #2 (same hair, different lighting)
Lower commitment: May want to highlight in the future, so will only darken 2 levels to avoid filling.
No unwanted tones that need correcting, no filler needed, and less than 25% gray.
Roots: Will use level 7 with cool/neutral tones
Mids: Will be the meeting point of the root color blended into the ends color.
Ends: Will use a level 8 with cool/neutral tones, with some warmth added to avoid looking too dull since the hair is a level 10 and healthy.
I used level 7 beige (cool neutral) + 7 Pearl (cool neutral) on the roots and pulled it over the line of demarcation.
Then I used [20 grams] level 7 Pearl (cool neutral) + [15 grams] 9 Platinum Sand (neutral) + [10 grams] 9 Platinum Lilac (cool neutral) + [10 grams] 9 Platinum Spice (warm) over the mids and ends.
Always Do a Strand Test Before Dyeing Your Hair Darker
Even a perfectly formulated color can produce unexpected results depending on your hair’s individual history and the brand used. A strand test is the only guaranteed way to confirm your formula before applying it to your entire head!
To perform a strand test, mix your formula exactly as you plan to use it and apply it to a small, hidden section of hair in the back. Process it for the full time, then rinse, dry, and evaluate the result.
Pay attention to more than just the final color! Ask yourself:
Did the hair deposit to the shade you expected?
Is there unwanted warmth that needs additional correction?
Is the tone too cool, too warm, or just right?
Does the hair still feel healthy, or has it become over-processed?
Do you need to adjust your formula, processing time, or developer strength before coloring the rest of your hair?
Hair dye formulation is part science and part interpretation. A strand test allows you to fine-tune your formula based on how your hair responds, giving you the best chance of achieving predictable, even results.
Recap: How To Formulate Hair Dye To Go Darker
Hair color formulation can seem overwhelming at first, but going darker becomes much easier when you break the process down into a few simple decisions. Start by identifying your current hair color, determine your goal, choose the right type of dye and developer, and then formulate for any gray coverage, unwanted tones, or filling that may be needed.
Remember that there is rarely only one “correct” formula. Professional stylists often create multiple formulas that could achieve a similar result. The goal is not to memorize every shade combination, but to understand why certain colors, developers, and filler shades are used so you can make informed decisions based on your own hair.
If you’re unsure, always perform a strand test before applying color to your entire head. A strand test can show how your hair responds to the formula, help you fine-tune the tone, and prevent disastrous mistakes.
Now that you understand how to choose the right hair dye when going darker, you’ll be able to formulate with much more confidence going forward, whether you’re covering gray, neutralizing warmth, returning to your natural color, or creating a deeper shade.
While I can’t cover every exact situation in this post, leave me any questions you may have on how to make a hair dye formula for going darker. And be sure to subscribe if you want to make everyday a good hair day!
From hairstylist and studio salon owner of 10+ years to haircare content creator. My goal is to use all of my experience and knowledge from years behind the chair to help you make everyday a good hair day!