

How To Do A Blended Money Piece: Face-Framing Highlights Tutorial
Adding a blended money piece is a great way to brighten the front of your hair while still keeping your color relatively low-maintenance. It can help your blonde look intentional without having to fully re-highlight your entire head. So in this post, I’ll show you how to do a blended money piece at home step by step, as well as answer some common questions on face framing highlights.

I’m currently in the process of growing out my all-over blonde hair. And three months ago, I did an airtouch highlighting technique to begin the blend into my darker natural hair color. But now that it’s grown out a bit, I want to brighten things back up around my face with a blended money piece so the growout continues to look intentional rather than unkempt.
What is a money piece?
A money piece is a face-framing highlight look where the front hairline is predominantly brighter and blonder than the rest of the hair. It brightens the hairline and draws attention around the face.
Money pieces can be bold and obvious or soft and subtle, depending on the placement and toning. As a hairstylist who specializes in lived-in and low-maintenance hair coloring techniques, I highly prefer the blended version, not a harsh stripe.

Money piece placement diagram
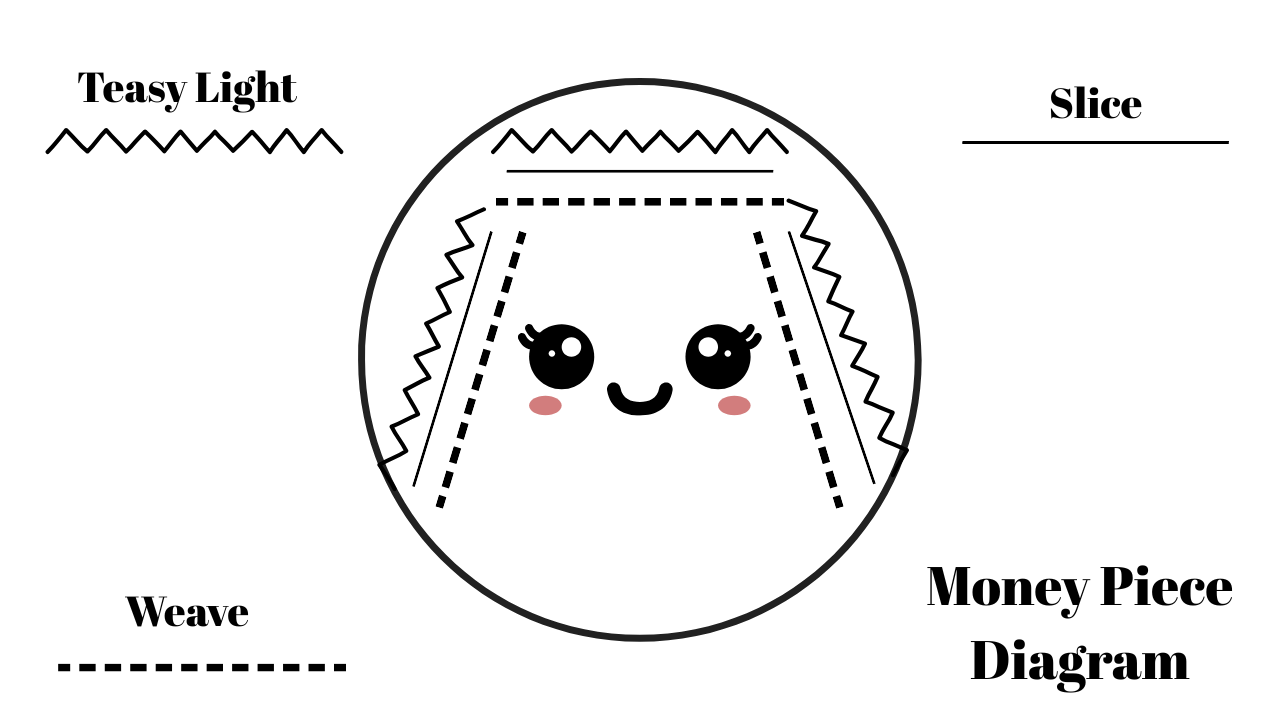
In the image above, you can see my preferred money piece placement that I use on the majority of clients.
The weave in the front allows you to leave out the baby hairs around the face, which results in a more natural look. The slice in the center maintains the brightness, which is how this stands out from the highlights throughout the rest of the hair. And the teasylight diffuses the color at the roots for the third foil, which is what makes it blend.
This pattern can, however, be adjusted based on the end goal. You can do all weaves, all teasylights, add more foils, or even paint the lightener right on the scalp for the chunkiest look.
But overall, using this placement diagram will land you with a bright, yet blended face-framing highlight.
Blended Money Piece Hair Tutorial
To learn how to do this on your own, watch my YouTube tutorial below. I cover what products I used, the sectioning, placement, and step-by-step application tips. I also demonstrate how to blend the money piece if it comes out too bold by utilizing a root smudge.
What products to use for a blended money piece
***Since I’m sharing the hair products that I love to use with you guys, my posts may include affiliate links to these products. If you take action and purchase a product through clicking one of my links, I’ll make some commission money from it at no extra cost to you. This enables me to be able to continue giving you awesome hair tips, so thanks! ***
- Pravana Ultra Lightener
- 20 Volume Developer
- Pravana Beige Demi Permanent (level 7)
- Wella Colorcharm Demi Permanent (for other levels/shades)
- 5 Volume Developer
- Highlighting Comb
- Hair Color Bowls
- Hair Color Brushes
- Highlighting Foils
- Color Scale
How to blend a bold money piece
A money piece can be blended in two different ways:
The first is the initial placement and technique of the highlights. Weaving and especially teasing the sections before applying the lightener will diffuse harsh lines and blend the blonde into the natural color. This is the first step to take if you want to ensure a low-maintenance grow-out.
Aside from watching the tutorial above, I demonstrate how to do teasy lights in this tutorial here.
The second method is to use a root smudge. This is ideal if you already have your highlights finished and they came out bolder than you’d like. It’s also ideal for those who are bright blonde and need a relatively bold money piece in order for it to contrast with the rest of the hair. The root smudge will soften the money piece at the root for a more blended final look.
Aside from watching the tutorial above, you can learn how to formulate a root smudge based on your natural hair color in this tutorial here.
How to do a money piece on dark hair
While it may feel daunting to attempt a money piece on dark hair, in reality, it’s not much different. The only difference is that you will likely want to keep it more subtle than bold so that it doesn’t become high-maintenance.
Based on the tutorial above, the only difference I would make for someone with dark hair is starting the teasy light lower on the strand than I did (see video tutorial). I had to take mine very high because the rest of my blonde was pretty high up, and I needed to create the contrast. But if you have dark hair and not many highlights, you’ll already have contrast. So ideally, you’ll want to keep the teasy light a little lower for a more subtle and blended look.
Alternatively, you can do two teasy lights in a row instead of a slice in the middle. You can also do only 2 rows of foils instead of 3. There really are many different ways you can customize this. There isn’t one exact placement rule; adjust based on contrast, maintenance goals, and existing blonde. If it comes out too bold, follow with a root smudge.
And for the root smudge, just make sure you use a demi-permanent color that is 1 level lighter than your natural hair color. So if your natural color is a 4, you’ll want to apply your root smudge in a 5. This will marry the colors together, creating a blended money piece on dark hair.
Money piece FAQs
Below are some of the most commonly asked questions on face framing highlights and money pieces.
What developer volume should I use for a blended money piece?
Your developer volume will be specific to you. In my tutorial, I used 20 volume, but I know my hair, I work fast, and I’m a professional. If you have fine hair, it’s lighter than a level 6, or you are likely going to work slow, you may want to use 10 or even 5 volume. If you need to, you can let the highlights process for longer, or even reapply the lightener after 30 minutes and that will help to bump it up.
However even if your color is darker than mine, I still would not go over 20 volume. Check out this guide for determining what developer volume to use with bleach for more info.
Should I tone my money piece?
In my tutorial above, the only toning I did was my root smudge. That’s because the rest of my hair didn’t have a toner on it, and I didn’t want to change that. However, if you have a toner on the rest of your hair (if it’s blonde), you may want to apply that same toner to the money piece below the root smudge.
Additionally, if you just want to customize the tone of the money piece, you may choose to tone it anyway, or to correct any brassiness from the lifting process. See my guide on toning for tips on formulating your toner.
Is a money piece high maintenance?
A chunkier money piece will always be more high-maintenance than a subtle one. As we mentioned earlier, you can make a money piece more low-maintenance by utilizing teasy lights and/or a root smudge to marry it into the natural color.
But if you don’t do either and opt for an on-the-scalp money piece application, that generally will be much more high-maintenance than the technique I used in this tutorial.
How often do you need to refresh a money piece?
Even when utilizing teasy lights and a root smudge, your money piece likely will need some maintenance sooner than the rest of your hair will. This is because it’s around your face and it’s generally thicker than a traditional highlight.
On average, you’ll need to do some sort of maintenance to a money piece every 4-8 weeks. 12 weeks is pushing it a little, but it isn’t unheard of either.
Conclusion
A blended money piece is a great way to brighten the front of your hair without fully re-highlighting everything. If your goal is to keep your blonde looking intentional while still staying relatively low-maintenance, this technique creates a softer face-framing highlight that grows out much more seamlessly than a bold, chunky money piece.
In my case, this was the perfect way to refresh my color after a few months of grow-out without undoing the lived-in effect I wanted from my previous highlights. If you want to see exactly how I sectioned, teased, and applied my foils, watch the full video tutorial above. And if you need more help customizing your final result, check out my guides on teasy lights, root smudges, toning, and choosing the right developer volume.
Leave me any questions you may have on money pieces in the comments below. And be sure to subscribe if you want to make every day a good hair day!
share item
