

How to Blend Regrowth into Blonde Hair With DIY Airtouch Highlights
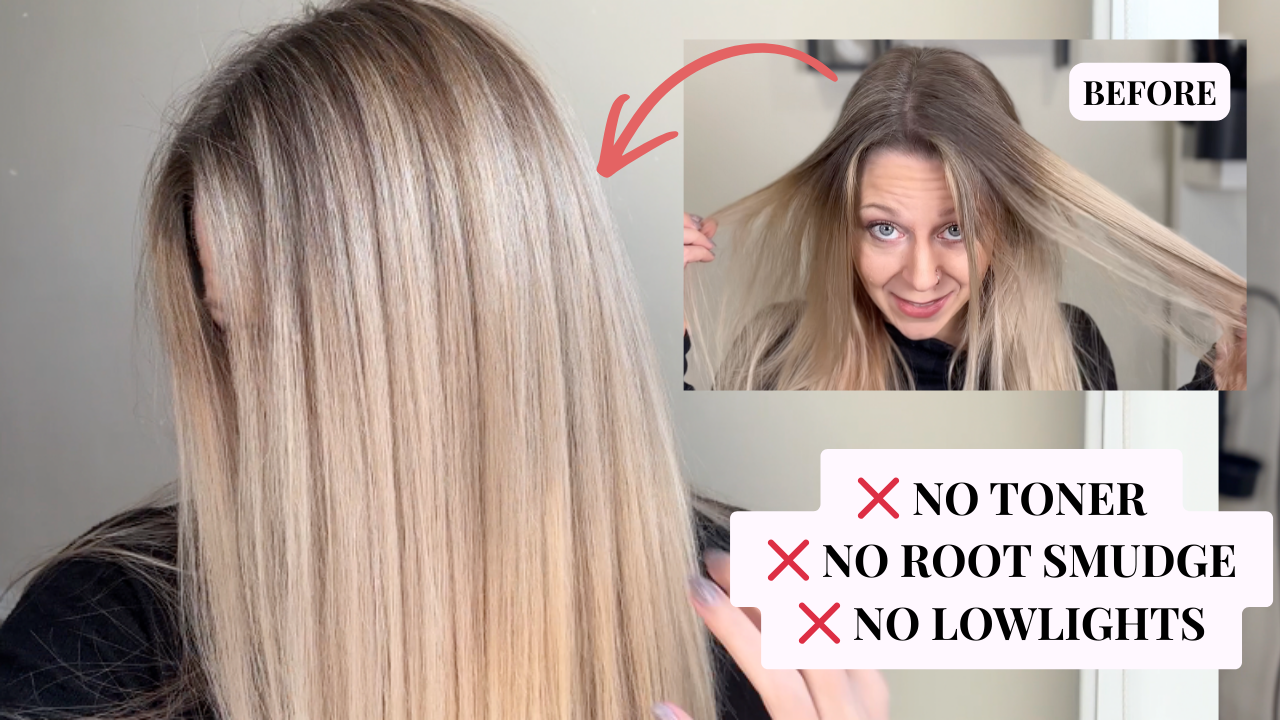
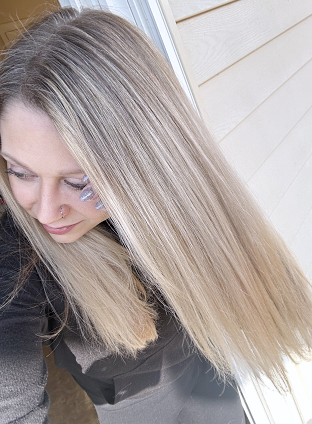
If you have a harsh line where your blonde meets your regrowth, I have a solution for you! In this tutorial, I’m using Airtouch highlights to blend regrowth into blonde hair for a seamless, natural grow-out and subtle gray blending. Because of this technique’s softness, I didn’t need to use a toner, root shadow, or lowlights, so you can see just how much blending the Airtouch technique can do on its own!
The goal for my hair is to grow my natural color out completely. But even if your goal isn’t to grow your natural color out, you can still use Airtouch highlights to maintain a lived-in, low-maintenance look. This technique is also ideal for gray blending since the highlights are fine and natural-looking.
What are Airtouch highlights?
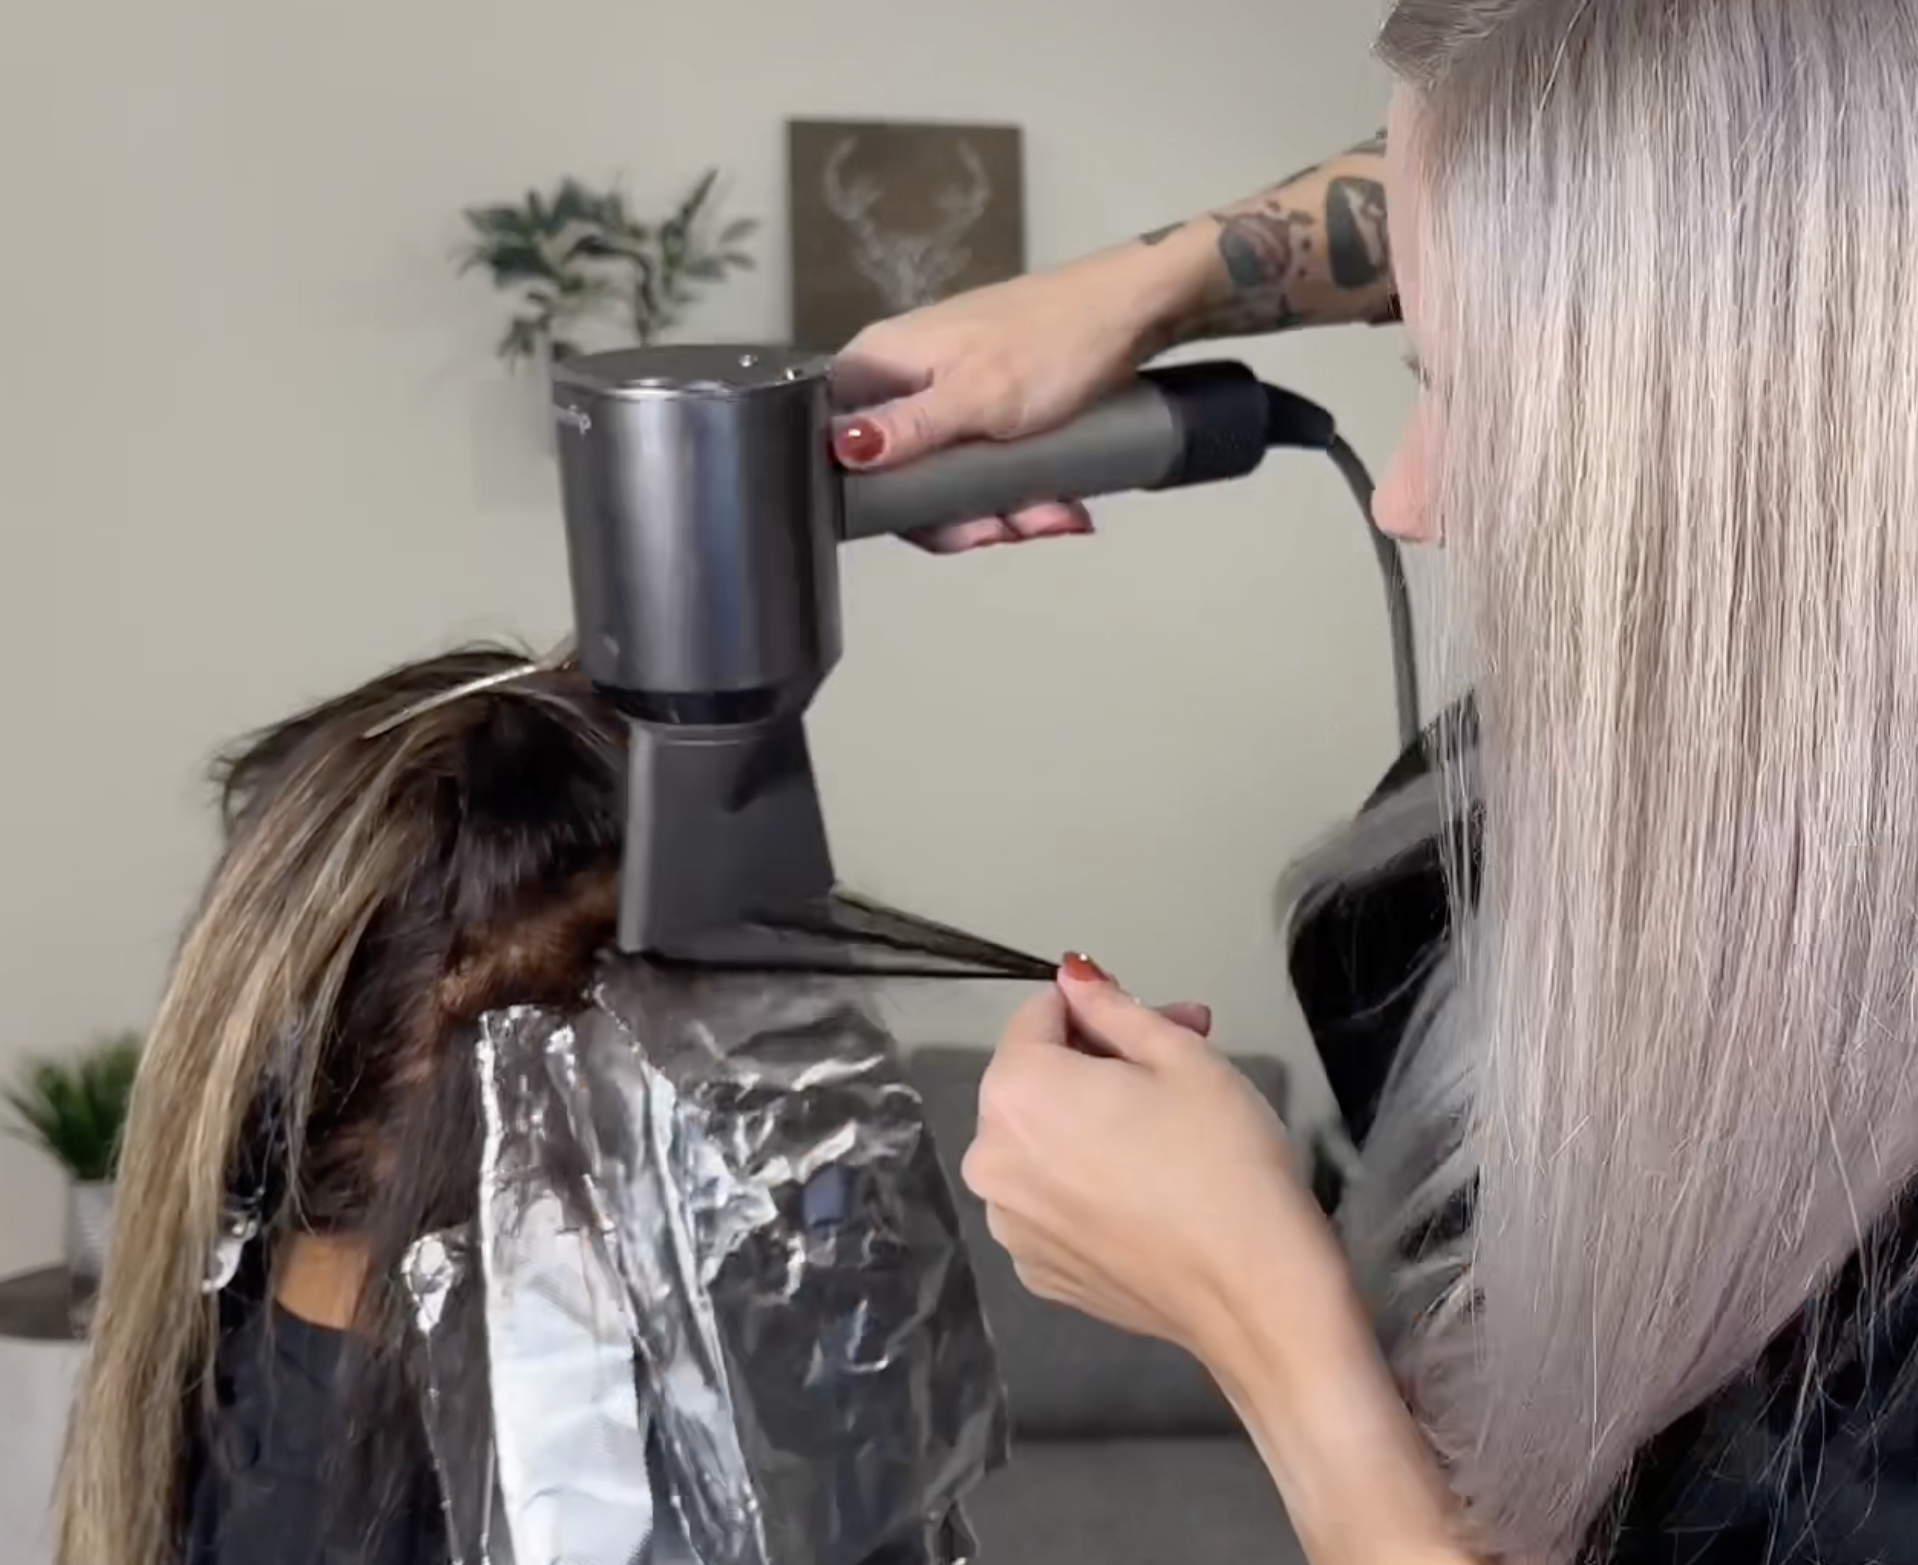
The term “airtouch” comes from the fact that a hair dryer is used to weave out the hair that’s not being highlighted. This is instead of using a rat tail comb like you would in a traditional highlight. It works by holding the section of hair about 3/4 of the way towards the ends, and blowing out all of the shorter hairs.
The hairs that get blown out are either damaged or new hair growth. It’s safer to only highlight the longer, healthier hairs. This also creates an incredibly seamless blend between the highlighted hair and non-highlighted hair.
Airtouch highlights are similar to teasy-lights. In teasy-lights, you backcomb the shorter hairs upward, but it still doesn’t look as natural as Airtouch because those shorter pieces aren’t fully left out of the foil. Teasy lights can also be difficult to comb out of tangle-prone hair, and they usually live further away from the scalp than airtouch. If desired, you can apply airtouch highlights right up to the scalp (like I do in this tutorial).
And no matter how good you are at weaving, Airtouch highlights will always look more natural and seamless than traditional highlights, which can appear streaky. Airtouch is the ideal highlighting technique for gray-blending because it resembles the fineness of how gray hair naturally grows in.
DIY Airtouch highlights tutorial (watch the video)
After reading through the FAQs and common mistakes below, watch my YouTube video for a full breakdown of how to do this technique on your own hair.
Disclaimer: I’m a licensed cosmetologist with 16+ years of experience. This content is for educational and entertainment purposes only and isn’t a substitute for professional services. Hair lightening can cause damage or breakage. If you’re unsure, please consult a licensed professional. You are responsible for any results from attempting techniques shown in this video/post.
Products + tools for highlights at home
***Since I’m sharing the products that I love to use with you guys, this page includes affiliate links to these products. If you take action and purchase a product through clicking one of my links, I’ll make some commission money from it at no extra cost to you. This enables me to be able to continue giving you awesome hair tips, so thanks! ***
- COLORCHARM Powder Hair Lightener
- 20 Volume Developer
- 10 Volume Developer
- Pravana Pure Light Power Lightener (the bleach I used, but is more expensive and not on Amazon):
- Foils
- Highlighting Combs
- Alligator Hair Clips
- Olaplex Purple Shampoo & Conditioner
- Olaplex Bonding Treatment
- Dyson Hair Dryer
DIY Airtouch Highlights Troubleshooting
Some relatively common issues you may face are:
Bleach bleed marks near the scalp (how to avoid & fix)
One of the most common mistakes made when doing Airtouch Highlights is accidentally creating a bleed mark. A bleed mark happens when bleach gets on a piece of hair that it shouldn’t, and a blotchy blonde spot forms near the scalp.
This can happen when you apply bleach too close to the edge of the foil. Since bleach swells as it oxidizes, it can climb over the foil edge and get on the hair that’s not supposed to be touched.
It can also happen when you don’t get the blown hairs out of the way well enough, and they creep their way into the foil. To avoid this, you can either clip the hairs out of the way after blowing them or backcomb the hair up above the foil so that it’s secure and out of the way.
Solution: If you do accidentally get a bleed mark, don’t fret. You can blend/correct this by applying a root smudge at the end. How To Formulate A Root Smudge Step-By-Step
Over-blowing vs under-blowing (line of demarcation not blended / too blonde)
If you blow out too much hair, then your line of demarcation won’t be blended enough, as the highlights will be too fine. Typically, the less root you have, the more hair you should highlight. As your natural color grows out more, you can begin to leave more hair out of the foils.
Similarly, you can overdo the highlights and become too blonde if you don’t blow out enough hair. Obviously, this is dependent on your goals.
The lower you hold the hair when hitting it with air, the less hair that will be blown out, and the blonder the hair will be. The higher you hold the hair, the more hair that will be blown out, which means less hair is being highlighted.
Solution: If you have minimal roots with a very solid line of demarcation, do not drop down a section of hair in between highlights. You will also want to hold the hair 1/2 way to 3/4 down the hair strand when you hit it with air, rather than on the very ends. And if your goal is to grow your natural hair color out, shoot for leaving more hair out. I recommend dropping a slice of hair between airtouch highlights (like I did in the tutorial above), and holding the hair at least 3/4 of the way to the ends of the hair when hitting it with air.
FAQ: Blend regrowth into blonde hair with DIY Airtouch highlights
If you have any other questions not listed here, be sure to leave them at the bottom of this post, and I will add them to the page!
How long do I process bleach highlights (and when do I rinse)?
When working with bleach, there is no universal process time like there is with traditional hair color. Your process time will depend on your hair texture, level, developer volume used, and what bleach was used. Thicker sections also process more slowly than thin sections.
For best results, I suggest pulling the foils when they look like the inside of a banana peel, or a pale yellow color. If they aren’t light enough after 30 minutes, you can apply more lightener (the same mixture and volume you used when highlighting) and keep checking after 15 minutes.
Can I highlight my own hair at home safely?
This is a question that I can’t fully answer, because some of you certainly can, while others may not be able to. I always suggest visiting a professional before attempting to dye (especially bleach) your hair yourself because I hate to see anyone ruin their hair. But I know that many of you are going to do it anyway, which is why I make this content.
If your hair is damaged or you have a crazy corrective color service that is needed, I highly advise seeing a professional. But if your hair is healthy and you follow my directions, then you should be capable of doing it yourself.
If you have the time, practice the technique using conditioner instead of bleach. This way, you’ll know better if you think you can do it.
Do I need toner after highlighting?
If you follow what I do in the video and you get your highlights to a pale yellow that looks like the inside of a banana peel when you check the foil, then you should not need to use a toner unless you have a very specific shade you are going for.
But if you are lifting through darker natural hair than mine, or previously dyed permanent color, then you may need to use a toner to further correct any brassiness. See this post here for tips on how to properly tone the hair based on your situation.
Do I need a root smudge/root shadow/root melt for root blending?
Unless you wind up with bleed marks, you shouldn’t need to use a root shadow for this highlighting technique. That’s one reason why I love it so much! That said, if you took too large of sections to highlight (larger than 1/4″, or 1/8″ if you have thick hair), your highlights may not blend quite as seamlessly as mine did in the tutorial. This can be blended with a root smudge.
What if my hair is damaged or porous (bleach breakage risk)?
If your hair is damaged already, then I DO NOT suggest doing this technique, or any highlighting service for that matter. If your goal is to grow out your blonde hair, see this post here for safer alternatives.
What if my natural hair color is much darker?
If your starting color is darker than mine is in the tutorial (I am a level 6-7), then you may need to reapply the lightener a second time prior to pulling the foils to get the color to a pale yellow. I still suggest using only 20 volume developer. Good saturation is key to good lift, so make sure you saturate the hair in the foils well!
You can also put a plastic cap over the foils as they process to keep heat in. This will speed it up a bit.
Will airtouch highlights help blend gray hair?
Absolutely! This is the number 1 technique that I suggest for gray blending services.
Related tutorials
- What Are Air Touch Highlights (And How To Do Them)
- What Highlighting Technique Is Best For You?
- How To Formulate A Root Smudge Step-By-Step
- How To Decide What Developer To Use With Bleach
- How To PROPERLY Tone Hair (5 Rules To Follow)
- The 4 Best Ways To Grow Out Old Hair Color
Conclusion
If you’re trying to blend regrowth into blonde hair without committing to an all-over color, DIY Airtouch highlights are one of my favorite techniques. They allow you to soften the harsh line and keep your grow-out looking natural without the need for a toner, root shadow, or lowlights to make it look blended. This is exactly why Airtouch is such a good option for a low-maintenance blonde and subtle gray blending.
Lightening your hair at home does come with risk, especially if your hair is already fragile, previously colored, or you’re working with a darker starting level. If you’re unsure, a licensed professional is always the safest route. But if you do decide to try Airtouch highlights at home, take your time, follow the tutorial, and use the troubleshooting tips above to avoid common issues like bleed marks.
If you haven’t watched the full DIY Airtouch highlights tutorial, be sure to check out the video above for the complete step-by-step.
Have a question I didn’t cover? Drop it in the comments! And subscribe below to make every day a good hair day!
share item
