

How To Formulate A Root Smudge Step-By-Step
If you’re tired of the harsh line that shows up too soon between blonding services or highlights — then a root smudge might just be your new best friend. This technique is a game-changer for blending your natural color into highlights or blonde. It softens that regrowth line, and gives your hair a more lived-in, seamless look. In this post, I’ll walk you through exactly how to formulate a root smudge step-by-step. I’ll break down the color types, developer, and shade selection to take the guessing game out of the equation.
Some of my proudest moments as a hairstylist have come from my blonde clients that tell me they’re still getting compliments on their hair, nearly 6 months after their appointment! And while I’d love to take all of the credit, it’s the technique that enables me to create these gorgeous low maintenance blondes.
***Since I’m sharing the products that I love to use with you guys, this page includes affiliate links to these products. If you take action and purchase a product through clicking one of my links, I’ll make some commission money from it at no extra cost to you. This enables me to be able to continue giving you awesome hair tips, so thanks! ***
What is a root smudge?
A root smudge (aka root shadow) is a color that is applied to the root of your hair to blend your natural color into your blonde or highlighted hair. This marries the colors together and creates a seamless line, allowing for a better growout. This turns high-maintenance colors to low-maintenance, and extends the time between blonding services.
This is also ideal when growing your blonde completely out. It softens the line and makes the transition look much more natural.
What type of color should be used for a root smudge?
Personally, I prefer using Pravana hair color. I’ve used this line the majority of my professional career, and it’s what I’ve grown to know and love. That being said, they make it harder to find without having a cosmetology license. You can sometimes find it on Amazon from third party sellers, or by Googling the specific color you want. You can often find various websites with it avaliable.
Realistically, the brand of color used is completely up to you and a personal preference. But the type of color you use is actually extremely important in how your results will come out.
Below, I’ll go over what situations when you may want to use semi-permanent color, demi-permanent color, and why you may want to avoid using permanent color altogether.
If you aren’t sure what the differences are between types of color, it may be helpful to read through this blog post first.
Why you may want to use semi-permanent
In a previous tutorial, I performed a root shadow on myself using a semi-permanent color depositing conditioner. I did this because I lighten my hair using high lift hair color, and I didn’t want to hinder my ability to lighten it the next time I brought my blonde back up. Since I don’t use bleach, I need to make the lightening process as clean as possible.
Sometimes demi permanent can hinder your ability to lighten the hair in the future, especially if you’re using anything other than bleach (high lift). So if this is something you’re worried about, semi-permanent is your safest bet because it will fade completely out of your hair.
Another reason why you may want to use semi color over demi is if you’re worried about messing it up. If you aren’t sure about the color choice, your ability to apply the root shadow without any harsh lines, or are just indecisive, this is your safest option.
Semi Permanent Products:
- Brown Tahitian Pearl Conditioner – This is the darkest and coolest toned color. It is technically used to remove red tones from brown hair. That being said, if applied to very yellow hair it can turn the hair a greenish hue. So only use this if your hair is past a yellow stage or if your color is darker.
- Star Sapphire Conditioner – This is my general go-to choice as it replicates a natural brown color. It is relatively cool toned, but not so much as the Brown Tahitian Pearl and isn’t as likely to take on a greenish hue when applied to yellow tones.
- Cocoa Quarts Conditioner – This is the lightest color I would use when it comes to the conditioners, and it is best if your natural color is a level 7 or lighter. This will not turn the hair a greenish hue if yellow is present.
When to use demi permanent as a root smudge
Now this time around, I’m using a demi permanent for my root smudge. This is because I’ve decided to grow my blonde out again, and I want something that’s going to stick a little longer than a semi-permanent color will. This will allow me to blend the line between my natural color and my blonde.
So if you’re planning on growing your blonde out, or you’re looking for something with more longevity than a semi-permanent color will give, then a demi-permanent would be the perfect choice.
Why you should avoid permanent hair color
For the most part you should avoid using permanent color for your root smudge, and there are a few reasons for this. Permanent color could create the need for a future corrective color service especially if you plan on lightening your hair again in the future.
Once the root smudge grows down, you would have a band of your natural, a band of permanent color, and the previous blonde. When you go to lighten through all of this, you’ll have a line that’s difficult to lighten where the permanent color lives. This likely would appear as a brassy or orange band or stripe around your head.
The second reason is because permanent color shifts the natural pigment in your hair. This process exposes the underlining warm tones that all hair contains. So when the color begins to fade in a few washes, the shade will often appear warm or brassy.
This doesn’t happen with demi permanent color because it deposits only, and doesn’t begin to lift the hair. So when demi fades, it just goes back to the natural color underneath of it.
The only exception to this permanent color situation is if you use an extremely low volume of developer (5-6 volume) to make a demi-like color. This is actually what I do with Pravana color. Most permanent color won’t lighten the hair enough with this low of a developer to expose any underlying warmth, but some can so I would advise you to perform a test strand before attempting this with anything other than Pravana.
What developer volume should be used for a root smudge?
When applying a root smudge, you NEVER want to use any developer higher than 6 volume. 10 volume and above can blow the cuticle open, and you’ll run the risk of shifting the natural color–even if you use a demi-permanent.
My best recommendation is to use 5 or 6 volume developer. Most lines will recommend you to only use their developer with their hair color, but I’ve found that generic works just fine–sometimes even better. Some lines have a specific developer for their demi color. Pravana’s is called “Zero lift” because it won’t lighten the hair at all, but this is just a 6 volume developer.
For some more tips on choosing your developer strength, see this post here.
Should you do a root smudge on wet or dry hair?
Technically you can apply your root smudge on wet or dry hair, but I recommend wet. This is because the water will slightly dilute the color, making it a little more transluscent which is ideal for blending. It’s also much easier to marry when it’s wet, as you can marry it and create a really seamless blend.
I also go slightly darker for my own root smudge than my natural color (for better coverage and longevity) and having the water dilute the color offsets this so it won’t take too dark.
If you choose to apply it on dry hair you will get better coverage and slightly more longevity, just keep in mind that it won’t likely blend as well and you run the risk of harsher lines present in your end result.
How to formulate a root smudge
Now that we’ve got the basics out of the way, let’s formulate our color! We’ll do this in only 2 steps.
I also want to mention that there are typically many different variations of formulas that will work for one head of hair, so don’t get super attached or stressed about the shades you choose.
I actually recommend playing with a slightly different formula each time you do this to determine what you like the best!
Step 1: Find the natural level
The first step is to determine your natural level, and it’s actually a little more challenging than you might think. If you aren’t familiar with the level system, read through this post first to get a thorough understanding.
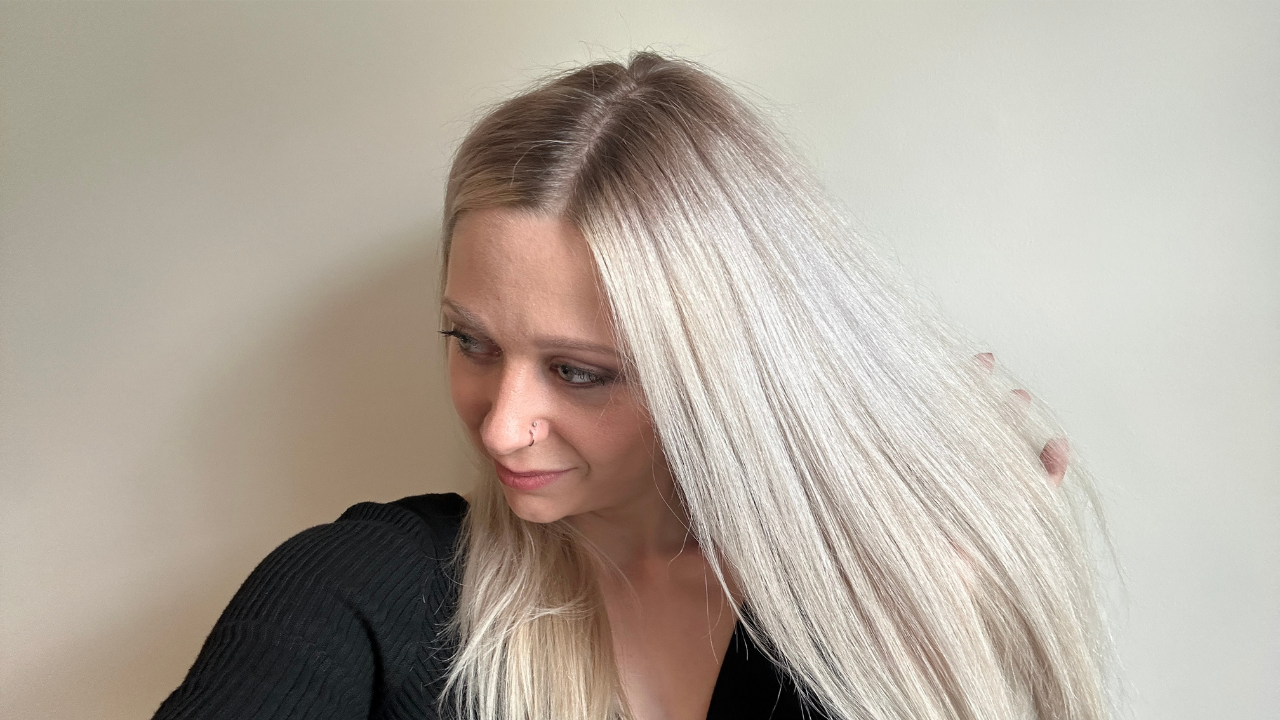
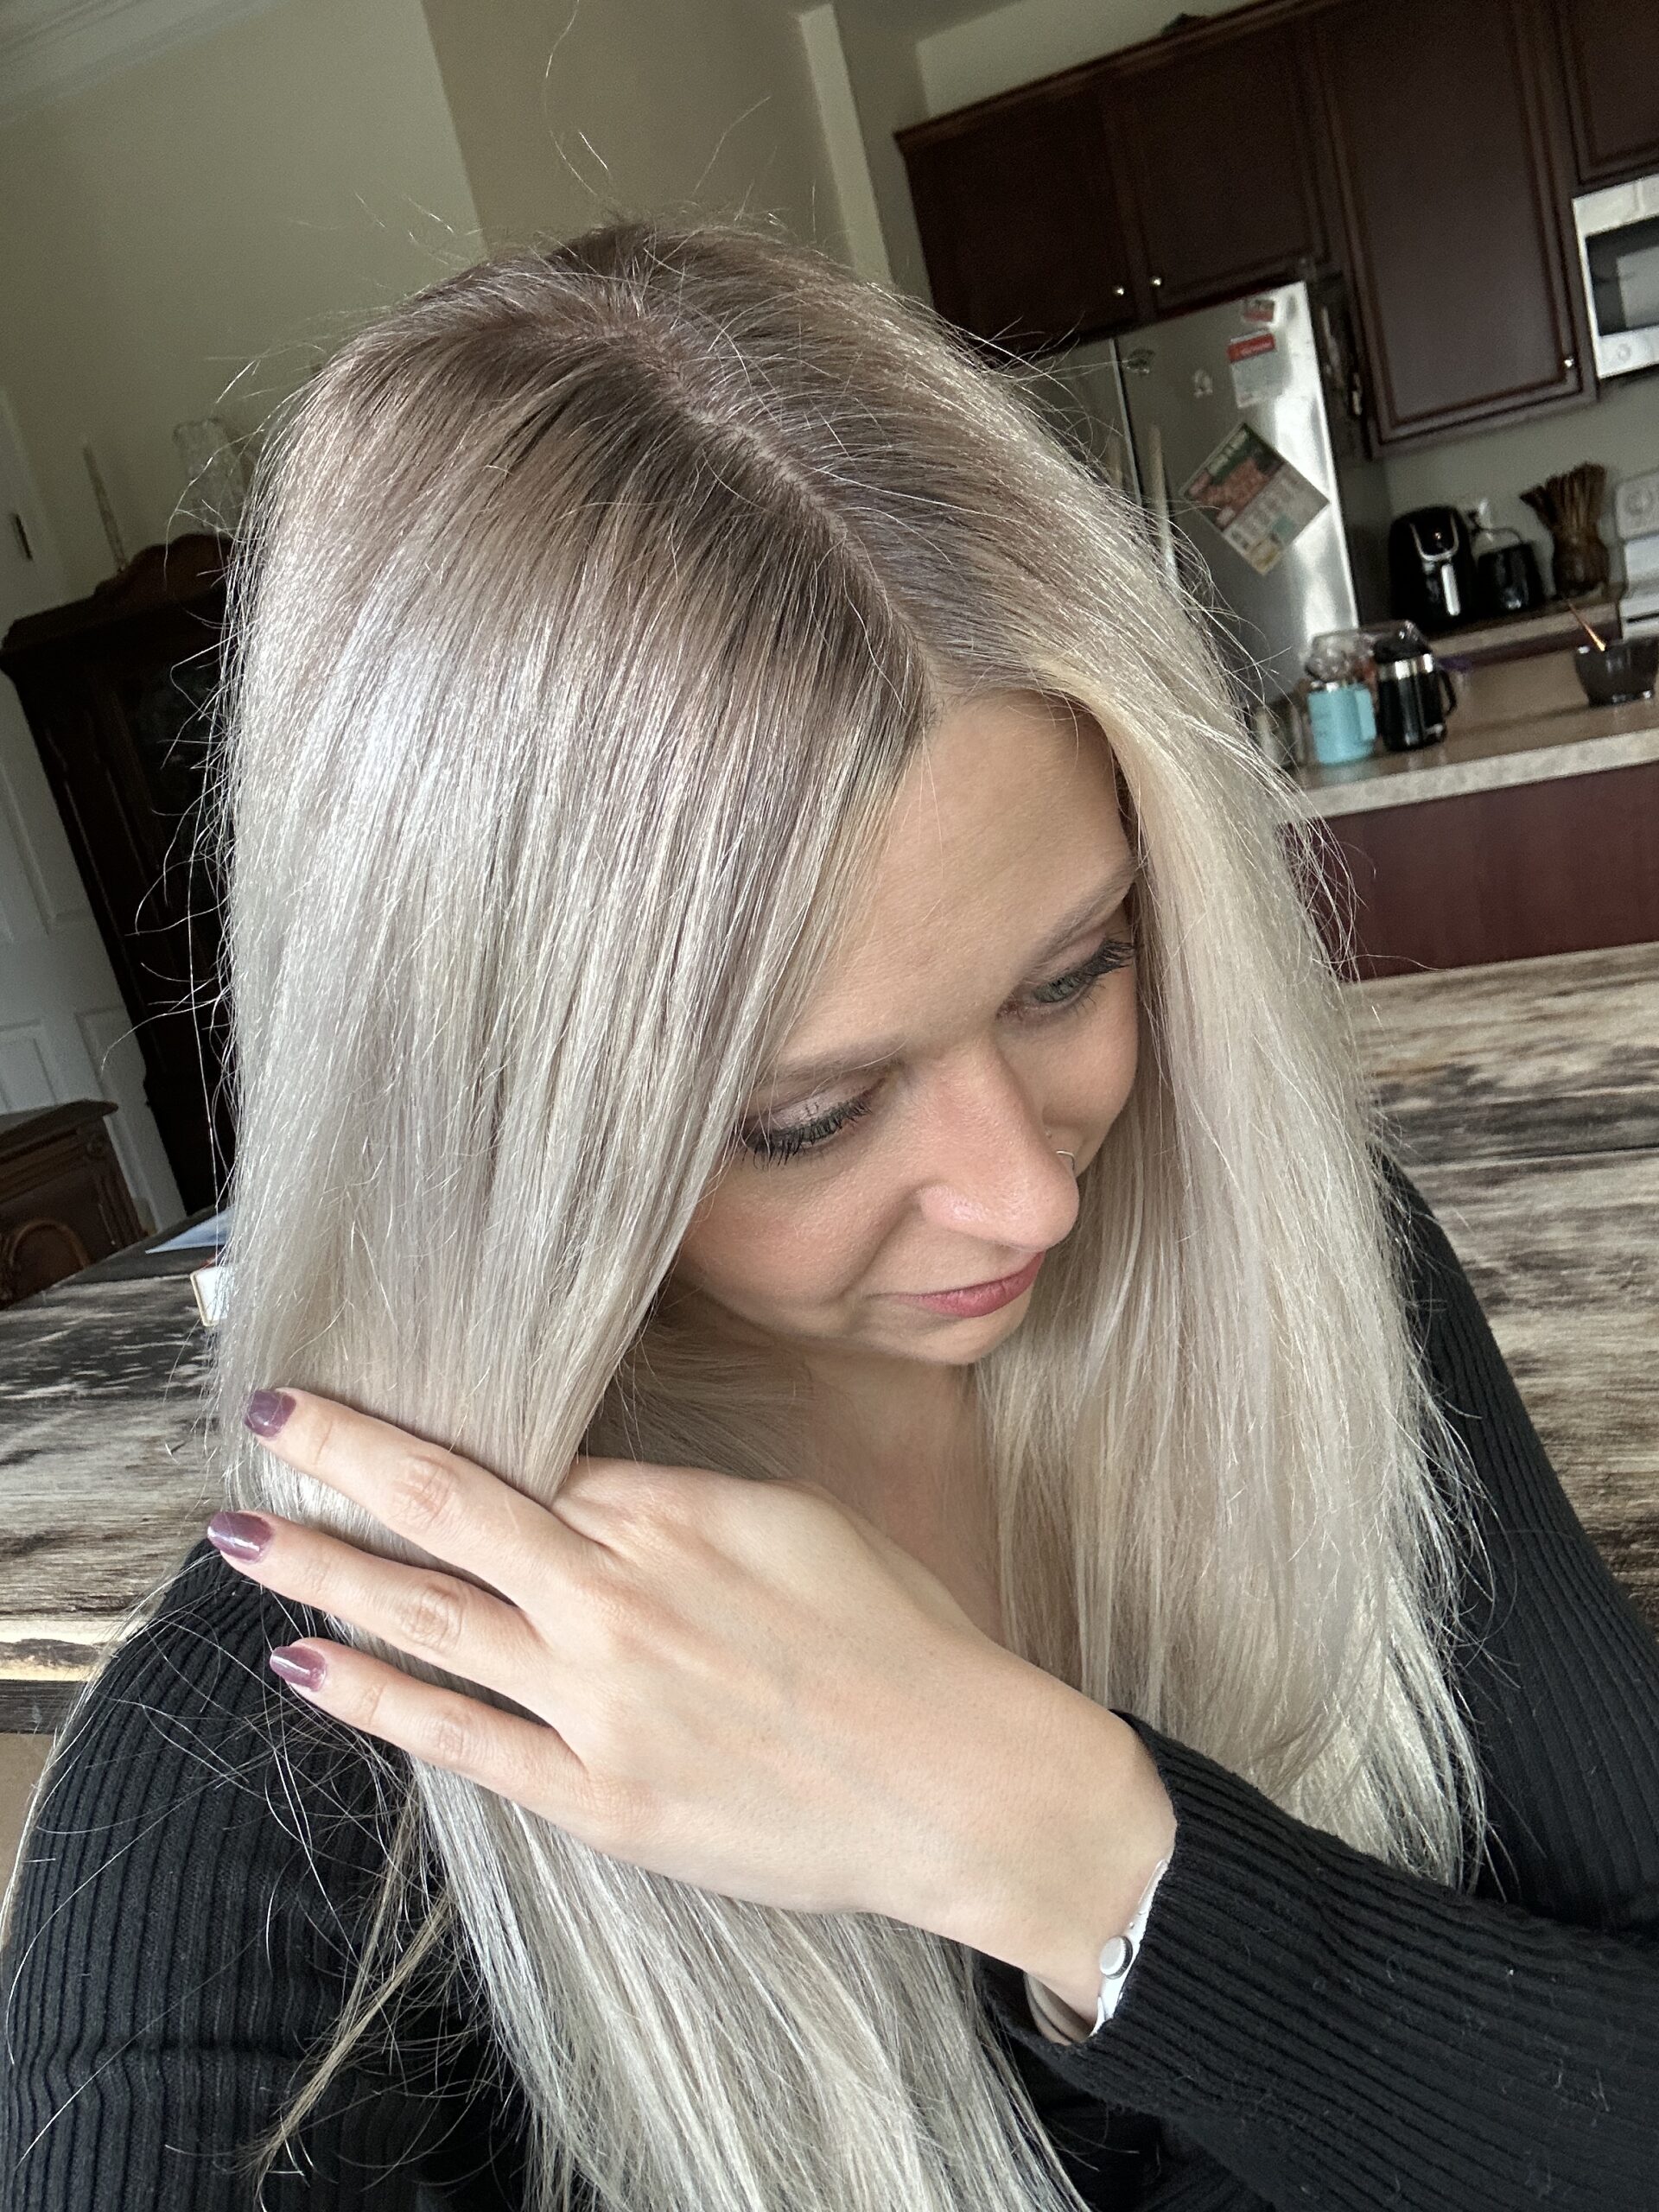
Now, I highly recommend taking a picture of your hair next to a swatch page and looking at it in black and white. This will help you see the levels without the shade confusing you. Ashier colors always appear darker, and warmer colors always appear lighter. Many people have ashier natural colors, and the swatch books often are warmer which can be incredibly decieving.
Just look at the difference between these two photos below! Looking at my natural color dead on, you would think it’s more like a 6, and the level 8 seems way too far off. But when we look at it in black and white, we can see that the 6 is too dark and the 8 isn’t as far off as it first appeared.
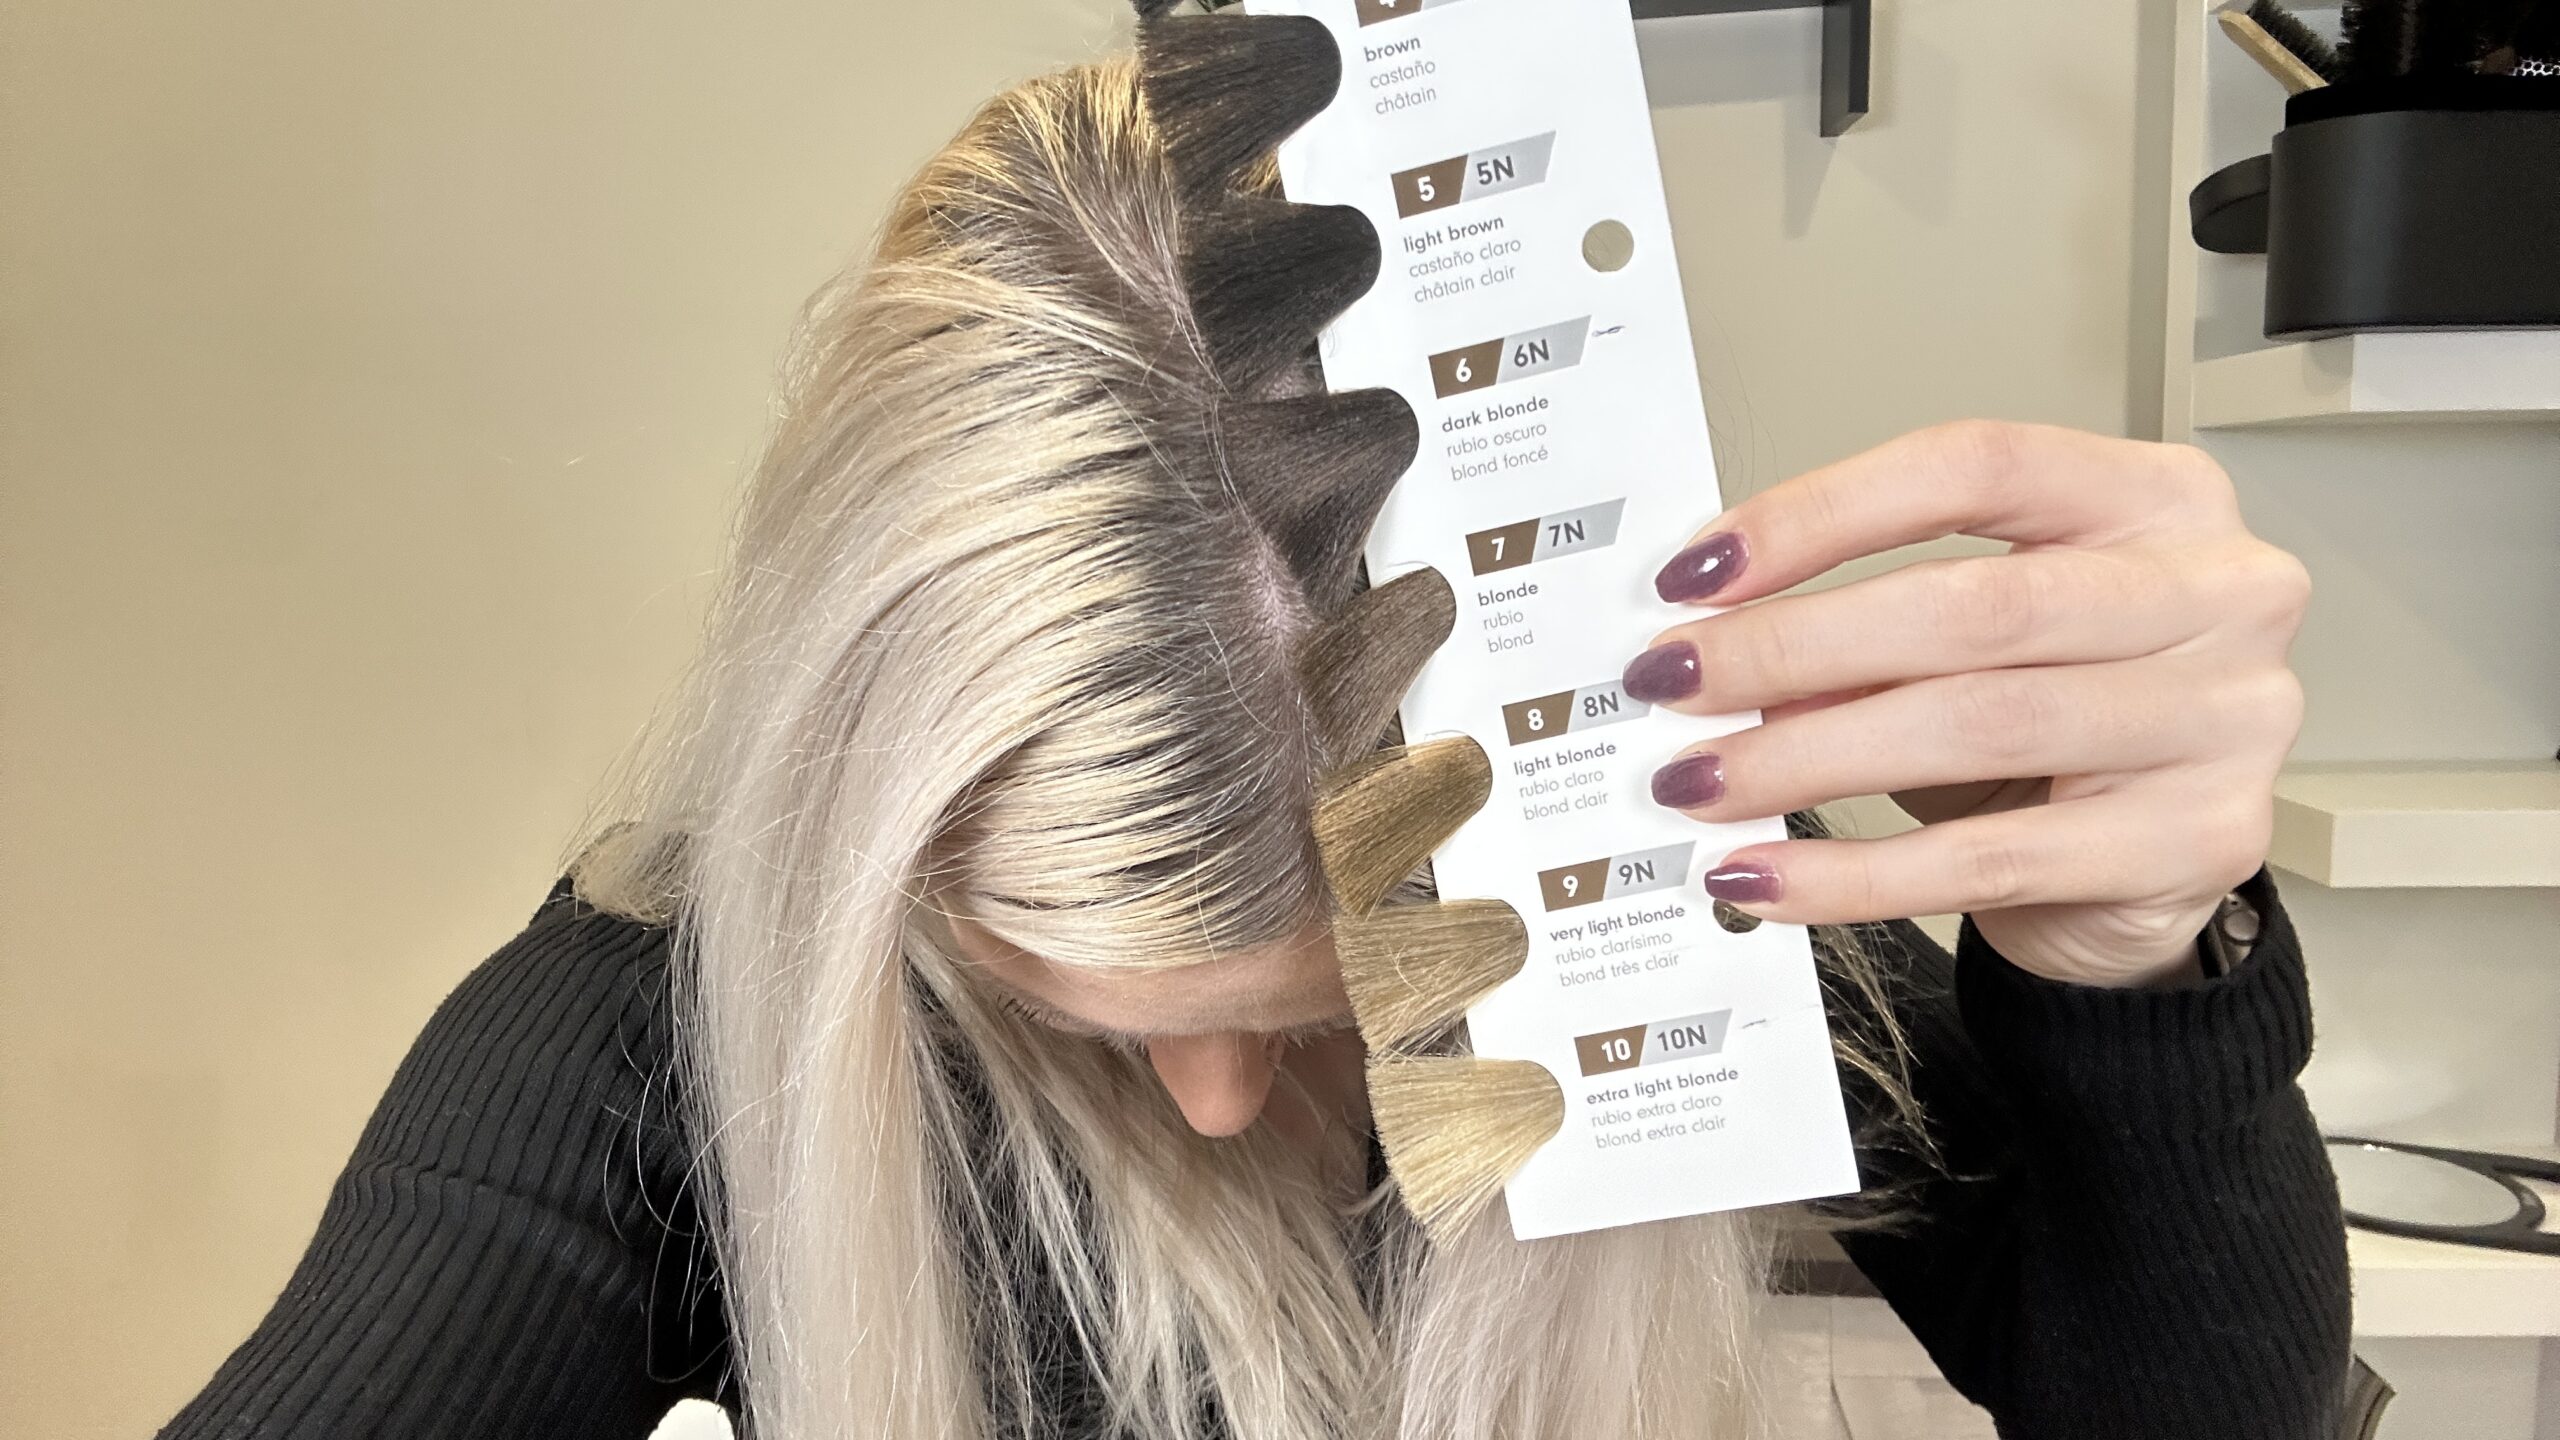
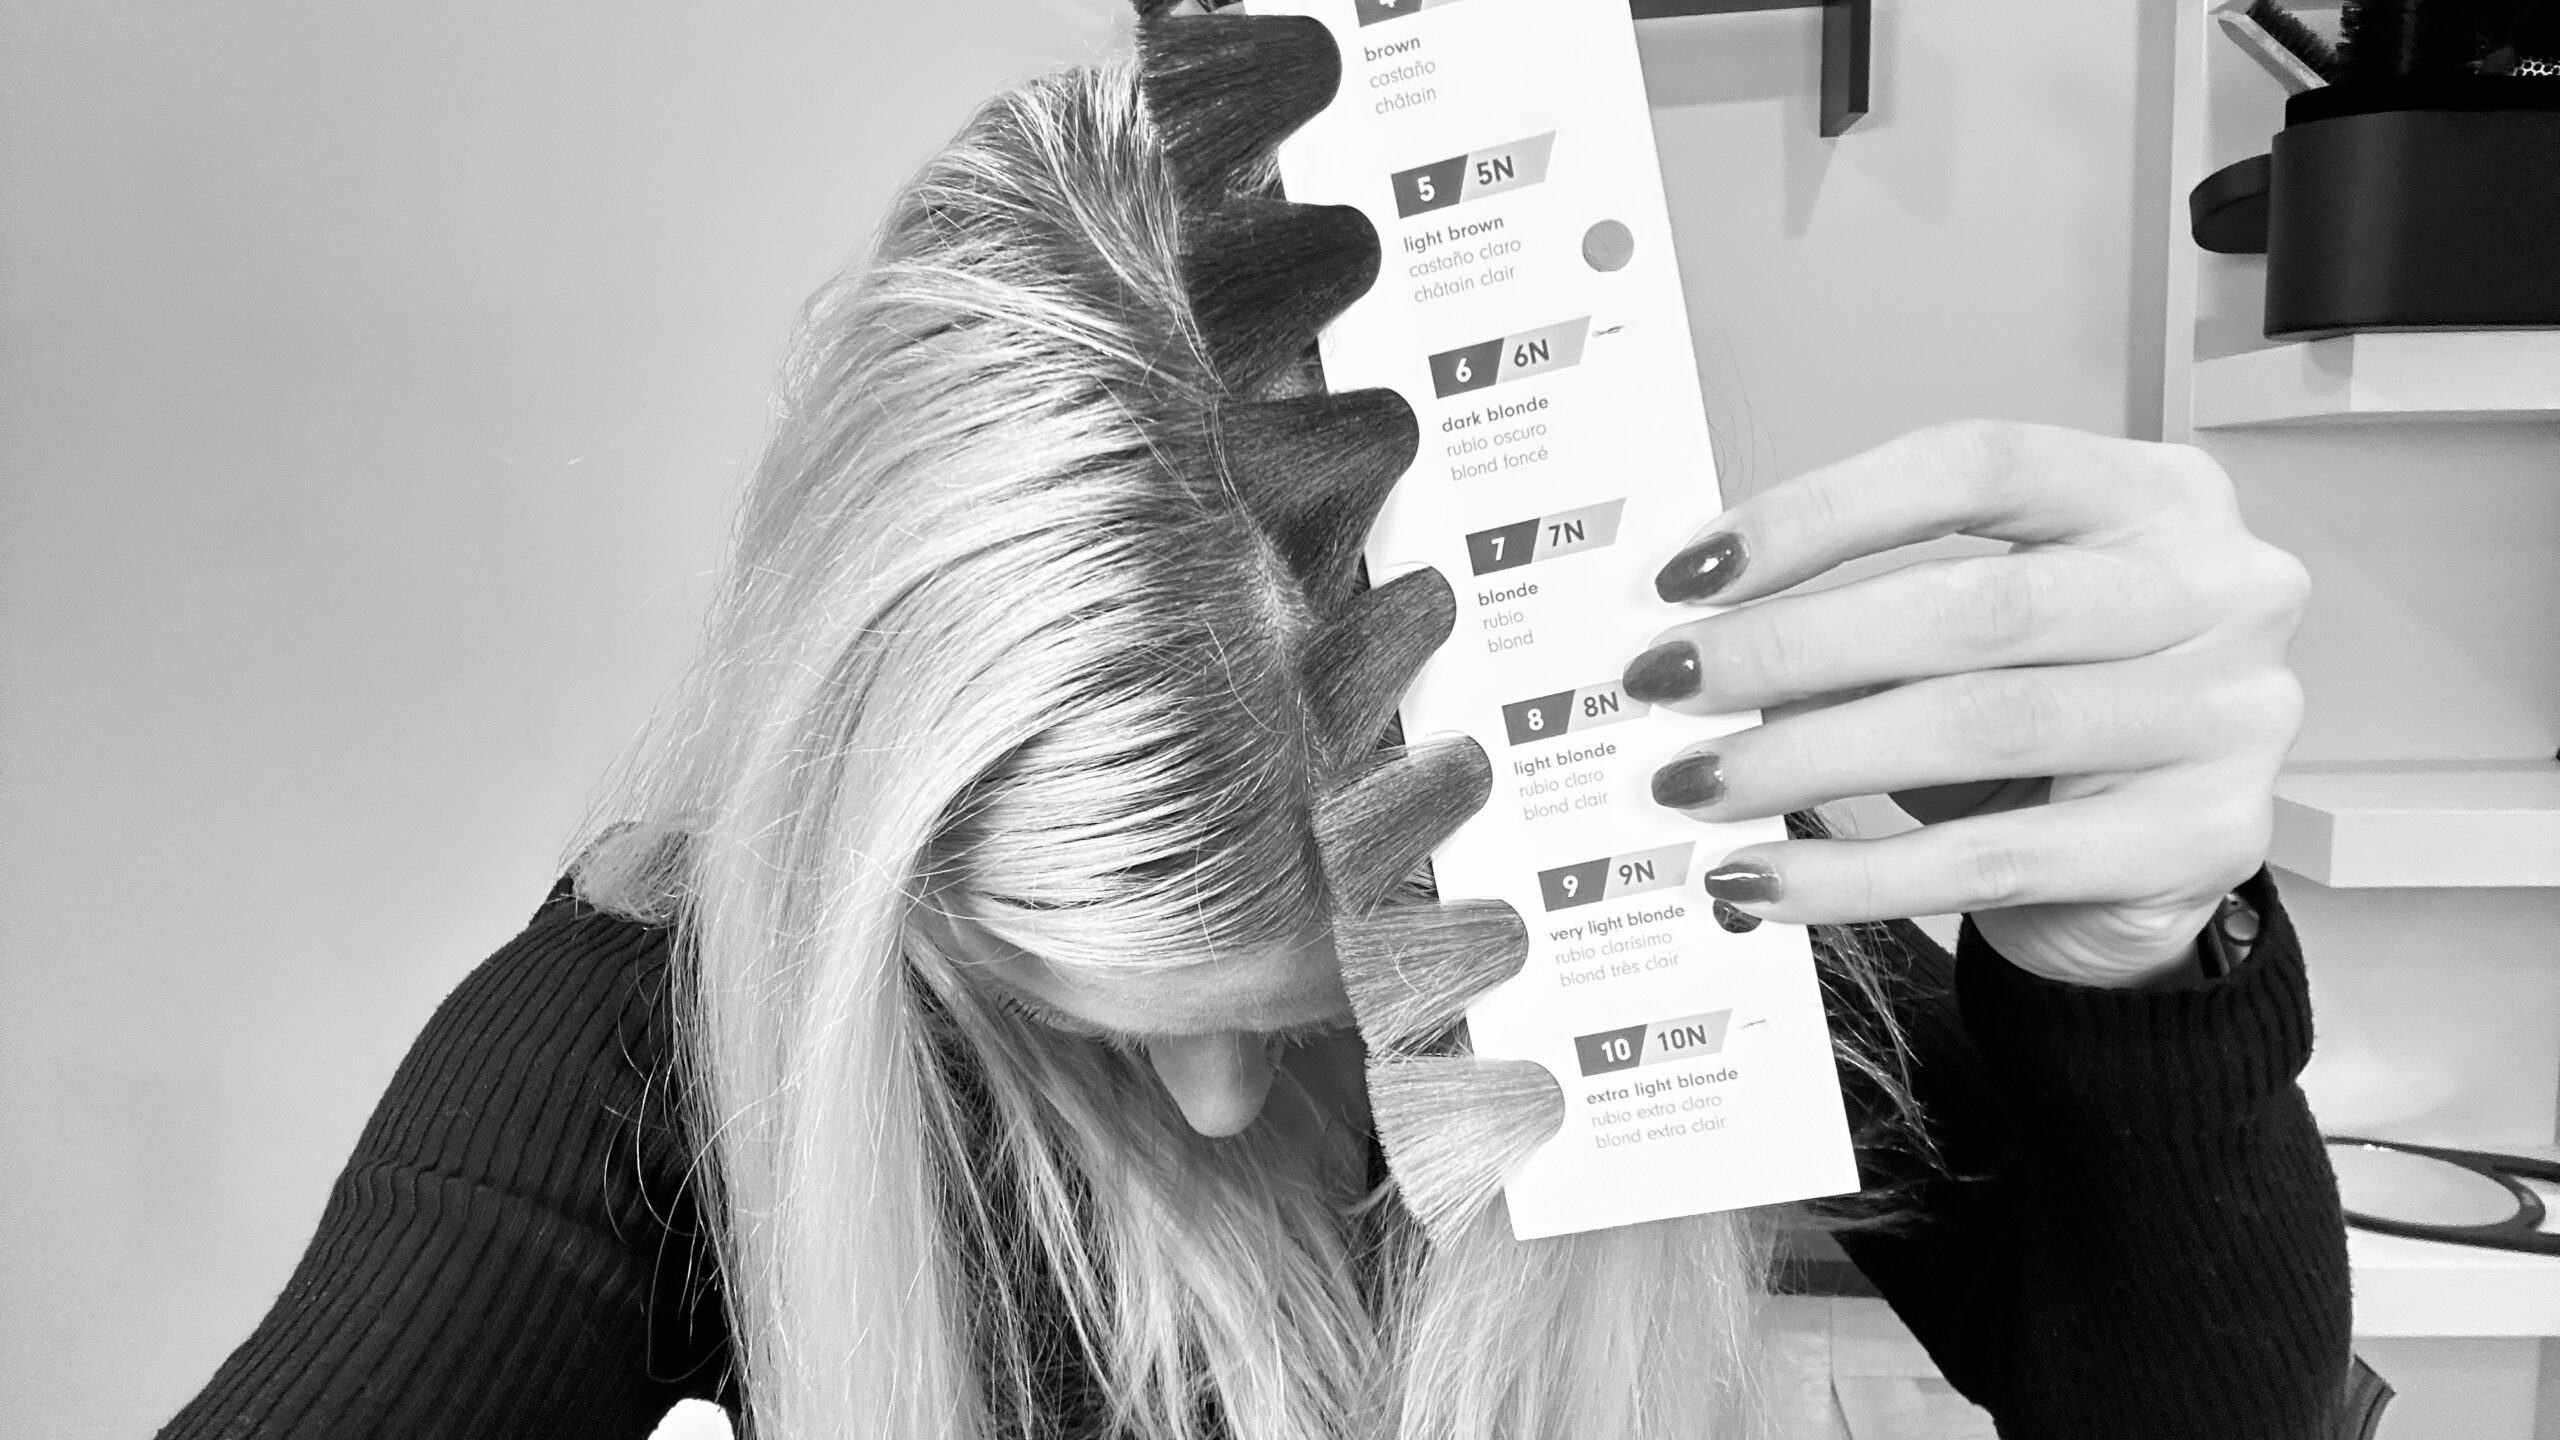
Ultimately I’m closest to a level 7, while some of my hair (especially around my hairline) is closer to an 8, and other sections (the back) may be closer to a 6.
I typically use a level darker for root smudges for two reasons. For one, the color will fade because it’s a demi, so it will lighten up over time. And two, the color will take lighter over the blonde. So to get better coverage and longevity, I use a darker level.
But if you’re worried about it taking too dark, you can use a lighter level to be safe!
Step 2: Determine shade
The next thing to determine is what shade you’re going to use. And as I mentioned earlier, don’t stress this too much as many different variations will work.
One of my favorite shades to use is beige. This works well for those with an ashier natural level, as most people have. I prefer using beige over ash because ash usually has a green base, and has the tendency to apply a slightly green hue over blonde hair. Since beige has a blue/violet base, this doesn’t happen.
If your color line doesn’t have a beige, you can also mix a natural or neutral with an ash, and this will also eliminate any ashy/green hue. Some lines have colors that are pre mixed just for this (NA- natural ash), and others you’ll need to mix them together yourself.
And if you have a warmer color, you may want to mix a natural and a warm together so that the blonde doesn’t take the warm tone too bright.
If you have an ashier natural color, consider using: beige, natural, natural/beige, natural/ash.
If you have a warmer natural color, consider using: pearl, natural/gold, natural/copper, beige/gold
For a more thorough understanding of the shades in hair color, see this post here.
Products To Try
Pravana for a “demi-like” color:
- Pravana 6.22 (beige)
- Pravana 6NTA (neutral ash)
- Pravana 6.8 (pearl)
- Pravana 6.23 (beige pearl)
- Pravana 7.22 (beige)
- Pravana 7NTA (neutral ash)
- Pravana 7.8 (pearl)
Wella demi permanent:
Developer:
How to apply a root smudge
suggest watching this Youtube video and skipping ahead to the application to see exactly how I do it!
Conclusion
To recap, the root smudging technique has been a game changer for turning blonde hair from a high maintenance color, to a low maintenance color.
It blends your natural color into your blonde or highlights to create a seamless grow out. It’s typically done with a demi-permanent color, but I often suggest using a semi-permanent color for certain situations.
If mixed with a demi or a permanent color, you should always use 6 volume or lower developer to avoid permanently shifting the hair and creating the need for a corrective color service in the future.
Root smudges are best applied to wet hair for a better blend and product dilution, but you can also apply them to dry hair for a deeper coverage.
The formulation process is only two steps: determine natural level, and then choose your shade. There is wiggle room when choosing your shade, so don’t get too stressed about making sure you have it down. Many different formulas will work here!
Leave me any questions you have for me on this technique in the comment section. And make sure to subscribe if you want to make everyday a good hair day!
share item

Comments